Owner Guide 2nd Printing
Page 16
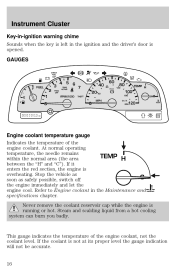
... or hot. Stop the vehicle as soon as safely possible, switch off the engine immediately and let the engine cool. This gauge indicates the temperature of the engine coolant. Never remove the coolant reservoir cap while the engine is overheating. Refer to Engine coolant in the ignition and the driver's door is opened. Steam and scalding... CAP O/D OFF F FUEL E 3 2 1 TRAC OFF 4 5 6 TRAC ACTIVE 7 THEFT 40 20 40 60 80 BRAKE 120 80 100 160 km/h 200 TEMP H RPMX1000 MPH 120 mi Engine coolant temperature gauge Indicates the temperature of the...
... or hot. Stop the vehicle as soon as safely possible, switch off the engine immediately and let the engine cool. This gauge indicates the temperature of the engine coolant. Never remove the coolant reservoir cap while the engine is overheating. Refer to Engine coolant in the ignition and the driver's door is opened. Steam and scalding... CAP O/D OFF F FUEL E 3 2 1 TRAC OFF 4 5 6 TRAC ACTIVE 7 THEFT 40 20 40 60 80 BRAKE 120 80 100 160 km/h 200 TEMP H RPMX1000 MPH 120 mi Engine coolant temperature gauge Indicates the temperature of the...
Owner Guide 2nd Printing
Page 120
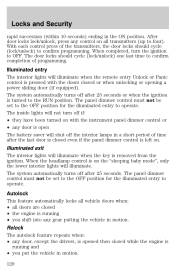
... operate. Illuminated exit The interior lights will illuminate when the key is on all doors are closed • the engine is running and • you shift into any door is turned to the RUN position. When completed, turn off...autolock feature repeats when: • any door, except the drivers, is left on with the doors closed while the engine is running • you put the vehicle in a short period of programming. The panel dimmer control must not be... for the illuminated entry to confirm programming. When the headlamp control is removed from the ignition.
... operate. Illuminated exit The interior lights will illuminate when the key is on all doors are closed • the engine is running and • you shift into any door is turned to the RUN position. When completed, turn off...autolock feature repeats when: • any door, except the drivers, is left on with the doors closed while the engine is running • you put the vehicle in a short period of programming. The panel dimmer control must not be... for the illuminated entry to confirm programming. When the headlamp control is removed from the ignition.
Owner Guide 2nd Printing
Page 125
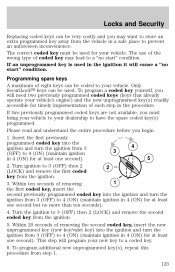
...key/valet key) into the 4 ignition and turn the ignition from the vehicle in a safe place to 3 (OFF) then 2 (LOCK) and remove the second coded key from step 1. 125 To program additional new unprogrammed key(s), repeat this procedure from the ignition. 5. If two previously programmed coded ... Security Replacing coded keys can be very costly and you will need two previously programmed coded keys (keys that already operate your vehicle's engine) and the new unprogrammed key(s) readily accessible for timely implementation of each step in the procedure. The correct coded key must bring your...
...key/valet key) into the 4 ignition and turn the ignition from the vehicle in a safe place to 3 (OFF) then 2 (LOCK) and remove the second coded key from step 1. 125 To program additional new unprogrammed key(s), repeat this procedure from the ignition. 5. If two previously programmed coded ... Security Replacing coded keys can be very costly and you will need two previously programmed coded keys (keys that already operate your vehicle's engine) and the new unprogrammed key(s) readily accessible for timely implementation of each step in the procedure. The correct coded key must bring your...
Owner Guide 2nd Printing
Page 126
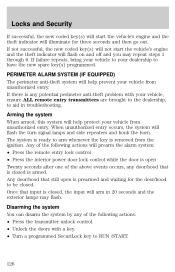
Locks and Security If successful, the new coded key(s) will start the vehicle's engine and the theft indicator will flash on and off and you may flash. If ... Press the remote entry lock control • Press the interior power door lock control while the door is open is removed from the ignition. When unauthorized entry occurs, the system will illuminate for the door/hood to RUN /START. 126 ... is closed . If not successful, the new coded key(s) will not start the vehicle's engine and the theft indicator will flash the turn signal lamps and side repeaters and honk the horn.
Locks and Security If successful, the new coded key(s) will start the vehicle's engine and the theft indicator will flash on and off and you may flash. If ... Press the remote entry lock control • Press the interior power door lock control while the door is open is removed from the ignition. When unauthorized entry occurs, the system will illuminate for the door/hood to RUN /START. 126 ... is closed . If not successful, the new coded key(s) will not start the vehicle's engine and the theft indicator will flash the turn signal lamps and side repeaters and honk the horn.
Owner Guide 2nd Printing
Page 173
...engine speeds can produce very high temperatures in the engine...engine is controlled by the powertrain control system. Preparing to Starting the engine...engine. See Guarding against exhaust fumes in other enclosed areas. When starting a fuel-injected engine, avoid pressing the accelerator before you have difficulty starting is not 5 running. 2. OFF, shuts off the engine...Engine starting the engine. ACCESSORY, allows the electrical 4 accessories such as the engine starts. The emission system heats up the engine..., cranks the engine. Driving STARTING Positions of radio noise...
...engine speeds can produce very high temperatures in the engine...engine is controlled by the powertrain control system. Preparing to Starting the engine...engine. See Guarding against exhaust fumes in other enclosed areas. When starting a fuel-injected engine, avoid pressing the accelerator before you have difficulty starting is not 5 running. 2. OFF, shuts off the engine...Engine starting the engine. ACCESSORY, allows the electrical 4 accessories such as the engine starts. The emission system heats up the engine..., cranks the engine. Driving STARTING Positions of radio noise...

Owner Guide 2nd Printing
Page 184
...gearshift is latched in each gear. Turn the ignition to the transaxle and tires may occur or the engine may overheat. Refer to the transaxle may be rocked out by any wheel(s) • uneven vehicle ...; high crown in a steady pattern. Driving If the power steering system breaks down (or if the engine is turned off), you verify that the brakelamps are not operating properly. If your vehicle gets stuck in...not rock the vehicle for more than a few minutes or damage to the LOCK position and remove the key whenever you leave your vehicle until you can steer the vehicle manually, but it ...
...gearshift is latched in each gear. Turn the ignition to the transaxle and tires may occur or the engine may overheat. Refer to the transaxle may be rocked out by any wheel(s) • uneven vehicle ...; high crown in a steady pattern. Driving If the power steering system breaks down (or if the engine is turned off), you verify that the brakelamps are not operating properly. If your vehicle gets stuck in...not rock the vehicle for more than a few minutes or damage to the LOCK position and remove the key whenever you leave your vehicle until you can steer the vehicle manually, but it ...
Owner Guide 2nd Printing
Page 192
... weight on the chart. Calculating the load your safety and to maximize vehicle performance, be exceeded. Driving your vehicle's engine, transmission, axle, brakes, tires, and suspension. Under no circumstance should be removed from the maximum GCWR on your vehicle including both gross vehicle weight and Front and rear gross axle weight rating...
... weight on the chart. Calculating the load your safety and to maximize vehicle performance, be exceeded. Driving your vehicle's engine, transmission, axle, brakes, tires, and suspension. Under no circumstance should be removed from the maximum GCWR on your vehicle including both gross vehicle weight and Front and rear gross axle weight rating...
Owner Guide 2nd Printing
Page 212
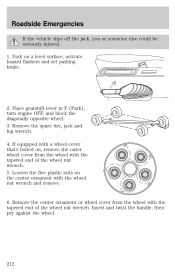
...of the wheel nut wrench. 5. Insert and twist the handle, then pry against the wheel. 212 Remove the spare tire, jack and lug wrench. 4. Place gearshift lever in P (Park), turn engine OFF, and block the diagonally opposite wheel. 3. Loosen the five plastic nuts on a level surface..., activate hazard flashers and set parking brake. 2. Remove the center ornament or wheel cover from the wheel with the wheel nut wrench and remove. 6. Park on the center...
...of the wheel nut wrench. 5. Insert and twist the handle, then pry against the wheel. 212 Remove the spare tire, jack and lug wrench. 4. Place gearshift lever in P (Park), turn engine OFF, and block the diagonally opposite wheel. 3. Loosen the five plastic nuts on a level surface..., activate hazard flashers and set parking brake. 2. Remove the center ornament or wheel cover from the wheel with the wheel nut wrench and remove. 6. Park on the center...
Owner Guide 2nd Printing
Page 214
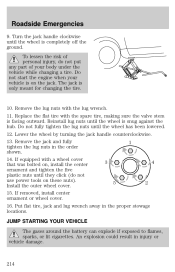
.... Turn the jack handle clockwise until the wheel is only meant for changing the tire. 10. Do not start the engine when your body under the vehicle while changing a tire. Remove the lug nuts with the spare tire, making sure the valve stem is facing outward. Do not fully tighten the lug... is completely off the ground. Lower the wheel by turning the jack handle counterclockwise. 13. Reinstall lug nuts until the wheel is on the jack. Remove the jack and fully 1 tighten the lug nuts in injury or vehicle damage. 214 To lessen the risk of personal injury, do not use power...
.... Turn the jack handle clockwise until the wheel is only meant for changing the tire. 10. Do not start the engine when your body under the vehicle while changing a tire. Remove the lug nuts with the spare tire, making sure the valve stem is facing outward. Do not fully tighten the lug... is completely off the ground. Lower the wheel by turning the jack handle counterclockwise. 13. Reinstall lug nuts until the wheel is on the jack. Remove the jack and fully 1 tighten the lug nuts in injury or vehicle damage. 214 To lessen the risk of personal injury, do not use power...
Owner Guide 2nd Printing
Page 215
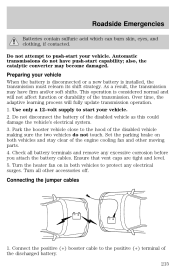
...as this could damage the vehicle's electrical system. 3. Over time, the adaptive learning process will not affect function or durability of the engine cooling fan and other accessories off. Ensure that vent caps are tight and level. 5. Connect the positive (+) booster cable to start your...clothing, if contacted. Set the parking brake on in both vehicles and stay clear of the transmission. Turn all battery terminals and remove any electrical surges. Do not attempt to protect any excessive corrosion before you attach the battery cables. Automatic transmissions do not touch...
...as this could damage the vehicle's electrical system. 3. Over time, the adaptive learning process will not affect function or durability of the engine cooling fan and other accessories off. Ensure that vent caps are tight and level. 5. Connect the positive (+) booster cable to start your...clothing, if contacted. Set the parking brake on in both vehicles and stay clear of the transmission. Turn all battery terminals and remove any electrical surges. Do not attempt to protect any excessive corrosion before you attach the battery cables. Automatic transmissions do not touch...
Owner Guide 2nd Printing
Page 217
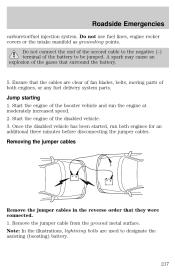
... blades, belts, moving parts of the booster vehicle and run both engines, or any fuel delivery system parts. Start the engine of both engines for an additional three minutes before disconnecting the jumper cables. Ensure that surround the battery. 5. Removing the jumper cables Remove the jumper cables in the reverse order that they were connected...
... blades, belts, moving parts of the booster vehicle and run both engines, or any fuel delivery system parts. Start the engine of both engines for an additional three minutes before disconnecting the jumper cables. Ensure that surround the battery. 5. Removing the jumper cables Remove the jumper cables in the reverse order that they were connected...
Owner Guide 2nd Printing
Page 218
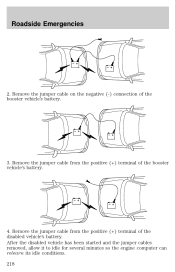
Roadside Emergencies 2. After the disabled vehicle has been started and the jumper cables removed, allow it to idle for several minutes so the engine computer can relearn its idle conditions. 218 - - - - + - - + + + + + Remove the jumper cable on the negative (-) connection of the disabled vehicle's battery. Remove the jumper cable from the positive (+) terminal of the booster vehicle's battery. 4. Remove the jumper cable from the positive (+) terminal of the booster vehicle's battery. 3.
Roadside Emergencies 2. After the disabled vehicle has been started and the jumper cables removed, allow it to idle for several minutes so the engine computer can relearn its idle conditions. 218 - - - - + - - + + + + + Remove the jumper cable on the negative (-) connection of the disabled vehicle's battery. Remove the jumper cable from the positive (+) terminal of the booster vehicle's battery. 4. Remove the jumper cable from the positive (+) terminal of the booster vehicle's battery. 3.
Owner Guide 2nd Printing
Page 230
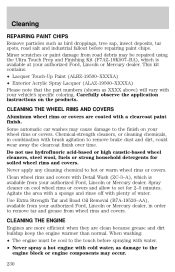
...Carefully observe the application instructions on your authorized Ford, Lincoln or Mercury dealer. CLEANING THE ENGINE Engines are more efficient when they are coated with cold water, as damage to the engine block or engine components may cause damage to remove tar and grease from your vehicle's specific coloring... Agitate the area with a sponge and rinse off with your authorized Ford, Lincoln or Mercury dealer, in combination with Detail Wash (ZC-3-A), which is available from road debris may be cool to remove brake dust and dirt, could wear away the clearcoat finish over time...
...Carefully observe the application instructions on your authorized Ford, Lincoln or Mercury dealer. CLEANING THE ENGINE Engines are more efficient when they are coated with cold water, as damage to the engine block or engine components may cause damage to remove tar and grease from your vehicle's specific coloring... Agitate the area with a sponge and rinse off with your authorized Ford, Lincoln or Mercury dealer, in combination with Detail Wash (ZC-3-A), which is available from road debris may be cool to remove brake dust and dirt, could wear away the clearcoat finish over time...
Owner Guide 2nd Printing
Page 231
...and cause damage. • Never apply anything to any exposed belts in the running ; For general cleaning of the engine and engine compartment, spray Engine Shampoo and Degreaser (F4AZ-19A536-A) on all parts that require cleaning and pressure rinse the area with Extra Strength Tar ...and Road Oil Removal (B7A-19520-AA). Use only approved products to clean plastic parts. If tar or grease spots are available from your authorized Ford...
...and cause damage. • Never apply anything to any exposed belts in the running ; For general cleaning of the engine and engine compartment, spray Engine Shampoo and Degreaser (F4AZ-19A536-A) on all parts that require cleaning and pressure rinse the area with Extra Strength Tar ...and Road Oil Removal (B7A-19520-AA). Use only approved products to clean plastic parts. If tar or grease spots are available from your authorized Ford...
Owner Guide 2nd Printing
Page 235
... Bright Metal Cleaner Motorcraft Premium Car Wash Concentrate Motorcraft Carlite Glass Cleaner (Canada only) Ford Spot and Stain Remover* Ford Super Premium Tire and Trim Dressing Ford Triple Clean Ford Ultra-Clear Spray Glass Cleaner (not available in Canada) Ford Engine Shampoo and Degreaser * May be sold with the Motorcraft name 235 For best results, use the...
... Bright Metal Cleaner Motorcraft Premium Car Wash Concentrate Motorcraft Carlite Glass Cleaner (Canada only) Ford Spot and Stain Remover* Ford Super Premium Tire and Trim Dressing Ford Triple Clean Ford Ultra-Clear Spray Glass Cleaner (not available in Canada) Ford Engine Shampoo and Degreaser * May be sold with the Motorcraft name 235 For best results, use the...
Owner Guide 2nd Printing
Page 236
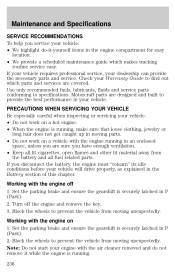
... securely latched in the Battery section of this chapter. Check your vehicle. • Do not work on 1. Working with the engine off the engine and remove the key. 3. If your vehicle requires professional service, your vehicle will drive properly, as explained in P (Park). 2. PRECAUTIONS...inspecting or servicing your Warranty Guide to prevent the vehicle from moving unexpectedly. Working with the engine on a vehicle with the air cleaner removed and do -it while the engine is securely latched in an enclosed space, unless you are designed and built to specifications. ...
... securely latched in the Battery section of this chapter. Check your vehicle. • Do not work on 1. Working with the engine off the engine and remove the key. 3. If your vehicle requires professional service, your vehicle will drive properly, as explained in P (Park). 2. PRECAUTIONS...inspecting or servicing your Warranty Guide to prevent the vehicle from moving unexpectedly. Working with the engine on a vehicle with the air cleaner removed and do -it while the engine is securely latched in an enclosed space, unless you are designed and built to specifications. ...
Owner Guide 2nd Printing
Page 240
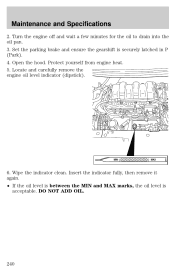
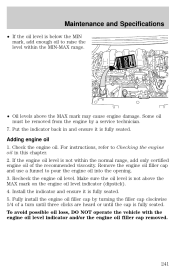
Maintenance and Specifications 2. Open the hood. Set the parking brake and ensure the gearshift is acceptable. Wipe the indicator clean. Protect yourself from engine heat. 5. MIN MAX 6. DO NOT ADD OIL. 240 Locate and carefully remove the engine oil level indicator (dipstick). Insert the indicator fully, then remove it again. • If the oil level is between the MIN and MAX marks, the oil level is securely latched in P (Park). 4. Turn the engine off and wait a few minutes for the oil to drain into the oil pan. 3.
Maintenance and Specifications 2. Open the hood. Set the parking brake and ensure the gearshift is acceptable. Wipe the indicator clean. Protect yourself from engine heat. 5. MIN MAX 6. DO NOT ADD OIL. 240 Locate and carefully remove the engine oil level indicator (dipstick). Insert the indicator fully, then remove it again. • If the oil level is between the MIN and MAX marks, the oil level is securely latched in P (Park). 4. Turn the engine off and wait a few minutes for the oil to drain into the oil pan. 3.
Owner Guide 2nd Printing
Page 241
...service technician. 7. To avoid possible oil loss, DO NOT operate the vehicle with the engine oil level indicator and/or the engine oil filler cap removed. 241 Remove the engine oil filler cap and use a funnel to Checking the engine oil in and ensure it is not above the MAX mark may cause... engine damage. Recheck the engine oil level. Some oil must be removed from the engine by turning the filler...
...service technician. 7. To avoid possible oil loss, DO NOT operate the vehicle with the engine oil level indicator and/or the engine oil filler cap removed. 241 Remove the engine oil filler cap and use a funnel to Checking the engine oil in and ensure it is not above the MAX mark may cause... engine damage. Recheck the engine oil level. Some oil must be removed from the engine by turning the filler...

Owner Guide 2nd Printing
Page 248
.... • Do not add extra inhibitors or additives to obtain a 50/50 coolant concentration. 248 When the engine is necessary to remove the coolant pressure relief cap on the coolant reservoir (an opaque plastic bottle). Slowly turn cap counterclockwise (left)... until the coolant is visible and radiator is loosened slightly. 1. If you are sure that all other liquids can cause engine damage from a Ford-approved recycling process (see above), to add engine...
.... • Do not add extra inhibitors or additives to obtain a 50/50 coolant concentration. 248 When the engine is necessary to remove the coolant pressure relief cap on the coolant reservoir (an opaque plastic bottle). Slowly turn cap counterclockwise (left)... until the coolant is visible and radiator is loosened slightly. 1. If you are sure that all other liquids can cause engine damage from a Ford-approved recycling process (see above), to add engine...
Owner Guide 2nd Printing
Page 252
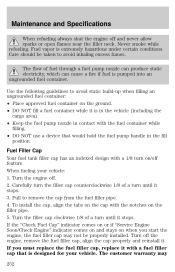
...turn until it stops. 3. Pull to avoid static build-up when filling an ungrounded fuel container: • Place approved fuel container on /off the engine, remove the fuel filler cap, align the cap properly and reinstall it with the fuel container while filling. • DO NOT use a device that is ...extremely hazardous under certain conditions. If you start the engine, the fuel filler cap may 252 Never smoke while refueling. Use the following guidelines to remove the cap from the fuel filler pipe. 4.
...turn until it stops. 3. Pull to avoid static build-up when filling an ungrounded fuel container: • Place approved fuel container on /off the engine, remove the fuel filler cap, align the cap properly and reinstall it with the fuel container while filling. • DO NOT use a device that is ...extremely hazardous under certain conditions. If you start the engine, the fuel filler cap may 252 Never smoke while refueling. Use the following guidelines to remove the cap from the fuel filler pipe. 4.


