Four Wheeling Supplement 1st Printing
Page 16
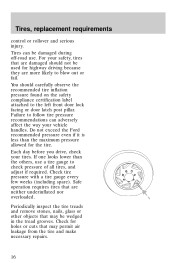
... pressure allowed for highway driving because they are neither underinflated nor overloaded. Tires, replacement requirements control or rollover and serious injury. Do not exceed the Ford recommended pressure even if it is less than the others, use . Safe operation requires tires that may permit air leakage from the tire and make... all tires, and adjust if required. Failure to follow tire pressure recommendations can be damaged during off-road use a tire gauge to the left front door lock facing or door latch post pillar.
... pressure allowed for highway driving because they are neither underinflated nor overloaded. Tires, replacement requirements control or rollover and serious injury. Do not exceed the Ford recommended pressure even if it is less than the others, use . Safe operation requires tires that may permit air leakage from the tire and make... all tires, and adjust if required. Failure to follow tire pressure recommendations can be damaged during off-road use a tire gauge to the left front door lock facing or door latch post pillar.
Owner Guide 1st Printing
Page 11
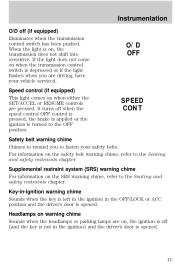
... to remind you are pressed. When the light is on , the ignition is off (and the key is not in the OFF/LOCK or ACC position and the driver's door is opened . 11 If the light does not come on the safety belt warning chime, refer to the Seating and safety restraints... chapter. Key-in-ignition warning chime Sounds when the key is left in the ignition in the ignition) and the driver's door is opened . It turns off (if equipped) Illuminates when the transmission control switch has been pushed. Supplemental restraint system (SRS) warning chime For information on...
... to remind you are pressed. When the light is on , the ignition is off (and the key is not in the OFF/LOCK or ACC position and the driver's door is opened . 11 If the light does not come on the safety belt warning chime, refer to the Seating and safety restraints... chapter. Key-in-ignition warning chime Sounds when the key is left in the ignition in the ignition) and the driver's door is opened . It turns off (if equipped) Illuminates when the transmission control switch has been pushed. Supplemental restraint system (SRS) warning chime For information on...

Owner Guide 1st Printing
Page 51
AUTO Window lock The window lock feature allows only the driver to restore the window controls. To lock out all doors and L to stop window operation. Controls and features One touch down • Press AUTO and release quickly. Press the left side to operate the power windows. Depress again to lock all doors. POWER DOOR LOCKS (IF EQUIPPED) Press U to unlock all the window controls except for the driver's press the right side of the control. WINDOW LOCK U L 51 The window will open fully.
AUTO Window lock The window lock feature allows only the driver to restore the window controls. To lock out all doors and L to stop window operation. Controls and features One touch down • Press AUTO and release quickly. Press the left side to operate the power windows. Depress again to lock all doors. POWER DOOR LOCKS (IF EQUIPPED) Press U to unlock all the window controls except for the driver's press the right side of the control. WINDOW LOCK U L 51 The window will open fully.
Owner Guide 1st Printing
Page 52
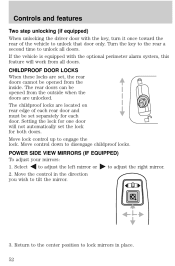
... located on rear edge of the vehicle to unlock that door only. CHILDPROOF DOOR LOCKS When these locks are unlocked. POWER SIDE VIEW MIRRORS (IF EQUIPPED) To adjust your mirrors: to adjust the left mirror or to disengage childproof locks. If the vehicle is equipped with the key, turn... mirror. 3. Return to the center position to engage the lock. Move lock control up to lock mirrors in the direction you wish to unlock all doors. Controls and features Two step unlocking (if equipped) When unlocking the driver door with the optional perimeter alarm system, this feature will not...
... located on rear edge of the vehicle to unlock that door only. CHILDPROOF DOOR LOCKS When these locks are unlocked. POWER SIDE VIEW MIRRORS (IF EQUIPPED) To adjust your mirrors: to adjust the left mirror or to disengage childproof locks. If the vehicle is equipped with the key, turn... mirror. 3. Return to the center position to engage the lock. Move lock control up to lock mirrors in the direction you wish to unlock all doors. Controls and features Two step unlocking (if equipped) When unlocking the driver door with the optional perimeter alarm system, this feature will not...
Owner Guide 1st Printing
Page 56
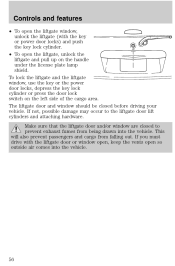
... If not, possible damage may occur to prevent exhaust fumes from falling out. If you must drive with the key or power door locks) and push the key lock cylinder. • To open so outside air comes into the vehicle. This will also prevent passengers and cargo from being drawn ...into the vehicle. 56 To lock the liftgate and the liftgate window, use the key or the power door locks, depress the key lock cylinder or press the door lock switch on the handle under the license plate lamp shield. The liftgate...
... If not, possible damage may occur to prevent exhaust fumes from falling out. If you must drive with the key or power door locks) and push the key lock cylinder. • To open so outside air comes into the vehicle. This will also prevent passengers and cargo from being drawn ...into the vehicle. 56 To lock the liftgate and the liftgate window, use the key or the power door locks, depress the key lock cylinder or press the door lock switch on the handle under the license plate lamp shield. The liftgate...
Owner Guide 1st Printing
Page 58
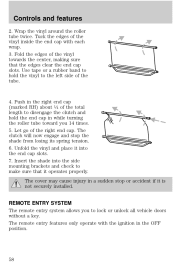
... the end cap in the right end cap (marked RH) about 1⁄4 of the total length to disengage the clutch and hold the vinyl to lock or unlock all vehicle doors without a key. Wrap the vinyl around the roller tube twice. Controls and features 2.
... the end cap in the right end cap (marked RH) about 1⁄4 of the total length to disengage the clutch and hold the vinyl to lock or unlock all vehicle doors without a key. Wrap the vinyl around the roller tube twice. Controls and features 2.
Owner Guide 1st Printing
Page 59
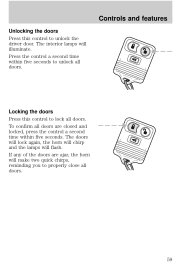
Controls and features Unlocking the doors Press this control to lock all doors. 59 Locking the doors Press this control to unlock the driver door. Press the control a second time within five seconds. If any of the doors are closed and locked, press the control a second time within five seconds to properly close all doors. To confirm all doors are ajar, the horn will make two quick chirps, reminding you to unlock all doors. The doors will lock again, the horn will chirp and the lamps will illuminate. The interior lamps will flash.
Controls and features Unlocking the doors Press this control to lock all doors. 59 Locking the doors Press this control to unlock the driver door. Press the control a second time within five seconds. If any of the doors are closed and locked, press the control a second time within five seconds to properly close all doors. To confirm all doors are ajar, the horn will make two quick chirps, reminding you to unlock all doors. The doors will lock again, the horn will chirp and the lamps will illuminate. The interior lamps will flash.
Owner Guide 1st Printing
Page 61
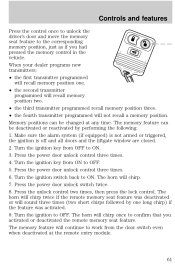
... memory seat feature was activated. 9. Press the power door unlock switch twice. 8. The memory feature will chirp once to work from the door switch even when deactivated at any time. Make sure ...the alarm system (if equipped) is not armed or triggered, the ignition is off and all doors and the liftgate window are closed. 2. When your dealer programs new transmitters: • the ... 5. The horn will chirp. 7. Controls and features Press the control once to unlock the driver's door and move the memory seat feature to ON. 3. Turn the ignition key from OFF to the corresponding...
... memory seat feature was activated. 9. Press the power door unlock switch twice. 8. The memory feature will chirp once to work from the door switch even when deactivated at any time. Make sure ...the alarm system (if equipped) is not armed or triggered, the ignition is off and all doors and the liftgate window are closed. 2. When your dealer programs new transmitters: • the ... 5. The horn will chirp. 7. Controls and features Press the control once to unlock the driver's door and move the memory seat feature to ON. 3. Turn the ignition key from OFF to the corresponding...
Owner Guide 1st Printing
Page 62
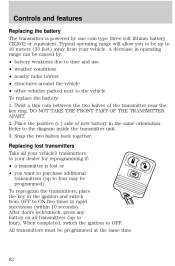
... orientation. When completed, switch the ignition to the diagram inside the transmitter unit. 3. Place the positive ( + ) side of the transmitter near the key ring. After doors lock/unlock, press any button on all your vehicle's transmitters to your vehicle. Snap the two halves back together. All transmitters must be up to four...
... orientation. When completed, switch the ignition to the diagram inside the transmitter unit. 3. Place the positive ( + ) side of the transmitter near the key ring. After doors lock/unlock, press any button on all your vehicle's transmitters to your vehicle. Snap the two halves back together. All transmitters must be up to four...
Owner Guide 1st Printing
Page 63
... key is in a row (within 10 seconds). All transmitters must not be reprogrammed at the same time. The inside lights will automatically lock all doors when: • all vehicle doors, liftgate and liftgate window are closed. 63 Controls and features Reprogramming transmitters To reprogram all transmitters, place the key in the ignition and...
... key is in a row (within 10 seconds). All transmitters must not be reprogrammed at the same time. The inside lights will automatically lock all doors when: • all vehicle doors, liftgate and liftgate window are closed. 63 Controls and features Reprogramming transmitters To reprogram all transmitters, place the key in the ignition and...
Owner Guide 1st Printing
Page 64
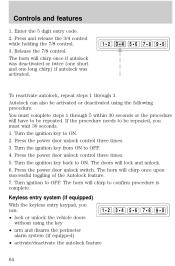
... entry code. 2. Press and release the 3/4 control while holding the 7/8 control. 3. Autolock can : 1 2 • lock or unlock the vehicle doors without using the following procedure: You must wait 30 seconds. 1. Turn the ignition key back to OFF. 4. Turn the ignition...8226; activate/deactivate the autolock feature 64 3 4 5 6 7 8 9 0 Release the 7/8 control. The doors will chirp to be repeated. Press the power door unlock switch. The horn will lock and unlock. 6. If the procedure needs to confirm procedure is complete. Turn the ignition key to OFF. Turn ignition...
... entry code. 2. Press and release the 3/4 control while holding the 7/8 control. 3. Autolock can : 1 2 • lock or unlock the vehicle doors without using the following procedure: You must wait 30 seconds. 1. Turn the ignition key back to OFF. 4. Turn the ignition...8226; activate/deactivate the autolock feature 64 3 4 5 6 7 8 9 0 Release the 7/8 control. The doors will chirp to be repeated. Press the power door unlock switch. The horn will lock and unlock. 6. If the procedure needs to confirm procedure is complete. Turn the ignition key to OFF. Turn ignition...
Owner Guide 1st Printing
Page 66
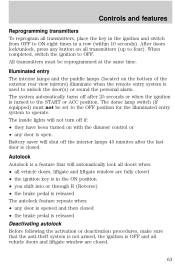
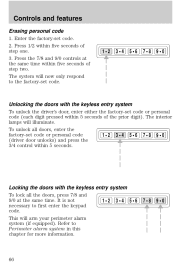
Press the 7/8 and 9/0 controls at the same time. Locking the doors with the keyless entry system To unlock the driver's door, enter either the factory-set code or personal code (each digit pressed within 5 seconds. The interior lamps will arm your perimeter ... The system will now only respond to the factory-set code. 1 2 3 4 5 6 7 8 9 0 Unlocking the doors with the keyless entry system To lock all doors, enter the factory-set code. 2. To unlock all the doors, press 7/8 and 9/0 at the same time within five seconds of step one. 3. Controls and features Erasing personal...
Press the 7/8 and 9/0 controls at the same time. Locking the doors with the keyless entry system To unlock the driver's door, enter either the factory-set code or personal code (each digit pressed within 5 seconds. The interior lamps will arm your perimeter ... The system will now only respond to the factory-set code. 1 2 3 4 5 6 7 8 9 0 Unlocking the doors with the keyless entry system To lock all doors, enter the factory-set code. 2. To unlock all the doors, press 7/8 and 9/0 at the same time within five seconds of step one. 3. Controls and features Erasing personal...
Owner Guide 1st Printing
Page 67
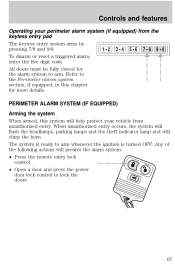
...headlamps, parking lamps and the theft indicator lamp and will prearm the alarm system: • Press the remote entry lock control • Open a door and press the power door lock control to arm whenever the ignition is turned OFF. Refer to arm. Any of the following actions will chirp the ...horn. All doors must be fully closed for more details. Controls and features Operating your vehicle from the keyless entry ...
...headlamps, parking lamps and the theft indicator lamp and will prearm the alarm system: • Press the remote entry lock control • Open a door and press the power door lock control to arm whenever the ignition is turned OFF. Refer to arm. Any of the following actions will chirp the ...horn. All doors must be fully closed for more details. Controls and features Operating your vehicle from the keyless entry ...
Owner Guide 1st Printing
Page 68
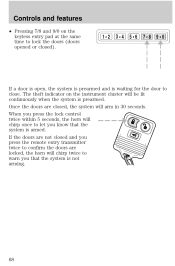
... on the keyless entry pad at the same time to lock the doors (doors opened or closed). 1 2 3 4 5 6 7 8 9 0 If a door is open, the system is prearmed and is armed. Once the doors are closed and you that the system is prearmed. If the doors are locked, the horn will chirp twice to close. Controls and features...cluster will be lit continuously when the system is not arming. 68 When you press the lock control twice within 5 seconds, the horn will chirp once to let you know that the system is waiting for the door to warn you press the remote entry transmitter twice to confirm the...
... on the keyless entry pad at the same time to lock the doors (doors opened or closed). 1 2 3 4 5 6 7 8 9 0 If a door is open, the system is prearmed and is armed. Once the doors are closed and you that the system is prearmed. If the doors are locked, the horn will chirp twice to close. Controls and features...cluster will be lit continuously when the system is not arming. 68 When you press the lock control twice within 5 seconds, the horn will chirp once to let you know that the system is waiting for the door to warn you press the remote entry transmitter twice to confirm the...
Owner Guide 1st Printing
Page 139
... Stop/Turn Trailer Tow Connector Right Headlamp, Foglamp Relay Brake Pedal Position Switch Speed Control/Amplifier Assembly, Brake Pressure Switch, Generic electronic Module (GEM), Shift Lock Actuator, Blend Door Actuator, A/C - Heater Assembly, Flasher Instrument Cluster Power Window Relay, Washer Pump Relay Brake Pedal Position Switch, Brake Pressure Switch 4 Wheel Anti...
... Stop/Turn Trailer Tow Connector Right Headlamp, Foglamp Relay Brake Pedal Position Switch Speed Control/Amplifier Assembly, Brake Pressure Switch, Generic electronic Module (GEM), Shift Lock Actuator, Blend Door Actuator, A/C - Heater Assembly, Flasher Instrument Cluster Power Window Relay, Washer Pump Relay Brake Pedal Position Switch, Brake Pressure Switch 4 Wheel Anti...

Owner Guide 1st Printing
Page 188
Do not turn /sidemarker 2 916NA Cargo lamp 1 211-2 Interior overhead lamp 1 912 (906) Front door courtesy lamp 1 168 Map lamps 2 168 (T10) Ashtray lamp 1 161 To replace all instrument panel lights - With the flat side of the bulb's plastic base ... the bulb while removing it straight back out of the socket. 2. When the grooves are aligned, push the bulb into the socket until it snaps, locking it into the socket. Turn the headlamps on and make sure they work properly. see your dealer. 188 Remove the old bulb from its socket...
Do not turn /sidemarker 2 916NA Cargo lamp 1 211-2 Interior overhead lamp 1 912 (906) Front door courtesy lamp 1 168 Map lamps 2 168 (T10) Ashtray lamp 1 161 To replace all instrument panel lights - With the flat side of the bulb's plastic base ... the bulb while removing it straight back out of the socket. 2. When the grooves are aligned, push the bulb into the socket until it snaps, locking it into the socket. Turn the headlamps on and make sure they work properly. see your dealer. 188 Remove the old bulb from its socket...

Owner Guide 1st Printing
Page 207
... your vehicle ...149,151 attaching cables ...149 disconnecting cables ...151 Keyless entry system autolock ...63 keypad ...64 locking and unlocking doors ...66 programming entry code ...65,66 Keys key in ignition chime ...11 Liftgate ...55 Lights, warning and indicator air bag... ...8 anti-lock brakes (ABS) ...8 anti-theft ...9 brake ...8 charging system ...9 check engine ...6,7 cruise indicator ...11 door ajar ...10 fuel reset ...7 overdrive off ...11 safety belt ...8 turn signal indicator ...9 Load limits...
... your vehicle ...149,151 attaching cables ...149 disconnecting cables ...151 Keyless entry system autolock ...63 keypad ...64 locking and unlocking doors ...66 programming entry code ...65,66 Keys key in ignition chime ...11 Liftgate ...55 Lights, warning and indicator air bag... ...8 anti-lock brakes (ABS) ...8 anti-theft ...9 brake ...8 charging system ...9 check engine ...6,7 cruise indicator ...11 door ajar ...10 fuel reset ...7 overdrive off ...11 safety belt ...8 turn signal indicator ...9 Load limits...
Owner Guide 1st Printing
Page 208
...console compass/temperature display ..44 storage compartment ...44 Panic alarm feature, remote entry system ...60 Parking brake ...105 Power door locks ...51 Power steering fluid, checking and adding ...169 Rear window washer ...42 Recreational towing, all wheels on the ...for fluids ...198 Relays ...136 Remote entry system ...58 illuminated entry ...63 locking/unlocking doors ...59 replacement/additional transmitters ...62,63 replacing the batteries ...62 Reporting safety defects ...205 Safety restraints automatic locking mode (retractor) ...78,79 extension assembly ...80 for children ...86 lap ...
...console compass/temperature display ..44 storage compartment ...44 Panic alarm feature, remote entry system ...60 Parking brake ...105 Power door locks ...51 Power steering fluid, checking and adding ...169 Rear window washer ...42 Recreational towing, all wheels on the ...for fluids ...198 Relays ...136 Remote entry system ...58 illuminated entry ...63 locking/unlocking doors ...59 replacement/additional transmitters ...62,63 replacing the batteries ...62 Reporting safety defects ...205 Safety restraints automatic locking mode (retractor) ...78,79 extension assembly ...80 for children ...86 lap ...
Scheduled Maintenance Guide 2nd Printing
Page 36
Clean battery and terminals, check electrolyte level on low maintenance battery. 36 Lubricate door, hood and tailgate hinge locks and latches. Lubricate door rubber weatherstrips. Owner maintenance checks AT LEAST ONCE A YEAR: u u u u Lubricate door, hood and tailgate hinges and checks.
Clean battery and terminals, check electrolyte level on low maintenance battery. 36 Lubricate door, hood and tailgate hinge locks and latches. Lubricate door rubber weatherstrips. Owner maintenance checks AT LEAST ONCE A YEAR: u u u u Lubricate door, hood and tailgate hinges and checks.


