
Four Wheeling Supplement 1st Printing
Page 9
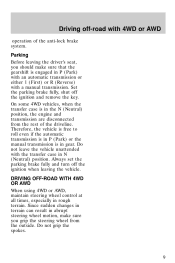
... and remove the key. Do not grip the spokes. 9 Driving off-road with 4WD or AWD operation of the driveline. Parking Before leaving the driver's seat, you grip the steering wheel from the rest of the anti-lock brake system. Do not leave the vehicle unattended with the transfer case in...
... and remove the key. Do not grip the spokes. 9 Driving off-road with 4WD or AWD operation of the driveline. Parking Before leaving the driver's seat, you grip the steering wheel from the rest of the anti-lock brake system. Do not leave the vehicle unattended with the transfer case in...

Owner Guide 1st Printing
Page 48
... of Your Cassette Tape Player How to insert a tape Insert a cassette (with the ignition on whether or not the radio power is completely in and "seated." Push the "AUDIO" button repeatedly until the display reads "FADE." Using the Controls of the "VOLUME" button to shift the sound to the front speakers...
... of Your Cassette Tape Player How to insert a tape Insert a cassette (with the ignition on whether or not the radio power is completely in and "seated." Push the "AUDIO" button repeatedly until the display reads "FADE." Using the Controls of the "VOLUME" button to shift the sound to the front speakers...
Owner Guide 1st Printing
Page 62
...from your air conditioning (if equipped) and heater system. The air can be dehumidified to remove moisture. After a few minutes of air under the front seats that will help you may select another air flow position. Rotate the H knob on the left to obtain your vehicle. 61 Rotate the control knob... to increase the air flow. u To prevent humidity buildup inside your u Do not put objects under the seats to the back seat area of your desired comfort level. This feature will also be cooled or heated. Rotate the center knob into the RED area for the...
...from your air conditioning (if equipped) and heater system. The air can be dehumidified to remove moisture. After a few minutes of air under the front seats that will help you may select another air flow position. Rotate the H knob on the left to obtain your vehicle. 61 Rotate the control knob... to increase the air flow. u To prevent humidity buildup inside your u Do not put objects under the seats to the back seat area of your desired comfort level. This feature will also be cooled or heated. Rotate the center knob into the RED area for the...
Owner Guide 1st Printing
Page 80
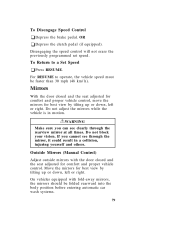
Do not block your vision. On vehicles equipped with the door closed and the seat adjusted for comfort and proper vehicle control, move the mirrors for comfort and proper vehicle control. Disengaging the speed control will not erase the previously ... Control) Adjust outside mirrors with fold-away mirrors, the mirrors should be faster than 30 mph (48 km/h). Mirrors With the door closed and the seat adjusted for best view by tilting up or down , left or right. RWARNING Make sure you cannot see clearly through the mirror, it could result...
Do not block your vision. On vehicles equipped with the door closed and the seat adjusted for comfort and proper vehicle control, move the mirrors for comfort and proper vehicle control. Disengaging the speed control will not erase the previously ... Control) Adjust outside mirrors with fold-away mirrors, the mirrors should be faster than 30 mph (48 km/h). Mirrors With the door closed and the seat adjusted for best view by tilting up or down , left or right. RWARNING Make sure you cannot see clearly through the mirror, it could result...

Owner Guide 1st Printing
Page 89
Seat mounted console 88
Seat mounted console 88
Owner Guide 1st Printing
Page 95
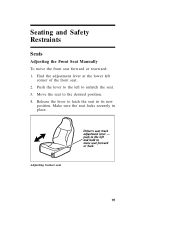
Push the lever to unlatch the seat. Release the lever to the desired position. Move the seat to latch the seat in place. Seating and Safety Restraints Seats Adjusting the Front Seat Manually To move the front seat forward or rearward: 1. 2. 3. 4. Adjusting bucket seat 95 Find the adjustment lever at the lower left to the left corner of the front seat. Make sure the seat locks securely in its new position.
Push the lever to unlatch the seat. Release the lever to the desired position. Move the seat to latch the seat in place. Seating and Safety Restraints Seats Adjusting the Front Seat Manually To move the front seat forward or rearward: 1. 2. 3. 4. Adjusting bucket seat 95 Find the adjustment lever at the lower left to the left corner of the front seat. Make sure the seat locks securely in its new position.
Owner Guide 1st Printing
Page 96
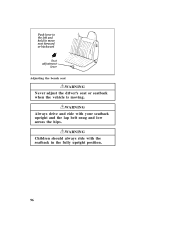
Adjusting the bench seat RWARNING Never adjust the driver's seat or seatback when the vehicle is moving. RWARNING Always drive and ride with the seatback in the fully upright position. 96 RWARNING Children should always ride with your seatback upright and the lap belt snug and low across the hips.
Adjusting the bench seat RWARNING Never adjust the driver's seat or seatback when the vehicle is moving. RWARNING Always drive and ride with the seatback in the fully upright position. 96 RWARNING Children should always ride with your seatback upright and the lap belt snug and low across the hips.
Owner Guide 1st Printing
Page 97
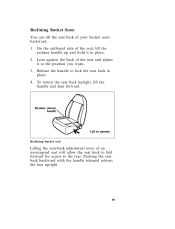
...of an unoccupied seat will allow the seat back to fold forward for access to the rear. Release the handle to lock the seat back in place. Lean against the back of your bucket seats backward. 1. 2. 3. 4. Reclining Bucket Seats You can tilt the seat back of the seat and adjust it ...in place. Reclining bucket seat Lifting the seat-back adjustment lever of the seat, lift the recliner handle up...
...of an unoccupied seat will allow the seat back to fold forward for access to the rear. Release the handle to lock the seat back in place. Lean against the back of your bucket seats backward. 1. 2. 3. 4. Reclining Bucket Seats You can tilt the seat back of the seat and adjust it ...in place. Reclining bucket seat Lifting the seat-back adjustment lever of the seat, lift the recliner handle up...
Owner Guide 1st Printing
Page 98
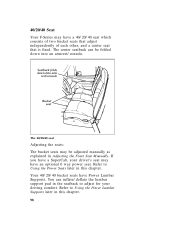
... may be folded down into an armrest/console. If you have a 40/20/40 seat which consists of two bucket seats that adjust independently of each other, and a center seat that is fixed. Refer to adjust for your driver's seat may have Power Lumbar Supports. You can be adjusted manually as explained in this...
... may be folded down into an armrest/console. If you have a 40/20/40 seat which consists of two bucket seats that adjust independently of each other, and a center seat that is fixed. Refer to adjust for your driver's seat may have Power Lumbar Supports. You can be adjusted manually as explained in this...
Owner Guide 1st Printing
Page 99
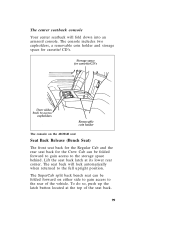
... two cupholders, a removable coin holder and storage space for the Crew Cab can be folded forward to gain access to the rear of the seat back. 99 The seat back will fold down into an armrest/console. To do so, push up the latch button located at its lower rear corner. The... console on the 40/20/40 seat Seat Back Release (Bench Seat) The front seat back for the Regular Cab and the rear seat back for cassette/CD's. The SuperCab split back bench seat can be folded forward on either side to gain access to the storage space...
... two cupholders, a removable coin holder and storage space for the Crew Cab can be folded forward to gain access to the rear of the seat back. 99 The seat back will fold down into an armrest/console. To do so, push up the latch button located at its lower rear corner. The... console on the 40/20/40 seat Seat Back Release (Bench Seat) The front seat back for the Regular Cab and the rear seat back for cassette/CD's. The SuperCab split back bench seat can be folded forward on either side to gain access to the storage space...
Owner Guide 1st Printing
Page 100
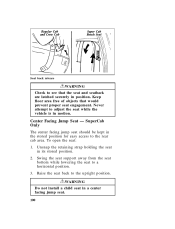
... Only The center facing jump seat should be kept in motion. Center Facing Jump Seat - RWARNING Do not install a child seat in position. Seat back release RWARNING Check to see that would prevent proper seat engagement. To open the seat: 1. 2. Unsnap the retaining strap holding the seat in its stored position. Raise the seat back to a horizontal position...
... Only The center facing jump seat should be kept in motion. Center Facing Jump Seat - RWARNING Do not install a child seat in position. Seat back release RWARNING Check to see that would prevent proper seat engagement. To open the seat: 1. 2. Unsnap the retaining strap holding the seat in its stored position. Raise the seat back to a horizontal position...
Owner Guide 1st Printing
Page 101
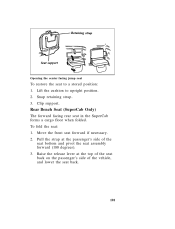
Snap retaining strap. Clip support. Pull the strap at the top of the seat back on the passenger's side of the seat bottom and pivot the seat assembly forward (180 degrees). Lift the cushion to a stored position: 1. 2. 3. Opening the center facing jump seat To restore the seat to upright position. Rear Bench Seat (SuperCab Only) The forward facing rear seat in the SuperCab forms a cargo floor when folded. Move the front seat forward if necessary. To fold the seat: 1. 2. Raise the release lever at the passenger's side of the vehicle, and lower the seat back. 3. 101
Snap retaining strap. Clip support. Pull the strap at the top of the seat back on the passenger's side of the seat bottom and pivot the seat assembly forward (180 degrees). Lift the cushion to a stored position: 1. 2. 3. Opening the center facing jump seat To restore the seat to upright position. Rear Bench Seat (SuperCab Only) The forward facing rear seat in the SuperCab forms a cargo floor when folded. Move the front seat forward if necessary. To fold the seat: 1. 2. Raise the release lever at the passenger's side of the vehicle, and lower the seat back. 3. 101
Owner Guide 1st Printing
Page 102
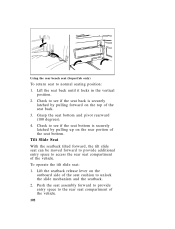
... forward to provide additional entry space to the rear seat compartment of the vehicle. 2. 102 Push the seat assembly forward to provide entry space to access the rear seat compartment of the seat back. Check to see if the seat back is securely latched by pulling forward on the ...is securely latched by pulling up on the outboard side of the seat bottom. 3. 4. Grasp the seat bottom and pivot rearward (180 degrees). To operate the tilt slide seat: 1. Using the rear bench seat (SuperCab only) To return seat to unlock the slide mechanism and the seatback. Lift the seatback ...
... forward to provide additional entry space to the rear seat compartment of the vehicle. 2. 102 Push the seat assembly forward to provide entry space to access the rear seat compartment of the seat back. Check to see if the seat back is securely latched by pulling forward on the ...is securely latched by pulling up on the outboard side of the seat bottom. 3. 4. Grasp the seat bottom and pivot rearward (180 degrees). To operate the tilt slide seat: 1. Using the rear bench seat (SuperCab only) To return seat to unlock the slide mechanism and the seatback. Lift the seatback ...
Owner Guide 1st Printing
Page 103
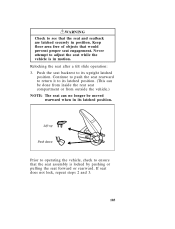
...RWARNING Check to see that would prevent proper seat engagement. If seat does not lock, repeat steps 2 and 3. 103 Push the seat backrest to ensure that the seat assembly is in its latched position. Keep floor area free of objects that the seat and seatback are latched securely in position. Never... attempt to its upright latched position. Continue to push the seat rearward to return it to adjust the seat while the vehicle is locked by pushing or pulling the seat forward or rearward. Prior to operating the vehicle, check to its latched position. (...
...RWARNING Check to see that would prevent proper seat engagement. If seat does not lock, repeat steps 2 and 3. 103 Push the seat backrest to ensure that the seat assembly is in its latched position. Keep floor area free of objects that the seat and seatback are latched securely in position. Never... attempt to its upright latched position. Continue to push the seat rearward to return it to adjust the seat while the vehicle is locked by pushing or pulling the seat forward or rearward. Prior to operating the vehicle, check to its latched position. (...
Owner Guide 1st Printing
Page 104
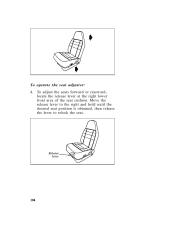
To adjust the seats forward or rearward, locate the release lever at the right lower front area of the seat cushion. Move the release lever to the right and hold until the desired seat position is obtained, then release the lever to relock the seat. 104 To operate the seat adjuster: 4.
To adjust the seats forward or rearward, locate the release lever at the right lower front area of the seat cushion. Move the release lever to the right and hold until the desired seat position is obtained, then release the lever to relock the seat. 104 To operate the seat adjuster: 4.
Owner Guide 1st Printing
Page 105
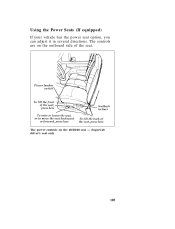
Using the Power Seats (If equipped) If your vehicle has the power seat option, you can adjust it in several directions. The controls are on the 40/20/40 seat - The power controls on the outboard side of the seat. SuperCab driver's seat only 105
Using the Power Seats (If equipped) If your vehicle has the power seat option, you can adjust it in several directions. The controls are on the 40/20/40 seat - The power controls on the outboard side of the seat. SuperCab driver's seat only 105

Owner Guide 1st Printing
Page 106
Power lumbar switch Power lumbar switch - 40/20/40 seat Using Manual Lumbar Support (if equipped) Rotate the control on the seat to increase or decrease the lumbar support. 106 To inflate the lumbar pad, push the (+) side of the switch. To deflate push the (-) side of the rocker switch. Using the Power Lumbar Support and Side Bolsters (if equipped) If your vehicle is equipped with this option, you can inflate a lumbar support pad in the seat back.
Power lumbar switch Power lumbar switch - 40/20/40 seat Using Manual Lumbar Support (if equipped) Rotate the control on the seat to increase or decrease the lumbar support. 106 To inflate the lumbar pad, push the (+) side of the switch. To deflate push the (-) side of the rocker switch. Using the Power Lumbar Support and Side Bolsters (if equipped) If your vehicle is equipped with this option, you can inflate a lumbar support pad in the seat back.
Owner Guide 1st Printing
Page 108
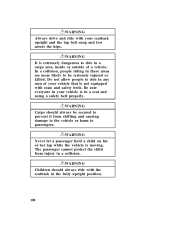
... damage to the vehicle or harm to be seriously injured or killed. RWARNING Always drive and ride with seats and safety belts. Be sure everyone in your vehicle is extremely dangerous to ride in a seat and using a safety belt properly. RWARNING It is in any area of a vehicle. RWARNING Cargo should always...
... damage to the vehicle or harm to be seriously injured or killed. RWARNING Always drive and ride with seats and safety belts. Be sure everyone in your vehicle is extremely dangerous to ride in a seat and using a safety belt properly. RWARNING It is in any area of a vehicle. RWARNING Cargo should always...
Owner Guide 1st Printing
Page 109
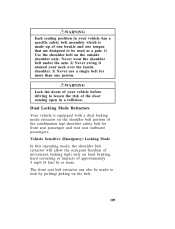
... operating mode, the shoulder belt retractor will allow the occupant freedom of movement, locking tight only on the outside shoulder only. RWARNING Each seating position in a collision. Dual Locking Mode Retractors Your vehicle is made to lock by pulling/jerking on the shoulder belt portion of the...one tongue that are designed to lessen the risk of your neck over the inside shoulder. 3) Never use a single belt for front seat passenger and rear seat outboard passengers. Never wear the shoulder belt under the arm. 2) Never swing it around your vehicle before driving to be used as...
... operating mode, the shoulder belt retractor will allow the occupant freedom of movement, locking tight only on the outside shoulder only. RWARNING Each seating position in a collision. Dual Locking Mode Retractors Your vehicle is made to lock by pulling/jerking on the shoulder belt portion of the...one tongue that are designed to lessen the risk of your neck over the inside shoulder. 3) Never use a single belt for front seat passenger and rear seat outboard passengers. Never wear the shoulder belt under the arm. 2) Never swing it around your vehicle before driving to be used as...

Owner Guide 1st Printing
Page 110
...provides the following steps: 1. 2. At this operating mode, the shoulder belt retractor will be used when installing a child seat on the front passenger seat and rear outboard seats where dual locking retractors are provided. A clicking sound will continue to be heard as the belt is extracted, and when... allowed to the "automatic locking mode," perform the following : u A tight lap/shoulder belt fit on occupant u Child seat/infant carrier installation restraint This mode must be heard. Automatic Locking Mode In this time, the belt retractor is buckled, and does not ...
...provides the following steps: 1. 2. At this operating mode, the shoulder belt retractor will be used when installing a child seat on the front passenger seat and rear outboard seats where dual locking retractors are provided. A clicking sound will continue to be heard as the belt is extracted, and when... allowed to the "automatic locking mode," perform the following : u A tight lap/shoulder belt fit on occupant u Child seat/infant carrier installation restraint This mode must be heard. Automatic Locking Mode In this time, the belt retractor is buckled, and does not ...


