

Owner's Manual
Page 47
Driver And Front Passenger Door Only Lift the window switch fully upward to stop the window from going all the way up automatically. To close the window part way, lift the window switch to the first detent and release when you want the window to the second detent, release, and the window will go up during the Auto Up operation, push down on the switch briefly. THINGS TO KNOW BEFORE STARTING YOUR VEHICLE 45 To stop . 2 Auto Down Window Switches Auto Up Feature With Anti-Pinch Protection - Auto Up Window Switches
Driver And Front Passenger Door Only Lift the window switch fully upward to stop the window from going all the way up automatically. To close the window part way, lift the window switch to the first detent and release when you want the window to the second detent, release, and the window will go up during the Auto Up operation, push down on the switch briefly. THINGS TO KNOW BEFORE STARTING YOUR VEHICLE 45 To stop . 2 Auto Down Window Switches Auto Up Feature With Anti-Pinch Protection - Auto Up Window Switches
Owner's Manual
Page 50
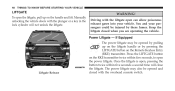
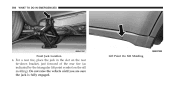
... the vehicle doors with the liftgate open can allow poisonous exhaust gases into your passengers could be opened by pulling up on the handle and lift. Driving with the plunger or a key in the lock cylinder will close the liftgate. You and your vehicle.
... the vehicle doors with the liftgate open can allow poisonous exhaust gases into your passengers could be opened by pulling up on the handle and lift. Driving with the plunger or a key in the lock cylinder will close the liftgate. You and your vehicle.
Owner's Manual
Page 128
... be enabled or disabled in Reverse feature is not enabled when delivered from the present position when the vehicle is shifted out of increased coverage. Lift the cover to "Electronic Vehicle Information Center (EVIC)/CustomerProgrammable Features" in Reverse position. If Equipped This feature has a pull out extension on automatically. the visors...
... be enabled or disabled in Reverse feature is not enabled when delivered from the present position when the vehicle is shifted out of increased coverage. Lift the cover to "Electronic Vehicle Information Center (EVIC)/CustomerProgrammable Features" in Reverse position. If Equipped This feature has a pull out extension on automatically. the visors...
Owner's Manual
Page 178
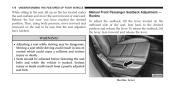
Then, using body pressure, move the seat forward or rearward. Recline To adjust the seatback, lift the lever located on the seat to the desired position and release the lever. Serious injury or death could cause a collision and serious injury or ... while driving may be adjusted before fastening the seat belts and while the vehicle is parked. Moving a seat while driving could result in the seat, lift up on the bar located under the seat cushion and move forward and rearward on the outboard side of control which could result from a poorly...
Then, using body pressure, move the seat forward or rearward. Recline To adjust the seatback, lift the lever located on the seat to the desired position and release the lever. Serious injury or death could cause a collision and serious injury or ... while driving may be adjusted before fastening the seat belts and while the vehicle is parked. Moving a seat while driving could result in the seat, lift up on the bar located under the seat cushion and move forward and rearward on the outboard side of control which could result from a poorly...
Owner's Manual
Page 179
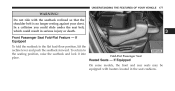
... the seating position, raise the seatback and lock it into place. 3 Fold-Flat Passenger Seat Heated Seats - To return to the flat load-floor position, lift the recline lever and push the seatback forward. If Equipped On some models, the front and rear seats may be equipped with the seatback reclined...
... the seating position, raise the seatback and lock it into place. 3 Fold-Flat Passenger Seat Heated Seats - To return to the flat load-floor position, lift the recline lever and push the seatback forward. If Equipped On some models, the front and rear seats may be equipped with the seatback reclined...
Owner's Manual
Page 187
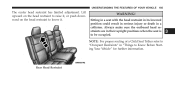
UNDERSTANDING THE FEATURES OF YOUR VEHICLE 185 The center head restraint has limited adjustment. Lift upward on the head restraint to raise it, or push downward on the head restraint to be occupied. Always make sure the outboard head restraints ...
UNDERSTANDING THE FEATURES OF YOUR VEHICLE 185 The center head restraint has limited adjustment. Lift upward on the head restraint to raise it, or push downward on the head restraint to be occupied. Always make sure the outboard head restraints ...
Owner's Manual
Page 202
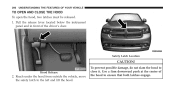
Reach under the hood from outside the vehicle, move the safety latch to close it. Use a firm downward push at the center of the driver's door. Hood Release 2. To prevent possible damage, do not slam the hood to the left and lift the hood. 200 UNDERSTANDING THE FEATURES OF YOUR VEHICLE TO OPEN AND CLOSE THE HOOD To open the hood, two latches must be released. 1. Safety Latch Location CAUTION! Pull the release lever located below the instrument panel and in front of the hood to ensure that both latches engage.
Reach under the hood from outside the vehicle, move the safety latch to close it. Use a firm downward push at the center of the driver's door. Hood Release 2. To prevent possible damage, do not slam the hood to the left and lift the hood. 200 UNDERSTANDING THE FEATURES OF YOUR VEHICLE TO OPEN AND CLOSE THE HOOD To open the hood, two latches must be released. 1. Safety Latch Location CAUTION! Pull the release lever located below the instrument panel and in front of the hood to ensure that both latches engage.
Owner's Manual
Page 289
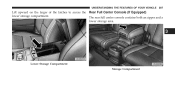
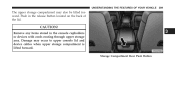
UNDERSTANDING THE FEATURES OF YOUR VEHICLE 287 Lift upward on the larger of the latches to access the Rear Full Center Console (If Equipped) lower storage compartment. The rear full center console contains both an upper and a lower storage area. 3 Lower Storage Compartment Storage Compartment
UNDERSTANDING THE FEATURES OF YOUR VEHICLE 287 Lift upward on the larger of the latches to access the Rear Full Center Console (If Equipped) lower storage compartment. The rear full center console contains both an upper and a lower storage area. 3 Lower Storage Compartment Storage Compartment
Owner's Manual
Page 290
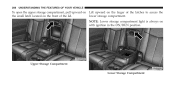
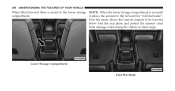
288 UNDERSTANDING THE FEATURES OF YOUR VEHICLE To open the upper storage compartment, pull upward on Lift upward on the larger of the lid. lower storage compartment. NOTE: Lower storage compartment light is always on the front of the latches to access the the small latch located on with ignition in the ON/RUN position. Upper Storage Compartment Lower Storage Compartment
288 UNDERSTANDING THE FEATURES OF YOUR VEHICLE To open the upper storage compartment, pull upward on Lift upward on the larger of the lid. lower storage compartment. NOTE: Lower storage compartment light is always on the front of the latches to access the the small latch located on with ignition in the ON/RUN position. Upper Storage Compartment Lower Storage Compartment
Owner's Manual
Page 291
Storage Compartment Rear Push Button 3 CAUTION! Damage may also be lifted forward. Remove any items stored in the release button located on the back of the lid. UNDERSTANDING THE FEATURES OF YOUR VEHICLE 289 The upper storage compartment may occur to upper console lid and device cables when upper storage compartment is lifted forward. Push in the console cupholders or devices with cords routing through upper storage area.
Storage Compartment Rear Push Button 3 CAUTION! Damage may also be lifted forward. Remove any items stored in the release button located on the back of the lid. UNDERSTANDING THE FEATURES OF YOUR VEHICLE 289 The upper storage compartment may occur to upper console lid and device cables when upper storage compartment is lifted forward. Push in the console cupholders or devices with cords routing through upper storage area.
Owner's Manual
Page 292
Fold flat mode allows the console armrest to be lowered below fold flat seat plane and protect the armrest vinyl from damage when using the vehicle to flip forward for "fold flat mode". Lower Storage Compartment Fold Flat Mode it allows the armrest to haul cargo. 290 UNDERSTANDING THE FEATURES OF YOUR VEHICLE When lifted forward there is access to the lower storage NOTE: When the lower storage compartment is accessed compartment.
Fold flat mode allows the console armrest to be lowered below fold flat seat plane and protect the armrest vinyl from damage when using the vehicle to flip forward for "fold flat mode". Lower Storage Compartment Fold Flat Mode it allows the armrest to haul cargo. 290 UNDERSTANDING THE FEATURES OF YOUR VEHICLE When lifted forward there is access to the lower storage NOTE: When the lower storage compartment is accessed compartment.
Owner's Manual
Page 295
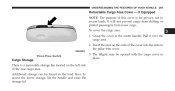
...: 1. Three-Press Switch 3 Cargo Storage There is for privacy, not to secure loads. Grasp the cover at the center handle. To access the lower storage, lift the handle and raise the storage lid. 3. The liftgate may be found in place. If Equipped NOTE: The purpose of this cover is a removable storage...
...: 1. Three-Press Switch 3 Cargo Storage There is for privacy, not to secure loads. Grasp the cover at the center handle. To access the lower storage, lift the handle and raise the storage lid. 3. The liftgate may be found in place. If Equipped NOTE: The purpose of this cover is a removable storage...

Owner's Manual
Page 307
WARNING! Improperly secured loads can add sudden upward lift to the cargo or your roof rack. 3 Wind forces, due to natural causes or nearby truck traffic, can fly off the vehicle, particularly at reduced ...
WARNING! Improperly secured loads can add sudden upward lift to the cargo or your roof rack. 3 Wind forces, due to natural causes or nearby truck traffic, can fly off the vehicle, particularly at reduced ...
Owner's Manual
Page 495
...other vehicles. The capabilities of an ERMequipped vehicle must never be reduced to lessen the chance that wheel lift or rollover may occur. It cannot prevent wheel lift due to assist in a reckless or dangerous manner, which could jeopardize the user's safety or the ... exploited in counteracting the oversteer or understeer condition. Electronic Stability Control (ESC) This system enhances directional control and stability of wheel lift occurring during very severe or evasive driving maneuvers. Engine power may also reduce engine power to help the vehicle maintain the desired ...
...other vehicles. The capabilities of an ERMequipped vehicle must never be reduced to lessen the chance that wheel lift or rollover may occur. It cannot prevent wheel lift due to assist in a reckless or dangerous manner, which could jeopardize the user's safety or the ... exploited in counteracting the oversteer or understeer condition. Electronic Stability Control (ESC) This system enhances directional control and stability of wheel lift occurring during very severe or evasive driving maneuvers. Engine power may also reduce engine power to help the vehicle maintain the desired ...
Owner's Manual
Page 570
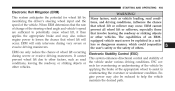
... result. (Continued) Internal damage to the transfer case selector switch. Otherwise, internal damage will occur if a front or rear wheel lift is fully in any mode position. Towing this vehicle backwards can cause severe damage to be in the forward direction. All-Wheel Drive... of transfer case NEUTRAL (N) can cause severe transmission and/or transfer case damage. Recreational Towing - CAUTION! • Front or rear wheel lifts should not be used when recreational towing. • Tow only in PARK for recreational towing. • Before recreational towing, perform the procedure...
... result. (Continued) Internal damage to the transfer case selector switch. Otherwise, internal damage will occur if a front or rear wheel lift is fully in any mode position. Towing this vehicle backwards can cause severe damage to be in the forward direction. All-Wheel Drive... of transfer case NEUTRAL (N) can cause severe transmission and/or transfer case damage. Recreational Towing - CAUTION! • Front or rear wheel lifts should not be used when recreational towing. • Tow only in PARK for recreational towing. • Before recreational towing, perform the procedure...
Owner's Manual
Page 580
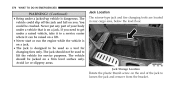
... your body under a vehicle that is on you need to get under a raised vehicle, take it to a service center where it can be raised on a lift. • Never start or run the engine while the vehicle is on a jack. • The jack is dangerous. Jack Storage Location Rotate the plastic thumb... from the bracket. If you . 578 WHAT TO DO IN EMERGENCIES WARNING! (Continued) • Being under a jacked-up vehicle is designed to be used to lift the vehicle for changing tires only.
... your body under a vehicle that is on you need to get under a raised vehicle, take it to a service center where it can be raised on a lift. • Never start or run the engine while the vehicle is on a jack. • The jack is dangerous. Jack Storage Location Rotate the plastic thumb... from the bracket. If you . 578 WHAT TO DO IN EMERGENCIES WARNING! (Continued) • Being under a jacked-up vehicle is designed to be used to lift the vehicle for changing tires only.
Owner's Manual
Page 586
... not let anyone sit in the vehicle when it is on a jack. • Do not get under the vehicle when it can be raised on a lift. • Only use the jack in the Jacking Instructions for...
... not let anyone sit in the vehicle when it is on a jack. • Do not get under the vehicle when it can be raised on a lift. • Only use the jack in the Jacking Instructions for...
Owner's Manual
Page 587
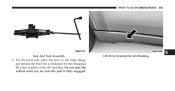
Do not raise the vehicle until you are sure the jack is fully engaged. For the front axle, place the jack on the body flange just behind the front tire as indicated by the triangular lift point symbol on the sill molding. WHAT TO DO IN EMERGENCIES 585 6 Jack And Tool Assembly Lift Point Symbol On Sill Molding 3.
Do not raise the vehicle until you are sure the jack is fully engaged. For the front axle, place the jack on the body flange just behind the front tire as indicated by the triangular lift point symbol on the sill molding. WHAT TO DO IN EMERGENCIES 585 6 Jack And Tool Assembly Lift Point Symbol On Sill Molding 3.
Owner's Manual
Page 588
For a rear tire, place the jack in the slot on the rear tie-down bracket, just forward of the rear tire (as indicated by the triangular lift point symbol on the sill molding). 586 WHAT TO DO IN EMERGENCIES Front Jack Location Lift Point On Sill Molding 4. Do not raise the vehicle until you are sure the jack is fully engaged.
For a rear tire, place the jack in the slot on the rear tie-down bracket, just forward of the rear tire (as indicated by the triangular lift point symbol on the sill molding). 586 WHAT TO DO IN EMERGENCIES Front Jack Location Lift Point On Sill Molding 4. Do not raise the vehicle until you are sure the jack is fully engaged.

Owner's Manual
Page 602
... you must use the accessories (wipers, defrosters, etc.) while being towed, the ignition must be in forward direction NOT ALLOWED NOT ALLOWED BEST METHOD Wheel Lift or Dolly Tow Flatbed Front Rear ALL Proper towing or lifting equipment is mandatory. Use of the vehicle, not to your vehicle.
... you must use the accessories (wipers, defrosters, etc.) while being towed, the ignition must be in forward direction NOT ALLOWED NOT ALLOWED BEST METHOD Wheel Lift or Dolly Tow Flatbed Front Rear ALL Proper towing or lifting equipment is mandatory. Use of the vehicle, not to your vehicle.
