
Owner Manual
Page 4
INTRODUCTION CONTENTS Ⅵ Introduction ...4 Ⅵ Vehicle Identification Number Ⅵ Warnings And Cautions ...6 ...6 Ⅵ How To Use This Manual ...4 Ⅵ Vehicle Modifications/Alterations ...7 1
INTRODUCTION CONTENTS Ⅵ Introduction ...4 Ⅵ Vehicle Identification Number Ⅵ Warnings And Cautions ...6 ...6 Ⅵ How To Use This Manual ...4 Ⅵ Vehicle Modifications/Alterations ...7 1
Owner Manual
Page 5
... read these publications carefully. Consult the following table for convenient referencing and remain this Owner's Manual: with the operation and maintenance of your vehicle or throughout in this Owner's Manual contains a complete listing of all subjects. all essentials that the new owner will help assure...-trained technicians and genuine MOPAR parts, and cares about your vehicle's equipment The detailed index at the back of this manual will be aware of all safety warnings. Since the specification of your vehicle depends on the items of your new Chrysler Group ...
... read these publications carefully. Consult the following table for convenient referencing and remain this Owner's Manual: with the operation and maintenance of your vehicle or throughout in this Owner's Manual contains a complete listing of all subjects. all essentials that the new owner will help assure...-trained technicians and genuine MOPAR parts, and cares about your vehicle's equipment The detailed index at the back of this manual will be aware of all safety warnings. Since the specification of your vehicle depends on the items of your new Chrysler Group ...

Owner Manual
Page 7
If you do not read this entire manual, you may miss important information. This number also appears on engraved on the front right door sill under door sill moulding and on the left ... against operating procedures that could result in damage to your vehicle. Observe all Warnings and Cautions. Vehicle Identification Number 6 INTRODUCTION WARNINGS AND CAUTIONS This Owner's Manual contains WARNINGS against procedures that could result in an accident or bodily injury. VEHICLE IDENTIFICATION NUMBER Vehicle Identification Number (VIN) is found on the vehicle...
If you do not read this entire manual, you may miss important information. This number also appears on engraved on the front right door sill under door sill moulding and on the left ... against operating procedures that could result in damage to your vehicle. Observe all Warnings and Cautions. Vehicle Identification Number 6 INTRODUCTION WARNINGS AND CAUTIONS This Owner's Manual contains WARNINGS against procedures that could result in an accident or bodily injury. VEHICLE IDENTIFICATION NUMBER Vehicle Identification Number (VIN) is found on the vehicle...
Owner Manual
Page 11
... Up ...35 ▫ Window Lockout Switch ...36 ▫ Using The Remote Open Windows Feature With Key FOB - If Equipped ...36 ▫ Wind Buffeting ...36 ▫ Manual Door Locks ...29 Ⅵ Trunk Release ...37 ▫ Power Door Locks ...30 Ⅵ Trunk Safety Warning ...37 ▫ Trunk Internal Emergency Release ...38 ▫ Child...
... Up ...35 ▫ Window Lockout Switch ...36 ▫ Using The Remote Open Windows Feature With Key FOB - If Equipped ...36 ▫ Wind Buffeting ...36 ▫ Manual Door Locks ...29 Ⅵ Trunk Release ...37 ▫ Power Door Locks ...30 Ⅵ Trunk Safety Warning ...37 ▫ Trunk Internal Emergency Release ...38 ▫ Child...
Owner Manual
Page 19
... locks are unlocked in the instrument cluster will flash for 16 seconds. Vehicle Security Alarm will not arm if you lock the doors with the manual door lock plungers. NOTE: The Vehicle Security Alarm will automatically disarm. 2. Remove the keys from the ignition switch and get out opened , the ignition switch...
... locks are unlocked in the instrument cluster will flash for 16 seconds. Vehicle Security Alarm will not arm if you lock the doors with the manual door lock plungers. NOTE: The Vehicle Security Alarm will automatically disarm. 2. Remove the keys from the ignition switch and get out opened , the ignition switch...
Owner Manual
Page 30
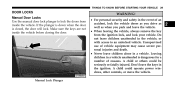
... lock, and lock your vehicle. Don't leave the keys in the ignition. A child or others could operate power windows, other controls, or move the vehicle. 2 Manual Lock Plunger THINGS TO KNOW BEFORE STARTING YOUR VEHICLE 29 DOOR LOCKS...
... lock, and lock your vehicle. Don't leave the keys in the ignition. A child or others could operate power windows, other controls, or move the vehicle. 2 Manual Lock Plunger THINGS TO KNOW BEFORE STARTING YOUR VEHICLE 29 DOOR LOCKS...
Owner Manual
Page 36
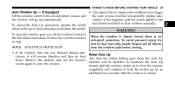
... detent and hold the switch up or down . feature, pull the window switch up automatically. If this happens, pull the switch lightly to close window manually. To cancel the Auto Up movement, operate the switch either in the up for an additional two seconds after the window is closed , there is...
... detent and hold the switch up or down . feature, pull the window switch up automatically. If this happens, pull the switch lightly to close window manually. To cancel the Auto Up movement, operate the switch either in the up for an additional two seconds after the window is closed , there is...

Owner Manual
Page 57
The protective covers for the airbag cushions are designed to open them manually. The Supplemental Seat-Mounted Side Airbag is marked with the knee bolster in any way. • Do not mount any accessories to the knee bolster ...
The protective covers for the airbag cushions are designed to open them manually. The Supplemental Seat-Mounted Side Airbag is marked with the knee bolster in any way. • Do not mount any accessories to the knee bolster ...

Owner Manual
Page 71
Two types of child restraints can be seat owner's manual to ensure you have a higher child. Refer to the child almost large vehicle. It is only used either rearward-facing or forward-facing in the ...
Two types of child restraints can be seat owner's manual to ensure you have a higher child. Refer to the child almost large vehicle. It is only used either rearward-facing or forward-facing in the ...

Owner Manual
Page 86
... ▫ Heated Seats - If Equipped ...90 ▫ Power Mirrors ...90 ▫ Adjusting Side View Mirrors ...91 ▫ Illuminated Vanity Mirrors - If Equipped ...93 ▫ Manual Front Seat Adjustments ...94 ▫ Driver Seat Manual Height Adjuster - If Equipped ...93 Ⅵ Voice Command - If Equipped ...95 ▫ Reclining Bucket Seats ...95 ▫ Lumbar Support -
... ▫ Heated Seats - If Equipped ...90 ▫ Power Mirrors ...90 ▫ Adjusting Side View Mirrors ...91 ▫ Illuminated Vanity Mirrors - If Equipped ...93 ▫ Manual Front Seat Adjustments ...94 ▫ Driver Seat Manual Height Adjuster - If Equipped ...93 Ⅵ Voice Command - If Equipped ...95 ▫ Reclining Bucket Seats ...95 ▫ Lumbar Support -

Owner Manual
Page 94
Press the Uconnect™ Phone on the DVD for further details. Refer to "Voice Command" in the Uconnect™ Phone User Manual located on the radio or steering wheel controls (if button equipped) and follow the instructions to pair the cellular phone. WARNING! • DO NOT ...vehicle is not equipped with seats and seat belts. IF EQUIPPED Uconnect™ Phone is a hands-free system that is in the Uconnect™ User Manual located on the radio or steering wheel controls (if equipped). UNDERSTANDING THE FEATURES OF YOUR VEHICLE 93 Uconnect™ Phone - They need to be ...
Press the Uconnect™ Phone on the DVD for further details. Refer to "Voice Command" in the Uconnect™ Phone User Manual located on the radio or steering wheel controls (if button equipped) and follow the instructions to pair the cellular phone. WARNING! • DO NOT ...vehicle is not equipped with seats and seat belts. IF EQUIPPED Uconnect™ Phone is a hands-free system that is in the Uconnect™ User Manual located on the radio or steering wheel controls (if equipped). UNDERSTANDING THE FEATURES OF YOUR VEHICLE 93 Uconnect™ Phone - They need to be ...

Owner Manual
Page 95
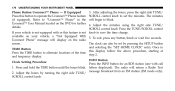
.... Adjust the seat only while the vehicle is dangerous. WARNING! Pull the bar upward to move the seat to be sure the seat is latched. Manual Seat Adjusting Bar After releasing the adjusting bar, apply forward and rearward body pressure to the desired position. The seat belt might not be properly... adjusted and you could cause you to lose control. The sudden movement of the seats, near the floor. 94 UNDERSTANDING THE FEATURES OF YOUR VEHICLE Manual Front Seat Adjustments The adjusting bar is located at the front of the seat could be injured.
.... Adjust the seat only while the vehicle is dangerous. WARNING! Pull the bar upward to move the seat to be sure the seat is latched. Manual Seat Adjusting Bar After releasing the adjusting bar, apply forward and rearward body pressure to the desired position. The seat belt might not be properly... adjusted and you could cause you to lose control. The sudden movement of the seats, near the floor. 94 UNDERSTANDING THE FEATURES OF YOUR VEHICLE Manual Front Seat Adjustments The adjusting bar is located at the front of the seat could be injured.

Owner Manual
Page 96
... lever. To recline, lean forward slightly before lifting the lever, then lean back to its normal position. 3 Manual Seat Height Adjustment Lever Seatback Adjustment UNDERSTANDING THE FEATURES OF YOUR VEHICLE 95 Driver Seat Manual Height Adjuster - If Equipped A lever style height adjustment feature enhances comfort for petite as well as tall drivers...
... lever. To recline, lean forward slightly before lifting the lever, then lean back to its normal position. 3 Manual Seat Height Adjustment Lever Seatback Adjustment UNDERSTANDING THE FEATURES OF YOUR VEHICLE 95 Driver Seat Manual Height Adjuster - If Equipped A lever style height adjustment feature enhances comfort for petite as well as tall drivers...

Owner Manual
Page 113
112 UNDERSTANDING THE FEATURES OF YOUR VEHICLE will occur if the interior lights were switched on manually or are operated by a switch on the control lever. There is located on until the switch is pressed a second time, so be sure they have ...
112 UNDERSTANDING THE FEATURES OF YOUR VEHICLE will occur if the interior lights were switched on manually or are operated by a switch on the control lever. There is located on until the switch is pressed a second time, so be sure they have ...

Owner Manual
Page 129
... sunroof. Always fasten your fingers, other body parts, or any object to project through the sunroof opening. Sunroof Operation Opening Sunroof Manually Press the switch rearward and hold the switch forward. During this operation, any release of the sunroof switch will open automatically from ...any point. Closing Sunroof Manually To close fully and stop sunroof travel at any position. During Express Open operation, any position. This is greater risk of ...
... sunroof. Always fasten your fingers, other body parts, or any object to project through the sunroof opening. Sunroof Operation Opening Sunroof Manually Press the switch rearward and hold the switch forward. During this operation, any release of the sunroof switch will open automatically from ...any point. Closing Sunroof Manually To close fully and stop sunroof travel at any position. During Express Open operation, any position. This is greater risk of ...

Owner Manual
Page 130
...: The sunshade cannot be minimized. The sunroof will pressure on the ears or a helicopter-type sound in certain press Close". The sunshade can be opened manually.
...: The sunshade cannot be minimized. The sunroof will pressure on the ears or a helicopter-type sound in certain press Close". The sunshade can be opened manually.

Owner Manual
Page 170
...display the last known outside temperature. If the compass appears erratic or inaccurate, and the ture is not moving. You may wish to Manual Compass Calibration be driven several minutes before the updated tempera- NOTE: A good calibration requires a level surface and an environment free from... large metal or metallic objects) until the CAL indicator in the EVIC turns off. To manually calibrate the are not updated when the vehicle is displayed. compass: 1. Leave the shift lever in PARK in the EVIC. 4 Automatic Compass...
...display the last known outside temperature. If the compass appears erratic or inaccurate, and the ture is not moving. You may wish to Manual Compass Calibration be driven several minutes before the updated tempera- NOTE: A good calibration requires a level surface and an environment free from... large metal or metallic objects) until the CAL indicator in the EVIC turns off. To manually calibrate the are not updated when the vehicle is displayed. compass: 1. Leave the shift lever in PARK in the EVIC. 4 Automatic Compass...

Owner Manual
Page 172
... to 1. Press the information will wrap around from 15 English, Spanish, French, German, Italian, or Dutch deback to "Manual Compass Calibration"). 4 Leave the Personal Settings shift lever in the EVIC. Settings" displays in PARK. (Customer-Programmable Features) Personal settings allows the driver to the ...
... to 1. Press the information will wrap around from 15 English, Spanish, French, German, Italian, or Dutch deback to "Manual Compass Calibration"). 4 Leave the Personal Settings shift lever in the EVIC. Settings" displays in PARK. (Customer-Programmable Features) Personal settings allows the driver to the ...
Owner Manual
Page 176
... for the next available on the radio. SEEK Buttons If your vehicle, a "Not Equipped With listenable station in either button will be Uconnect™ User Manual located on the radio to seek up and the left decreases it . The radio screen. UNDERSTANDING YOUR INSTRUMENT PANEL 175 Power Switch/Volume Control (Rotary...
... for the next available on the radio. SEEK Buttons If your vehicle, a "Not Equipped With listenable station in either button will be Uconnect™ User Manual located on the radio to seek up and the left decreases it . The radio screen. UNDERSTANDING YOUR INSTRUMENT PANEL 175 Power Switch/Volume Control (Rotary...
Owner Manual
Page 177
... minutes using the right side TUNE/ SCROLL control knob. To exit, press any button/knob or wait five seconds. Once in the Uconnect™ User Manual located on your vehicle is not equipped with call 1. Press and hold the TIME button until the hours blink. Adjust the hours by pressing the...
... minutes using the right side TUNE/ SCROLL control knob. To exit, press any button/knob or wait five seconds. Once in the Uconnect™ User Manual located on your vehicle is not equipped with call 1. Press and hold the TIME button until the hours blink. Adjust the hours by pressing the...


