Owner Manual
Page 185
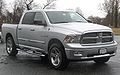
... the perception of 160 Watts (13 Press the switch forward and release to provide power. element must be minimized. The 12-Volt power outlets have a cap attached to clean • To ensure proper operation a MOPAR knob and the glass panel. ELECTRICAL POWER OUTLETS The auxiliary 12-Volt power outlets can...
... the perception of 160 Watts (13 Press the switch forward and release to provide power. element must be minimized. The 12-Volt power outlets have a cap attached to clean • To ensure proper operation a MOPAR knob and the glass panel. ELECTRICAL POWER OUTLETS The auxiliary 12-Volt power outlets can...

Owner Manual
Page 217
Slide the cleat off the end of the end cap. Utility Rail Cleat Utility Rail End Cap UNDERSTANDING THE FEATURES OF YOUR VEHICLE 215 To move the cleat to any position on the cleat and slide it to the detent nearest the desired location. Utility Rail Detent 2 - Make sure the cleat is seated in the detent and tighten the nut. To remove the cleats from the utility rail, remove the end cap by pushing up on the locking tab, located on the bottom of the rail. 3 1 - Cleat Retainer Nut 3 - Then pull out on the rail, turn the nut counterclockwise, approximately three turns.
Slide the cleat off the end of the end cap. Utility Rail Cleat Utility Rail End Cap UNDERSTANDING THE FEATURES OF YOUR VEHICLE 215 To move the cleat to any position on the cleat and slide it to the detent nearest the desired location. Utility Rail Detent 2 - Make sure the cleat is seated in the detent and tighten the nut. To remove the cleats from the utility rail, remove the end cap by pushing up on the locking tab, located on the bottom of the rail. 3 1 - Cleat Retainer Nut 3 - Then pull out on the rail, turn the nut counterclockwise, approximately three turns.

Owner Manual
Page 218
... "Consumer Information Truck-Camper Loading" document available from your authorized dealer. NOTE: If your vehicle is installed on the rear sill. campers. NOTE: When a cap or pickup camper is excluded, please refer to access the rear camera connector Camper Applications Certain truck models are not recommended for slide-in this important document...
... "Consumer Information Truck-Camper Loading" document available from your authorized dealer. NOTE: If your vehicle is installed on the rear sill. campers. NOTE: When a cap or pickup camper is excluded, please refer to access the rear camera connector Camper Applications Certain truck models are not recommended for slide-in this important document...

Owner Manual
Page 220
...the right side pivot clears the hanger bracket. 4. WARNING! If Equipped The lock is deadly, the exhaust system on vehicles equipped with "Cap or Slide-In Campers" should extend beyond the overhanging camper compartment and be locked using the vehicle key. Slide the entire tailgate to ...the right to the tailgate handle. NOTE: Do not carry the tailgate loose in the truck pickup box. Unlatch the tailgate and remove the support cables by 5. Locking Tang 3. 218 UNDERSTANDING THE FEATURES OF YOUR VEHICLE 2. Locking Tailgate - ...
...the right side pivot clears the hanger bracket. 4. WARNING! If Equipped The lock is deadly, the exhaust system on vehicles equipped with "Cap or Slide-In Campers" should extend beyond the overhanging camper compartment and be locked using the vehicle key. Slide the entire tailgate to ...the right to the tailgate handle. NOTE: Do not carry the tailgate loose in the truck pickup box. Unlatch the tailgate and remove the support cables by 5. Locking Tang 3. 218 UNDERSTANDING THE FEATURES OF YOUR VEHICLE 2. Locking Tailgate - ...
Owner Manual
Page 230
... stop the vehicle. The front and rear driveshafts are mechanically locked together forcing the front and rear wheels to look under the Cooling System Pressure Cap paragraph.
... stop the vehicle. The front and rear driveshafts are mechanically locked together forcing the front and rear wheels to look under the Cooling System Pressure Cap paragraph.

Owner Manual
Page 234
... of six seconds. ECO ...Fuel Saver Indicator door ...Door Ajar LoW tirE ...Low Tire Pressure CHAngE OIL ...Oil Change Required ESPOFF ...ESP Off gASCAP ...Fuel Cap Fault noFUSE ...Fuse Fault LoWASH ...Low Washer Fluid Some of 30 seconds until the ignition is messages will display in the instrument cluster. display will...
... of six seconds. ECO ...Fuel Saver Indicator door ...Door Ajar LoW tirE ...Low Tire Pressure CHAngE OIL ...Oil Change Required ESPOFF ...ESP Off gASCAP ...Fuel Cap Fault noFUSE ...Fuse Fault LoWASH ...Low Washer Fluid Some of 30 seconds until the ignition is messages will display in the instrument cluster. display will...

Owner Manual
Page 310
... Vehicles ...393 ▫ Starting ...393 ▫ Cruising Range ...393 ▫ Replacement Parts ...394 ▫ Maintenance ...394 Ⅵ Adding Fuel ...394 ▫ Loose Fuel Filler Cap (Gas Cap) Message ...396 Ⅵ Vehicle Loading ...396 ▫ Certification Label ...396 Ⅵ Trailer Towing ...399 ▫ Common Towing Definitions ...399 ▫ Trailer Hitch Classification ...403 ▫...
... Vehicles ...393 ▫ Starting ...393 ▫ Cruising Range ...393 ▫ Replacement Parts ...394 ▫ Maintenance ...394 Ⅵ Adding Fuel ...394 ▫ Loose Fuel Filler Cap (Gas Cap) Message ...396 Ⅵ Vehicle Loading ...396 ▫ Certification Label ...396 Ⅵ Trailer Towing ...399 ▫ Common Towing Definitions ...399 ▫ Trailer Hitch Classification ...403 ▫...

Owner Manual
Page 313
... is running when the key is routed under the hood on held to the floor, the "Normal Starting" procedure should the c-clip. It includes a removable cap that is automatically controlled and will decrease as the engine warms up. in cold weather. Connect the cord to the floor.
... is running when the key is routed under the hood on held to the floor, the "Normal Starting" procedure should the c-clip. It includes a removable cap that is automatically controlled and will decrease as the engine warms up. in cold weather. Connect the cord to the floor.

Owner Manual
Page 375
... = 32°F (0°C) then the cold tire inflation pressure should be too low. After inspecting or adjusting the tire pressure, always reinstall the valve stem cap (if equipped). Do not reduce this in mind when checking tire pressure inside a garage, especially in the Winter. build up or your tire pressure will...
... = 32°F (0°C) then the cold tire inflation pressure should be too low. After inspecting or adjusting the tire pressure, always reinstall the valve stem cap (if equipped). Do not reduce this in mind when checking tire pressure inside a garage, especially in the Winter. build up or your tire pressure will...
Owner Manual
Page 384
... 35 psi (241 kPa). Undesirable system operation or sensor damage may result. • After inspecting or adjusting the tire pressure always reinstall the valve stem cap.
... 35 psi (241 kPa). Undesirable system operation or sensor damage may result. • After inspecting or adjusting the tire pressure always reinstall the valve stem cap.

Owner Manual
Page 393
STARTING AND OPERATING 391 subjects that are unique to the other sections of this manual for information on E-85. 5 E-85 Fuel Cap E-85 Badge Only vehicles with the E-85 fuel filler door label can operate on features that are common between Flexible Fuel and gasoline-only powered vehicles. Please refer to these vehicles. CAUTION!
STARTING AND OPERATING 391 subjects that are unique to the other sections of this manual for information on E-85. 5 E-85 Fuel Cap E-85 Badge Only vehicles with the E-85 fuel filler door label can operate on features that are common between Flexible Fuel and gasoline-only powered vehicles. Please refer to these vehicles. CAUTION!

Owner Manual
Page 394
... is below 32°F (0°C). Do not use E-85 as a cleaning agent and never use it near the vehicle when removing the fuel filler tube cap (gas cap) or filling the tank. 392 STARTING AND OPERATING ETHANOL FUEL (E-85) For best results, a refueling pattern that avoids alternatE-85 is a mixture of approximately...
... is below 32°F (0°C). Do not use E-85 as a cleaning agent and never use it near the vehicle when removing the fuel filler tube cap (gas cap) or filling the tank. 392 STARTING AND OPERATING ETHANOL FUEL (E-85) For best results, a refueling pattern that avoids alternatE-85 is a mixture of approximately...
Owner Manual
Page 396
... located behind the fuel filler door, on the inside of the fuel door. to be compatible with ethanol. CAUTION! Hanging the cap will cause difficulty in your vehicle. It will prevent unnecessary damage maintenance schedule section of this manual. Open the fuel compatible components can... with correct ethanol compatible parts. Always be placed over the tab on the left side of the vehicle. door and remove the fuel cap by turning it counterclockwise. CAUTION! 394 STARTING AND OPERATING Replacement Parts Many components in your Flexible Fuel Vehicle (FFV) are designed to the ...
... located behind the fuel filler door, on the inside of the fuel door. to be compatible with ethanol. CAUTION! Hanging the cap will cause difficulty in your vehicle. It will prevent unnecessary damage maintenance schedule section of this manual. Open the fuel compatible components can... with correct ethanol compatible parts. Always be placed over the tab on the left side of the vehicle. door and remove the fuel cap by turning it counterclockwise. CAUTION! 394 STARTING AND OPERATING Replacement Parts Many components in your Flexible Fuel Vehicle (FFV) are designed to the ...

Owner Manual
Page 397
... not "top off , the fuel tank is removed or the tank filled. • Never add fuel to turn on the ground while filling. 5 Fuel Filler Cap Insert fuel nozzle and begin dispensing fuel. This is in or near the vehicle when the gas...
... not "top off , the fuel tank is removed or the tank filled. • Never add fuel to turn on the ground while filling. 5 Fuel Filler Cap Insert fuel nozzle and begin dispensing fuel. This is in or near the vehicle when the gas...
Owner Manual
Page 398
... Administration regulations, your vehicle has a certification label affixed to turn the message off . Tighten the gas cap until one click is heard/felt. Also, a poorly-fitted aftermarket cap can cause the MIL to illuminate, due to the fuel system or emission control system could let impurities ... installed, or damaged, a Rating (GAWR) front and rear, and Vehicle Identification "gASCAP" message will turn on the MIL. A poorly fitting cap could result from the system. This label contains the month and year of manufacture, If the vehicles diagnostic system determines that the gas...
... Administration regulations, your vehicle has a certification label affixed to turn the message off . Tighten the gas cap until one click is heard/felt. Also, a poorly-fitted aftermarket cap can cause the MIL to illuminate, due to the fuel system or emission control system could let impurities ... installed, or damaged, a Rating (GAWR) front and rear, and Vehicle Identification "gASCAP" message will turn on the MIL. A poorly fitting cap could result from the system. This label contains the month and year of manufacture, If the vehicles diagnostic system determines that the gas...

Owner Manual
Page 433
...risk of operation to allow the wheel nuts to lower the jack. Lower the jack to recommended torque. hand, it may result in cap damage. Wheel Nuts All wheel nuts should first be necessary to use the jack drive tube in the vehicle. If the bottle jack,...EMERGENCIES 431 wheel nuts. Using the wheel wrench, finish tightening the wheel tools as previously described. nuts using a crisscross pattern. Tighten the wheel caps on the spare wheel. Adjust the tire pressure when possible. Progress around the WARNING! 6 the correct tightness, have them checked with chrome plated...
...risk of operation to allow the wheel nuts to lower the jack. Lower the jack to recommended torque. hand, it may result in cap damage. Wheel Nuts All wheel nuts should first be necessary to use the jack drive tube in the vehicle. If the bottle jack,...EMERGENCIES 431 wheel nuts. Using the wheel wrench, finish tightening the wheel tools as previously described. nuts using a crisscross pattern. Tighten the wheel caps on the spare wheel. Adjust the tire pressure when possible. Progress around the WARNING! 6 the correct tightness, have them checked with chrome plated...

Owner Manual
Page 441
...; Engine Compartment- 3.7L ...441 Ⅵ Engine Compartment- 4.7L ...442 Ⅵ Engine Compartment- 5.7L ...443 Ⅵ Onboard Diagnostic System (OBD II) ...444 ▫ Loose Fuel Filler Cap Message ...444 Ⅵ Emissions Inspection And Maintenance Programs ...445 Ⅵ Replacement Parts ...446 Ⅵ Dealer Service ...447 Ⅵ Maintenance Procedures ...447 ▫ Engine Oil ...448...
...; Engine Compartment- 3.7L ...441 Ⅵ Engine Compartment- 4.7L ...442 Ⅵ Engine Compartment- 5.7L ...443 Ⅵ Onboard Diagnostic System (OBD II) ...444 ▫ Loose Fuel Filler Cap Message ...444 Ⅵ Emissions Inspection And Maintenance Programs ...445 Ⅵ Replacement Parts ...446 Ⅵ Dealer Service ...447 Ⅵ Maintenance Procedures ...447 ▫ Engine Oil ...448...
Owner Manual
Page 446
... further damage to turn on could also affect fuel economy and drivability. Loose Fuel Filler Cap Message If the vehicle's diagnostic system determines that the gas cap is properly tightened. Tighten the gas cap until a "clicking" sound is flashing, severe catalytic converter damage and power loss will...). 444 MAINTAINING YOUR VEHICLE ONBOARD DIAGNOSTIC SYSTEM (OBD II) Your vehicle is required. This is an indication that the fuel filler cap in loose, improperly installed, or damaged, a GASCAP message will turn the message off. Press the odometer reset button to the emission control system...
... further damage to turn on could also affect fuel economy and drivability. Loose Fuel Filler Cap Message If the vehicle's diagnostic system determines that the gas cap is properly tightened. Tighten the gas cap until a "clicking" sound is flashing, severe catalytic converter damage and power loss will...). 444 MAINTAINING YOUR VEHICLE ONBOARD DIAGNOSTIC SYSTEM (OBD II) Your vehicle is required. This is an indication that the fuel filler cap in loose, improperly installed, or damaged, a GASCAP message will turn the message off. Press the odometer reset button to the emission control system...

Owner Manual
Page 447
MAINTAINING YOUR VEHICLE 445 appear the next time the vehicle is detected twice ment. This might serviced, recently had a dead battery or a battery replaceindicate a damaged cap. Insert your vehicle may not be ready if your vehicle was recently check. 7 If the problem is started. If the OBD II system should be ...
MAINTAINING YOUR VEHICLE 445 appear the next time the vehicle is detected twice ment. This might serviced, recently had a dead battery or a battery replaceindicate a damaged cap. Insert your vehicle may not be ready if your vehicle was recently check. 7 If the problem is started. If the OBD II system should be ...

Owner Manual
Page 451
.... Change Engine Oil Refer to "Engine Compartment" in Section 8 for the proper maintenance intervals. For information on engine oil filler cap location, refer to the "Maintenance Schedule" in this section. 7 MAINTAINING YOUR VEHICLE 449 CAUTION! The manufacturer only recommends API Certified... engine oils. The engine oil filler cap also shows the recommended engine oil viscosity for all types of operating conditions, the manufacturer only recommends engine oils that the oil...
.... Change Engine Oil Refer to "Engine Compartment" in Section 8 for the proper maintenance intervals. For information on engine oil filler cap location, refer to the "Maintenance Schedule" in this section. 7 MAINTAINING YOUR VEHICLE 449 CAUTION! The manufacturer only recommends API Certified... engine oils. The engine oil filler cap also shows the recommended engine oil viscosity for all types of operating conditions, the manufacturer only recommends engine oils that the oil...


