
Owner Manual
Page 80
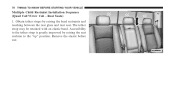
The tether strap may be retained with an elastic band. Remove the elastic before use. Accessibility to the "up" position. Obtain tether straps by raising the seat cushion to the tether strap is greatly improved by raising the head restraints and reaching between the rear glass and rear seat. Rear Seats) 1. 78 THINGS TO KNOW BEFORE STARTING YOUR VEHICLE Multiple Child Restraint Installation Sequence (Quad Cab/Crew Cab -
The tether strap may be retained with an elastic band. Remove the elastic before use. Accessibility to the "up" position. Obtain tether straps by raising the seat cushion to the tether strap is greatly improved by raising the head restraints and reaching between the rear glass and rear seat. Rear Seats) 1. 78 THINGS TO KNOW BEFORE STARTING YOUR VEHICLE Multiple Child Restraint Installation Sequence (Quad Cab/Crew Cab -
Owner Manual
Page 86
..., etc.). Periodic Safety Checks You Should Make Outside Front seat belt assemblies must be able to eight Check the tires (including spare) for stones, nails, glass, or other objects or retractor condition, replace the belt. Safety Checks You Should Make Inside the Vehicle If the light is not lit during starting...
..., etc.). Periodic Safety Checks You Should Make Outside Front seat belt assemblies must be able to eight Check the tires (including spare) for stones, nails, glass, or other objects or retractor condition, replace the belt. Safety Checks You Should Make Inside the Vehicle If the light is not lit during starting...

Owner Manual
Page 148
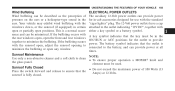
... located on the left side of the instrument panel, next to close it could fly up when the vehicle is not as scratch resistant as glass and therefore different lens cleaning procedures must be followed. Use a firm downward push at the front center of the headlights, parking lights, instrument panel lights...
... located on the left side of the instrument panel, next to close it could fly up when the vehicle is not as scratch resistant as glass and therefore different lens cleaning procedures must be followed. Use a firm downward push at the front center of the headlights, parking lights, instrument panel lights...
Owner Manual
Page 185
... all times. 3 Sunroof Maintenance NOTE: Use only a non-abrasive cleaner and a soft cloth to clean • To ensure proper operation a MOPAR knob and the glass panel. UNDERSTANDING THE FEATURES OF YOUR VEHICLE 183 Wind Buffeting Wind buffeting can be described as the perception of 160 Watts (13 Press the switch...
... all times. 3 Sunroof Maintenance NOTE: Use only a non-abrasive cleaner and a soft cloth to clean • To ensure proper operation a MOPAR knob and the glass panel. UNDERSTANDING THE FEATURES OF YOUR VEHICLE 183 Wind Buffeting Wind buffeting can be described as the perception of 160 Watts (13 Press the switch...
Owner Manual
Page 202
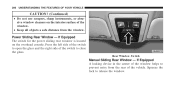
Rear Window Switch Manual Sliding Rear Window - Squeeze the lock to close the glass. 200 UNDERSTANDING THE FEATURES OF YOUR VEHICLE CAUTION! (Continued) • Do not use scrapers, sharp instruments, or abrasive window cleaners on the overhead console. Power ...Sliding Rear Window - Press the left side of the switch to open the glass and the right side of the window helps to prevent entry from the window. If Equipped A locking device in the center of the switch to...
Rear Window Switch Manual Sliding Rear Window - Squeeze the lock to close the glass. 200 UNDERSTANDING THE FEATURES OF YOUR VEHICLE CAUTION! (Continued) • Do not use scrapers, sharp instruments, or abrasive window cleaners on the overhead console. Power ...Sliding Rear Window - Press the left side of the switch to open the glass and the right side of the window helps to prevent entry from the window. If Equipped A locking device in the center of the switch to...

Owner Manual
Page 303
...the while keeping the windshield clear. It allows you to stay comfortable NOTE: • If the system is set to clear the windshield and side glass. 4 through the defrost and side window ATC is in cold or snowy conditions. A slight amount of fog, mist or ice on the windshield... or side glass, select Defrost mode and increase blower speed. A/C can be manually selected to a cool temperature, dehumidified air flows demister outlets. Use Defrost mode with...
...the while keeping the windshield clear. It allows you to stay comfortable NOTE: • If the system is set to clear the windshield and side glass. 4 through the defrost and side window ATC is in cold or snowy conditions. A slight amount of fog, mist or ice on the windshield... or side glass, select Defrost mode and increase blower speed. A/C can be manually selected to a cool temperature, dehumidified air flows demister outlets. Use Defrost mode with...

Owner Manual
Page 305
... service (i.e., vacation) for two weeks or more, run the air conditioning system at idle for long periods, as leaves. To clear is clear of the glass in odor, and if they enter the plenum they could plug the mild, rainy and/or humid weather. the windows, select Defrost or Mix mode... and increase the front blower speed. In Winter months make sure the air intake on the inside of the glass in the air intake may reduce airflow, can cause Vehicle windows tend to minimize the possibility of compressor damage when the system is free of...
... service (i.e., vacation) for two weeks or more, run the air conditioning system at idle for long periods, as leaves. To clear is clear of the glass in odor, and if they enter the plenum they could plug the mild, rainy and/or humid weather. the windows, select Defrost or Mix mode... and increase the front blower speed. In Winter months make sure the air intake on the inside of the glass in the air intake may reduce airflow, can cause Vehicle windows tend to minimize the possibility of compressor damage when the system is free of...

Owner Manual
Page 456
... please proceed to ensure proper function. Always use . and safety catch should be affecting its Windshield Wiper Blades function. be lubricated twice a ing on dry glass for fluid level at regular intervals. Adding Washer Fluid The fluid reservoir is Lock Cylinder Lubricant directly into the lock cylinder. If any debris that...
... please proceed to ensure proper function. Always use . and safety catch should be affecting its Windshield Wiper Blades function. be lubricated twice a ing on dry glass for fluid level at regular intervals. Adding Washer Fluid The fluid reservoir is Lock Cylinder Lubricant directly into the lock cylinder. If any debris that...

Owner Manual
Page 475
... with a dry cloth. not spray cleaner directly on a regular basis Do not use an abrasive type cleaner. Do stone breakage than glass headlights. Use caution when cleaning the inside rear winclosed areas they may lights (if equipped) that you are potentially flammable, and if ...used in household-type glass cleaner. Application of scratching the lenses and reducing light output, avoid wiping with the radio antenna. wool or other sharp instruments which ...
... with a dry cloth. not spray cleaner directly on a regular basis Do not use an abrasive type cleaner. Do stone breakage than glass headlights. Use caution when cleaning the inside rear winclosed areas they may lights (if equipped) that you are potentially flammable, and if ...used in household-type glass cleaner. Application of scratching the lenses and reducing light output, avoid wiping with the radio antenna. wool or other sharp instruments which ...

Owner Manual
Page 483
... Mounted Stop Lamp (CHMSL) ...921 fender ledges. Remove the two plastic push-in fasteners that secure the Quad Headlamp - Aluminum base bulbs are brass or glass-wedge base. 1.
... Mounted Stop Lamp (CHMSL) ...921 fender ledges. Remove the two plastic push-in fasteners that secure the Quad Headlamp - Aluminum base bulbs are brass or glass-wedge base. 1.

Owner Manual
Page 485
...bulb counterclockwise 1⁄4 turn to unlock the bulb from the housing. CAUTION! Replace bulb(s) as necessary. Do not contaminate the bulb glass by touching it with your fingers or by allowing it to contact other oily surfaces. Pull the bulb straight out from the housing...8226; Always use the correct bulb size and type for replacement. Disconnect electrical connectors. 11. CAUTION! • Do not contaminate the bulb glass by touching it with your fingers or by allowing it to contact other oily surfaces. Fog Lamps 1. MAINTAINING YOUR VEHICLE 483 10. Disconnect...
...bulb counterclockwise 1⁄4 turn to unlock the bulb from the housing. CAUTION! Replace bulb(s) as necessary. Do not contaminate the bulb glass by touching it with your fingers or by allowing it to contact other oily surfaces. Pull the bulb straight out from the housing...8226; Always use the correct bulb size and type for replacement. Disconnect electrical connectors. 11. CAUTION! • Do not contaminate the bulb glass by touching it with your fingers or by allowing it to contact other oily surfaces. Fog Lamps 1. MAINTAINING YOUR VEHICLE 483 10. Disconnect...

Owner Manual
Page 487
Rotate the bulb socket counterclockwise 1/4 turn to the body as shown. Pull the bulb straight out of the socket. Disconnect the wiring harness connector from the housing. 5. Remove the two screws holding the housing/lens to 1. MAINTAINING YOUR VEHICLE 485 3. Shortened bulb life will result. 6. Reverse the procedure to contact other oily surfaces. CAUTION! unlock it to install the bulb and housing. 7 Do not contaminate the bulb glass by touching it with your fingers or by allowing it from the Center High-Mounted Stoplamp (CHMSL) With bulb socket. Cargo Lamp 4.
Rotate the bulb socket counterclockwise 1/4 turn to the body as shown. Pull the bulb straight out of the socket. Disconnect the wiring harness connector from the housing. 5. Remove the two screws holding the housing/lens to 1. MAINTAINING YOUR VEHICLE 485 3. Shortened bulb life will result. 6. Reverse the procedure to contact other oily surfaces. CAUTION! unlock it to install the bulb and housing. 7 Do not contaminate the bulb glass by touching it with your fingers or by allowing it from the Center High-Mounted Stoplamp (CHMSL) With bulb socket. Cargo Lamp 4.

Owner Manual
Page 489
Reverse the procedure for installation of bulbs and housing. 7 Shortened bulb life will result. • Outside Bulbs: Cargo Lamps • Inside Bulb: Center High-Mounted Stop Lamp 5. Do not contaminate the bulb glass by touching it with your fingers or by allowing it to contact other oily surfaces. MAINTAINING YOUR VEHICLE 487 CAUTION!
Reverse the procedure for installation of bulbs and housing. 7 Shortened bulb life will result. • Outside Bulbs: Cargo Lamps • Inside Bulb: Center High-Mounted Stop Lamp 5. Do not contaminate the bulb glass by touching it with your fingers or by allowing it to contact other oily surfaces. MAINTAINING YOUR VEHICLE 487 CAUTION!

Owner Manual
Page 530
... Voltmeter ...235 High Beam/Low Beam Select Switch ...153 Gear Ranges ...315,322 Lights On Reminder ...151 General Information ...17,25,127,385 Passing ...153 Glass Cleaning ...473 Switch ...147 Grocery Bag Retainer ...198
... Voltmeter ...235 High Beam/Low Beam Select Switch ...153 Gear Ranges ...315,322 Lights On Reminder ...151 General Information ...17,25,127,385 Passing ...153 Glass Cleaning ...473 Switch ...147 Grocery Bag Retainer ...198
