Owner's Manual
Page 1
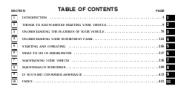
SECTION 1 2 3 4 5 6 7 8 9 10 TABLE OF CONTENTS PAGE INTRODUCTION ...3 THINGS TO KNOW BEFORE STARTING YOUR VEHICLE ...9 UNDERSTANDING THE FEATURES OF YOUR VEHICLE ...75 UNDERSTANDING YOUR INSTRUMENT PANEL ...161 STARTING AND OPERATING ...255 WHAT TO DO IN EMERGENCIES ...317 MAINTAINING YOUR VEHICLE ...335 MAINTENANCE SCHEDULES ...389 IF YOU NEED CONSUMER ASSISTANCE ...413 INDEX ...421 1 2 3 4 5 6 7 8 9 10
SECTION 1 2 3 4 5 6 7 8 9 10 TABLE OF CONTENTS PAGE INTRODUCTION ...3 THINGS TO KNOW BEFORE STARTING YOUR VEHICLE ...9 UNDERSTANDING THE FEATURES OF YOUR VEHICLE ...75 UNDERSTANDING YOUR INSTRUMENT PANEL ...161 STARTING AND OPERATING ...255 WHAT TO DO IN EMERGENCIES ...317 MAINTAINING YOUR VEHICLE ...335 MAINTENANCE SCHEDULES ...389 IF YOU NEED CONSUMER ASSISTANCE ...413 INDEX ...421 1 2 3 4 5 6 7 8 9 10
Owner's Manual
Page 12
... pedal or the gear selector lever. A child could be warned not to thieves. Don't leave the keys in the ignition switch, a chime will cancel this feature. Leaving children in a vehicle unattended is dangerous for up to 45 seconds after 2 seconds of running if an invalid key is in the ignition. Opening...
... pedal or the gear selector lever. A child could be warned not to thieves. Don't leave the keys in the ignition switch, a chime will cancel this feature. Leaving children in a vehicle unattended is dangerous for up to 45 seconds after 2 seconds of running if an invalid key is in the ignition. Opening...
Owner's Manual
Page 17
... switch or remote keyless entry transmitter. This prevents you press the power door lock switch while the key is in the vehicle. The Auto Lock feature is in the ignition and a door is open , the power 5. all doors are closed, 4. The transmission is enabled, 2. locks will sound if the key is...
... switch or remote keyless entry transmitter. This prevents you press the power door lock switch while the key is in the vehicle. The Auto Lock feature is in the ignition and a door is open , the power 5. all doors are closed, 4. The transmission is enabled, 2. locks will sound if the key is...

Owner's Manual
Page 18
... was in the ignition switch. The Automatic Door Locks can be enabled or disabled by performing the following procedure: 1. You can turn the feature back on by repeating the above mentioned procedure or by performing the procedure in NEUTRAL or PARK, 4. the transmission is 0 mph (0 km.../h). the vehicle speed is in the Electronic Vehicle Information Center (EVIC), Customer Programmable Features section on vehicles with power door locks if: 1. Within 10 seconds of the final cycle, press the interior driver's door lock switch to...
... was in the ignition switch. The Automatic Door Locks can be enabled or disabled by performing the following procedure: 1. You can turn the feature back on by repeating the above mentioned procedure or by performing the procedure in NEUTRAL or PARK, 4. the transmission is 0 mph (0 km.../h). the vehicle speed is in the Electronic Vehicle Information Center (EVIC), Customer Programmable Features section on vehicles with power door locks if: 1. Within 10 seconds of the final cycle, press the interior driver's door lock switch to...

Owner's Manual
Page 19
...outside when the child protection locks are equipped with local laws. NOTE: Use the Auto Door Locks and Auto Unlock features in the Electronic Vehicle Information Center (EVIC), Customer Programmable Features section or by performing the procedure in accordance with a child protection door lock system. 2 WARNING! The Auto ...Unlock On Exit feature is enabled when your vehicle is shipped from the assembly plant and can only be enabled or disabled by repeating the above...
...outside when the child protection locks are equipped with local laws. NOTE: Use the Auto Door Locks and Auto Unlock features in the Electronic Vehicle Information Center (EVIC), Customer Programmable Features section or by performing the procedure in accordance with a child protection door lock system. 2 WARNING! The Auto ...Unlock On Exit feature is enabled when your vehicle is shipped from the assembly plant and can only be enabled or disabled by repeating the above...

Owner's Manual
Page 21
Press the UNLOCK button for 4 to unlock all doors and liftgate. NOTE: If desired, the "Remote Unlock Driver's Door 1st" feature can be turned on . While the UNLOCK button is pressed, (after 4 seconds) press the LOCK button. Release both buttons. Keyless Entry ...Transmitter 2 2. The illuminated entry system also turns on and off by referring to the Customer Programmable Features of the "Electronic Vehicle Information Center (EVIC)" section or by repeating this procedure. THINGS TO KNOW BEFORE STARTING YOUR VEHICLE 21 To unlock ...
Press the UNLOCK button for 4 to unlock all doors and liftgate. NOTE: If desired, the "Remote Unlock Driver's Door 1st" feature can be turned on . While the UNLOCK button is pressed, (after 4 seconds) press the LOCK button. Release both buttons. Keyless Entry ...Transmitter 2 2. The illuminated entry system also turns on and off by referring to the Customer Programmable Features of the "Electronic Vehicle Information Center (EVIC)" section or by repeating this procedure. THINGS TO KNOW BEFORE STARTING YOUR VEHICLE 21 To unlock ...

Owner's Manual
Page 22
...ON position. When the panic alarm is pressed (after 4 seconds), press the PANIC button. NOTE: When you may have to the Customer Programmable Features of the system. While the LOCK button is on, the headlights and park lights will flash, the horn will stay on and off by ...referring to be reactivated by following these steps. 1. The "Sound Horn On Lock" feature can be turned on . The panic alarm will pulse on for 4 to the radio frequency noises of the "Electronic Vehicle Information Center (EVIC)" section...
...ON position. When the panic alarm is pressed (after 4 seconds), press the PANIC button. NOTE: When you may have to the Customer Programmable Features of the system. While the LOCK button is on, the headlights and park lights will flash, the horn will stay on and off by ...referring to be reactivated by following these steps. 1. The "Sound Horn On Lock" feature can be turned on . The panic alarm will pulse on for 4 to the radio frequency noises of the "Electronic Vehicle Information Center (EVIC)" section...
Owner's Manual
Page 23
... open /close . To Turn Off "Flash Lights On Lock/Unlock" NOTE: If desired, the "Flash Lights On Lock/Unlock" feature can be turned on and off by referring to the Customer Programmable Features of the "Electronic Vehicle Information Center (EVIC)" section or by following these steps. 1. THINGS TO KNOW BEFORE STARTING YOUR...
... open /close . To Turn Off "Flash Lights On Lock/Unlock" NOTE: If desired, the "Flash Lights On Lock/Unlock" feature can be turned on and off by referring to the Customer Programmable Features of the "Electronic Vehicle Information Center (EVIC)" section or by following these steps. 1. THINGS TO KNOW BEFORE STARTING YOUR...
Owner's Manual
Page 24
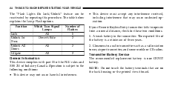
... Signal Lamps All Driver's Side All All Number of Industry Canada. 24 THINGS TO KNOW BEFORE STARTING YOUR VEHICLE The "Flash Lights On Lock/Unlock" feature can be reactivated by repeating this procedure. NOTE: Do not touch the battery terminals that may not cause harmful interference.
... Signal Lamps All Driver's Side All All Number of Industry Canada. 24 THINGS TO KNOW BEFORE STARTING YOUR VEHICLE The "Flash Lights On Lock/Unlock" feature can be reactivated by repeating this procedure. NOTE: Do not touch the battery terminals that may not cause harmful interference.
Owner's Manual
Page 32
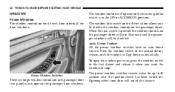
... and the passenger windows will be disabled. The power window switches remain active for up to stop. Opening either front door will go down feature. When the lock switch is in the ON or ACCESSORY position. Press the window switch to disable the window controls on the driver's door..., press the window switch to the first detent and release it when you to the second detent, release, and the window will cancel this feature. Power Window Switches There are single window controls on the driver's door control all the door windows. The window lock switch on the passenger...
... and the passenger windows will be disabled. The power window switches remain active for up to stop. Opening either front door will go down feature. When the lock switch is in the ON or ACCESSORY position. Press the window switch to disable the window controls on the driver's door..., press the window switch to the first detent and release it when you to the second detent, release, and the window will cancel this feature. Power Window Switches There are single window controls on the driver's door control all the door windows. The window lock switch on the passenger...

Owner's Manual
Page 33
...can be minimized. Your vehicle may exhibit wind buffeting with the rear windows open, open positions. OCCUPANT RESTRAINTS Some of the most important safety features in your vehicle are the restraint systems. These include the front and rear seat belts for the driver and all passengers, front airbags for both... the driver and front passenger, and if equipped, left and right window bags for adult-size seat belts, your seat belts or the LATCH feature (refer to the Child Restraint section in this manual), can be described as the perception of pressure on the ears or a helicopter type sound...
...can be minimized. Your vehicle may exhibit wind buffeting with the rear windows open, open positions. OCCUPANT RESTRAINTS Some of the most important safety features in your vehicle are the restraint systems. These include the front and rear seat belts for the driver and all passengers, front airbags for both... the driver and front passenger, and if equipped, left and right window bags for adult-size seat belts, your seat belts or the LATCH feature (refer to the Child Restraint section in this manual), can be described as the perception of pressure on the ears or a helicopter type sound...

Owner's Manual
Page 35
... striking the inside of the belt to lock during very sudden stops or collisions. Someone on the road may be belted at all times. This feature allows the shoulder part of the vehicle or being thrown out. 2 WARNING! • It is designed to move freely with Lap/ Shoulder Belts. In a collision...
... striking the inside of the belt to lock during very sudden stops or collisions. Someone on the road may be belted at all times. This feature allows the shoulder part of the vehicle or being thrown out. 2 WARNING! • It is designed to move freely with Lap/ Shoulder Belts. In a collision...

Owner's Manual
Page 68
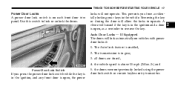
... will also be able to pull out more easily attach the hook or connector to the lower anchorages and tether anchorages. NOTE: To reset this feature you push the child restraint rearward and downward into the seat. Pull the belt from the retractor. Follow the instructions of the manufacturer when installing...
... will also be able to pull out more easily attach the hook or connector to the lower anchorages and tether anchorages. NOTE: To reset this feature you push the child restraint rearward and downward into the seat. Pull the belt from the retractor. Follow the instructions of the manufacturer when installing...

Owner's Manual
Page 69
... anchorages are to be introduced to passenger carrying vehicles over a period of years, child restraint systems having attachments for those anchorages will continue to have features for some time. Again, carefully follow the instructions that come with the child restraint installation, instead of tucking the seat belt behind the child restraint...
... anchorages are to be introduced to passenger carrying vehicles over a period of years, child restraint systems having attachments for those anchorages will continue to have features for some time. Again, carefully follow the instructions that come with the child restraint installation, instead of tucking the seat belt behind the child restraint...

Owner's Manual
Page 75
... ▫ Automatic Dimming Mirror - If Equipped ...80 ▫ Driver's Side Outside Mirror Auto Dimmer - If Equipped ...80 ▫ Exterior Mirrors Folding Feature ...80 ▫ Outside Mirror - Driver's Side ...81 ▫ Outside Mirror - Passenger's Side ...81 ▫ Power Remote-Control Mirrors ...82 &#... ...82 Hands-Free Communication (UConnect™) - If Equipped ...83 ▫ Operations ...85 ▫ Phone Call Features ...91 ▫ UConnect™ System Features ...94 ▫ Advanced Phone Connectivity ...98 ▫ Things You Should Know About Your UConnect™ System ...100 3
... ▫ Automatic Dimming Mirror - If Equipped ...80 ▫ Driver's Side Outside Mirror Auto Dimmer - If Equipped ...80 ▫ Exterior Mirrors Folding Feature ...80 ▫ Outside Mirror - Driver's Side ...81 ▫ Outside Mirror - Passenger's Side ...81 ▫ Power Remote-Control Mirrors ...82 &#... ...82 Hands-Free Communication (UConnect™) - If Equipped ...83 ▫ Operations ...85 ▫ Phone Call Features ...91 ▫ UConnect™ System Features ...94 ▫ Advanced Phone Connectivity ...98 ▫ Things You Should Know About Your UConnect™ System ...100 3
Owner's Manual
Page 76
76 UNDERSTANDING THE FEATURES OF YOUR VEHICLE Seats ...106 ▫ 10-Way Driver's Power Seat - If Equipped . . 106 ▫ 8-Way Driver's Power Seat - If Equipped ...107 ▫ 4-Way Passenger's ...
76 UNDERSTANDING THE FEATURES OF YOUR VEHICLE Seats ...106 ▫ 10-Way Driver's Power Seat - If Equipped . . 106 ▫ 8-Way Driver's Power Seat - If Equipped ...107 ▫ 4-Way Passenger's ...

Owner's Manual
Page 77
UNDERSTANDING THE FEATURES OF YOUR VEHICLE 77 ▫ Automatic Headlights ...128 ▫ Daytime Running Lights (Canada Only) ...128 ▫ Lights-On Reminder ...128 ▫ Headlight Time Delay ...128 &#... ▫ Turn Signals ...129 ▫ Highbeam/Lowbeam Select Switch ...130 ▫ Passing Light ...130 Windshield Wipers And Washers ...130 ▫ Windshield Washers ...130 ▫ Mist Feature ...131 ▫ Windshield Wiper Operation ...131 ▫ Intermittent Wiper System ...131 ▫ Rear Window Wiper/Washer ...131 Tilt Steering Column ...133 Traction Control Switch - If...
UNDERSTANDING THE FEATURES OF YOUR VEHICLE 77 ▫ Automatic Headlights ...128 ▫ Daytime Running Lights (Canada Only) ...128 ▫ Lights-On Reminder ...128 ▫ Headlight Time Delay ...128 &#... ▫ Turn Signals ...129 ▫ Highbeam/Lowbeam Select Switch ...130 ▫ Passing Light ...130 Windshield Wipers And Washers ...130 ▫ Windshield Washers ...130 ▫ Mist Feature ...131 ▫ Windshield Wiper Operation ...131 ▫ Intermittent Wiper System ...131 ▫ Rear Window Wiper/Washer ...131 Tilt Steering Column ...133 Traction Control Switch - If...

Owner's Manual
Page 78
... Erasing HomeLinkButtons ...147 ▫ Reprogramming a Single HomeLinkButton ...147 ▫ Security ...148 Power Sunroof - If Equipped ...149 ▫ Express Open Feature ...150 ▫ Wind Buffeting ...151 ▫ Sunroof Maintenance ...151 Electrical Power Outlets ...152 ▫ Electrical Outlet Use With Engine Off ...153 ... ...154 ▫ Second Row Seat Cupholders ...154 ▫ Third Row Seat Cupholders - If Equipped ...155 Storage ...155 ▫ Console Features ...155 ▫ Rear Cargo Storage Bin - If Equipped ...155 ▫ Retractable Cargo Area Cover - If Equipped . . 156 ▫...
... Erasing HomeLinkButtons ...147 ▫ Reprogramming a Single HomeLinkButton ...147 ▫ Security ...148 Power Sunroof - If Equipped ...149 ▫ Express Open Feature ...150 ▫ Wind Buffeting ...151 ▫ Sunroof Maintenance ...151 Electrical Power Outlets ...152 ▫ Electrical Outlet Use With Engine Off ...153 ... ...154 ▫ Second Row Seat Cupholders ...154 ▫ Third Row Seat Cupholders - If Equipped ...155 Storage ...155 ▫ Console Features ...155 ▫ Rear Cargo Storage Bin - If Equipped ...155 ▫ Retractable Cargo Area Cover - If Equipped . . 156 ▫...
Owner's Manual
Page 79
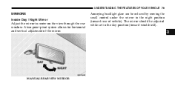
UNDERSTANDING THE FEATURES OF YOUR VEHICLE 79 MIRRORS Inside Day / Night Mirror Adjust the mirror to the night position (toward windshield). 3 MANUAL REARVIEW MIRROR The mirror should be reduced by moving the small control under the mirror to center on the view through the rear window. A two point pivot system allows for horizontal and vertical adjustment of vehicle). Annoying headlight glare can be adjusted while set in the day position (toward rear of the mirror.
UNDERSTANDING THE FEATURES OF YOUR VEHICLE 79 MIRRORS Inside Day / Night Mirror Adjust the mirror to the night position (toward windshield). 3 MANUAL REARVIEW MIRROR The mirror should be reduced by moving the small control under the mirror to center on the view through the rear window. A two point pivot system allows for horizontal and vertical adjustment of vehicle). Annoying headlight glare can be adjusted while set in the day position (toward rear of the mirror.

Owner's Manual
Page 80
...If Equipped This mirror automatically adjusts for annoying headlight glare from vehicles behind you . The hinges have three detent positions; Exterior Mirrors Folding Feature All exterior mirrors are hinged and may be moved either forward or rearward to the mirror during cleaning, never spray any cleaning solution directly... onto the mirror. A light in the mirror will illuminate to indicate when this feature on or off by pressing the button at the base of the Rearview Mirror. To avoid damage to resist damage. You can turn...
...If Equipped This mirror automatically adjusts for annoying headlight glare from vehicles behind you . The hinges have three detent positions; Exterior Mirrors Folding Feature All exterior mirrors are hinged and may be moved either forward or rearward to the mirror during cleaning, never spray any cleaning solution directly... onto the mirror. A light in the mirror will illuminate to indicate when this feature on or off by pressing the button at the base of the Rearview Mirror. To avoid damage to resist damage. You can turn...

