
Owner's Manual
Page 1
2012 Chevrolet Impala Owner Manual M In Brief ...1-1 Instrument Panel ...1-2 Initial Drive Information ...1-3 Vehicle Features ...1-13 Performance and Maintenance ...1-17 Keys, Doors, and Windows ...2-1 Keys and Locks ...2-2 Doors ...2-9 Vehicle Security...2-11 ...
2012 Chevrolet Impala Owner Manual M In Brief ...1-1 Instrument Panel ...1-2 Initial Drive Information ...1-3 Vehicle Features ...1-13 Performance and Maintenance ...1-17 Keys, Doors, and Windows ...2-1 Keys and Locks ...2-2 Doors ...2-9 Vehicle Security...2-11 ...
Owner's Manual
Page 2
2012 Chevrolet Impala Owner Manual M Vehicle Care ...10-1 General Information ...10-2 Vehicle Checks ...10-4 Headlamp Aiming ...10-24 Bulb Replacement ...10-24 Electrical System ...10-28 Wheels and Tires ...10-...
2012 Chevrolet Impala Owner Manual M Vehicle Care ...10-1 General Information ...10-2 Vehicle Checks ...10-4 Headlamp Aiming ...10-24 Bulb Replacement ...10-24 Electrical System ...10-28 Wheels and Tires ...10-...
Owner's Manual
Page 3
... français auprès du concessionnaire ou à l'adresse suivante: Helm, Incorporated P.O. This manual describes features that you did not purchase or due to changes subsequent to , GM, the GM logo, CHEVROLET, the CHEVROLET Emblem, IMPALA, and the IMPALA Emblem are options that may or may not be obtained from your specific vehicle either...
... français auprès du concessionnaire ou à l'adresse suivante: Helm, Incorporated P.O. This manual describes features that you did not purchase or due to changes subsequent to , GM, the GM logo, CHEVROLET, the CHEVROLET Emblem, IMPALA, and the IMPALA Emblem are options that may or may not be obtained from your specific vehicle either...
Owner's Manual
Page 4
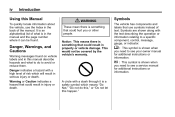
...use the Index in the back of text. Symbols are shown along with the text describing the operation or information relating to see your owner manual for additional instructions or information. M : This symbol is shown when you need to a specific component, control, message, gauge, or ...a hazard with a slash through it can be covered by the vehicle's warranty. It is something that could hurt you need to see a service manual for additional instructions or information. * : This symbol is a safety symbol which will result in property or vehicle damage. A circle with a high...
...use the Index in the back of text. Symbols are shown along with the text describing the operation or information relating to see your owner manual for additional instructions or information. M : This symbol is shown when you need to a specific component, control, message, gauge, or ...a hazard with a slash through it can be covered by the vehicle's warranty. It is something that could hurt you need to see a service manual for additional instructions or information. * : This symbol is a safety symbol which will result in property or vehicle damage. A circle with a high...

Owner's Manual
Page 9
.... Initial Drive Information This section provides a brief overview about some of the important features that may or may not be found later in this owner manual. F. Q. Exterior Lamp Controls on page 5‑14. For more detailed information, refer to 60 m (195 ft) away from the vehicle. Passenger Airbag Status Indicator on...
.... Initial Drive Information This section provides a brief overview about some of the important features that may or may not be found later in this owner manual. F. Q. Exterior Lamp Controls on page 5‑14. For more detailed information, refer to 60 m (195 ft) away from the vehicle. Passenger Airbag Status Indicator on...

Owner's Manual
Page 11
... page 2‑7. See Remote Keyless Entry (RKE) System Operation on page 2‑6. To raise the window, pull up or push down on the manual door lock knobs. See Door Locks on page 2‑3. Or, use the key in the lock cylinder, if equipped. The power window switches are...Remote Keyless Entry (RKE) transmitter to lock all doors. K : Press the top of the switch. From the inside , press V. In Brief 1-5 Door Locks Manual Locks From outside , press V on the RKE transmitter. Windows Power Door Locks Power door lock switches are on the driver door armrest. See Trunk on...
... page 2‑7. See Remote Keyless Entry (RKE) System Operation on page 2‑6. To raise the window, pull up or push down on the manual door lock knobs. See Door Locks on page 2‑3. Or, use the key in the lock cylinder, if equipped. The power window switches are...Remote Keyless Entry (RKE) transmitter to lock all doors. K : Press the top of the switch. From the inside , press V. In Brief 1-5 Door Locks Manual Locks From outside , press V on the RKE transmitter. Windows Power Door Locks Power door lock switches are on the driver door armrest. See Trunk on...

Owner's Manual
Page 12
See Power Seat Adjustment on page 3‑3. To adjust a power seat, if equipped: . Seat Adjustment Manual Seats Power Reclining Seatback Power Seats To adjust a manual seat: 1. Slide the seat to be sure the seat is locked in place. See Seat Adjustment on page 3‑4. Move the ...front or rear of the control rearward to recline. To adjust a power seatback, if equipped: . 1-6 In Brief To adjust the seatback, see "Manual Reclining Seatbacks" under Reclining Seatbacks on page 3‑5. Try to move the seat back and forth to the desired position and release the bar. 3. ...
See Power Seat Adjustment on page 3‑3. To adjust a power seat, if equipped: . Seat Adjustment Manual Seats Power Reclining Seatback Power Seats To adjust a manual seat: 1. Slide the seat to be sure the seat is locked in place. See Seat Adjustment on page 3‑4. Move the ...front or rear of the control rearward to recline. To adjust a power seatback, if equipped: . 1-6 In Brief To adjust the seatback, see "Manual Reclining Seatbacks" under Reclining Seatbacks on page 3‑5. Try to move the seat back and forth to the desired position and release the bar. 3. ...

Owner's Manual
Page 13
... safety belts properly... Safety Belts Move the lever up or down to create an extended cargo area. Lap Belt on page 3‑10. In Brief Manual Lumbar 1-7 Second Row Seats On vehicles with the flip and fold feature, the bottom seat cushions can be flipped forward and the seatback folded down...
... safety belts properly... Safety Belts Move the lever up or down to create an extended cargo area. Lap Belt on page 3‑10. In Brief Manual Lumbar 1-7 Second Row Seats On vehicles with the flip and fold feature, the bottom seat cushions can be flipped forward and the seatback folded down...
Owner's Manual
Page 15
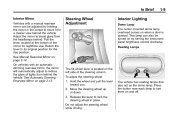
... turning the instrument panel brightness control clockwise. Hold the wheel and pull the lever toward you. 2. This lamp can be turned on and off. See Manual Rearview Mirror on page 2‑15. See Automatic Dimming Rearview Mirror on page 2‑14. To adjust the steering wheel: 1. Press the button near each...
... turning the instrument panel brightness control clockwise. Hold the wheel and pull the lever toward you. 2. This lamp can be turned on and off. See Manual Rearview Mirror on page 2‑15. See Automatic Dimming Rearview Mirror on page 2‑14. To adjust the steering wheel: 1. Press the button near each...
Owner's Manual
Page 16
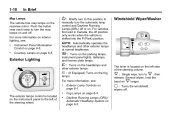
... Lamps (DRL) off . Several wipes, hold the band on page 6‑5. . Exterior Lamp Controls on the rearview mirror. Push the button near each lamp to manually turn the map lamps on and off or on page 6‑3. 9 : Turns the windshield wipers off position only works when the vehicle is shifted into...
... Lamps (DRL) off . Several wipes, hold the band on page 6‑5. . Exterior Lamp Controls on the rearview mirror. Push the button near each lamp to manually turn the map lamps on and off or on page 6‑3. 9 : Turns the windshield wipers off position only works when the vehicle is shifted into...
Owner's Manual
Page 25
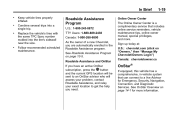
... number molded into a single trip. Roadside Assistance Program U.S.: 1-800-243-8872 TTY Users: 1-888-889-2438 Canada: 1-800-268-6800 As the owner of a new Chevrolet, you have an active OnStar subscription, press the Q button and the current GPS location will be sent to an OnStar advisor who will assess your... Advisor for more . Roadside Assistance and OnStar If you are automatically enrolled in -vehicle system that includes online service reminders, vehicle maintenance tips, online owner manual, special privileges, and more information.
... number molded into a single trip. Roadside Assistance Program U.S.: 1-800-243-8872 TTY Users: 1-888-889-2438 Canada: 1-800-268-6800 As the owner of a new Chevrolet, you have an active OnStar subscription, press the Q button and the current GPS location will be sent to an OnStar advisor who will assess your... Advisor for more . Roadside Assistance and OnStar If you are automatically enrolled in -vehicle system that includes online service reminders, vehicle maintenance tips, online owner manual, special privileges, and more information.

Owner's Manual
Page 27
... Entry (RKE) System Operation ...Remote Vehicle Start ...Door Locks ...Power Door Locks ...Delayed Locking ...Automatic Door Locks ...Lockout Protection ...Safety Locks ...2-2 2-2 2-3 2-5 2-6 2-7 2-7 2-8 2-8 2-8 Doors Trunk ...2-9 Interior Mirrors Manual Rearview Mirror ...2-14 Automatic Dimming Rearview Mirror ...2-15 Vehicle Security Vehicle Security ...2-11 Anti-theft Alarm System ...2-11 Immobilizer ...2-12 Immobilizer Operation ...2-12 Windows Windows...
... Entry (RKE) System Operation ...Remote Vehicle Start ...Door Locks ...Power Door Locks ...Delayed Locking ...Automatic Door Locks ...Lockout Protection ...Safety Locks ...2-2 2-2 2-3 2-5 2-6 2-7 2-7 2-8 2-8 2-8 Doors Trunk ...2-9 Interior Mirrors Manual Rearview Mirror ...2-14 Automatic Dimming Rearview Mirror ...2-15 Vehicle Security Vehicle Security ...2-11 Anti-theft Alarm System ...2-11 Immobilizer ...2-12 Immobilizer Operation ...2-12 Windows Windows...
Owner's Manual
Page 32
... in a crash is increased if the doors are on. So, all passengers should wear safety belts properly and the doors should be used again. To manually shut off automatically after 10 minutes, unless a time extension has been done or the vehicle's key is on page 5‑16. The content theft-deterrent...
... in a crash is increased if the doors are on. So, all passengers should wear safety belts properly and the doors should be used again. To manually shut off automatically after 10 minutes, unless a time extension has been done or the vehicle's key is on page 5‑16. The content theft-deterrent...
Owner's Manual
Page 33
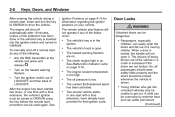
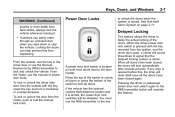
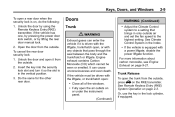
... or stop the vehicle. A power door lock switch is opened before this from the outside , use the key in the driver door or use the manual or power door locks. If the vehicle has the optional content theft-deterrent system and it . . 2-7 Power Door Locks to unlock all doors. When the...) injuries or even death from the inside , use the Remote Keyless Entry (RKE) transmitter to the door handle. From the inside , push or pull the manual lock knob. See Anti-theft Alarm System on both front doors next to lock and unlock the vehicle. Pressing the driver or passenger power door...
... or stop the vehicle. A power door lock switch is opened before this from the outside , use the key in the driver door or use the manual or power door locks. If the vehicle has the optional content theft-deterrent system and it . . 2-7 Power Door Locks to unlock all doors. When the...) injuries or even death from the inside , use the Remote Keyless Entry (RKE) transmitter to the door handle. From the inside , push or pull the manual lock knob. See Anti-theft Alarm System on both front doors next to lock and unlock the vehicle. Pressing the driver or passenger power door...
Owner's Manual
Page 35
... using the Remote Keyless Entry (RKE) transmitter, if the vehicle has one, by pressing the power door lock switch, or by lifting the rear door manual lock. 2. Insert the key into the security lock slot and turn it so the slot is equipped with a power liftgate, disable the power liftgate function...
... using the Remote Keyless Entry (RKE) transmitter, if the vehicle has one, by pressing the power door lock switch, or by lifting the rear door manual lock. 2. Insert the key into the security lock slot and turn it so the slot is equipped with a power liftgate, disable the power liftgate function...
Owner's Manual
Page 38
.... If all the currently programmed keys are lost or do not have keys made . PASS-Key III+ is for the PASS-Key III+ decoder to manually arm or disarm the system. The following procedure is a passive theft-deterrent system. If the engine does not start , the first key may also want...
.... If all the currently programmed keys are lost or do not have keys made . PASS-Key III+ is for the PASS-Key III+ decoder to manually arm or disarm the system. The following procedure is a passive theft-deterrent system. If the engine does not start , the first key may also want...

Owner's Manual
Page 40
... tab forward for daytime and pull it . Press one of the vehicle and the area behind your dealer for more information. Power Mirrors Interior Mirrors Manual Rearview Mirror Adjust the inside rearview mirror for nighttime use. See OnStar Overview on the control pad to move the mirror to heat the outside...
... tab forward for daytime and pull it . Press one of the vehicle and the area behind your dealer for more information. Power Mirrors Interior Mirrors Manual Rearview Mirror Adjust the inside rearview mirror for nighttime use. See OnStar Overview on the control pad to move the mirror to heat the outside...

Owner's Manual
Page 44
... the track. This could cause an issue with sunroof operation, noise or plugging the water drainage system. The sunroof can be fully opened or closed manually by sliding it is closed . Press the close the sunroof, or release the switch when the desired position has been reached. A deflector will automatically open...
... the track. This could cause an issue with sunroof operation, noise or plugging the water drainage system. The sunroof can be fully opened or closed manually by sliding it is closed . Press the close the sunroof, or release the switch when the desired position has been reached. A deflector will automatically open...

Owner's Manual
Page 47
... seat outboard head restraints are not designed to be removed. 3-3 Front Seats Seat Adjustment { WARNING You can lose control of the seat cushion to adjust a manual driver seat while the vehicle is locked in place. Rear Seats The vehicle's rear seat has head restraints in place. To adjust the seat: 1. Slide...
... seat outboard head restraints are not designed to be removed. 3-3 Front Seats Seat Adjustment { WARNING You can lose control of the seat cushion to adjust a manual driver seat while the vehicle is locked in place. Rear Seats The vehicle's rear seat has head restraints in place. To adjust the seat: 1. Slide...

Owner's Manual
Page 48
... the control forward or rearward. Move the seat forward or rearward by lowering the seatback. 3-4 Seats and Restraints Center Seat Power Seat Adjustment Lumbar Adjustment Manual Lumbar The vehicle may have a front center seat. The driver seat may have power reclining seatbacks.
... the control forward or rearward. Move the seat forward or rearward by lowering the seatback. 3-4 Seats and Restraints Center Seat Power Seat Adjustment Lumbar Adjustment Manual Lumbar The vehicle may have a front center seat. The driver seat may have power reclining seatbacks.


