

Owner's Manual
Page 1
... Silverado Owner Manual M In Brief ...1-1 Instrument Panel ...1-2 Initial Drive Information ...1-8 Vehicle Features ...1-25 Performance and Maintenance ...1-32 Keys, Doors and Windows ...2-1 Keys and Locks ...2-2 Doors ...2-9 Vehicle Security...2-11 Exterior Mirrors ...2-14 Interior Mirrors ...2-17 Windows ...2-18 Roof ...2-20 Seats and Restraints ...3-1 Head Restraints ...3-2 Front Seats ...3-3 Rear Seats ...3-11 Safety Belts ...3-12 Airbag System ...3-29 Child Restraints ...3-47 Storage ...4-1 Storage Compartments ...4-1 Instruments and Controls ...5-1 Controls ...5-2 Warning Lights, Gauges...
... Silverado Owner Manual M In Brief ...1-1 Instrument Panel ...1-2 Initial Drive Information ...1-8 Vehicle Features ...1-25 Performance and Maintenance ...1-32 Keys, Doors and Windows ...2-1 Keys and Locks ...2-2 Doors ...2-9 Vehicle Security...2-11 Exterior Mirrors ...2-14 Interior Mirrors ...2-17 Windows ...2-18 Roof ...2-20 Seats and Restraints ...3-1 Head Restraints ...3-2 Front Seats ...3-3 Rear Seats ...3-11 Safety Belts ...3-12 Airbag System ...3-29 Child Restraints ...3-47 Storage ...4-1 Storage Compartments ...4-1 Instruments and Controls ...5-1 Controls ...5-2 Warning Lights, Gauges...
Owner's Manual
Page 2
2011 Chevrolet Silverado Owner Manual M Vehicle Care ...10-1 General Information ...10-2 Vehicle Checks ...10-4 Headlamp Aiming ...10-41 Bulb Replacement ...10-43 Electrical System ...10-47 Wheels and Tires ...10-55 Jump Starting ...10-94 Towing ...10-99 Appearance Care ...10-104 Service and Maintenance ...11-1 General Information ...11-1 Scheduled Maintenance ...11-2 Recommended Fluids, Lubricants, and Parts ...11-8 Maintenance Records ...11-12 Technical Data ...12-1 Vehicle Identification ...12-1 Vehicle Data ...12-2 Customer Information...
2011 Chevrolet Silverado Owner Manual M Vehicle Care ...10-1 General Information ...10-2 Vehicle Checks ...10-4 Headlamp Aiming ...10-41 Bulb Replacement ...10-43 Electrical System ...10-47 Wheels and Tires ...10-55 Jump Starting ...10-94 Towing ...10-99 Appearance Care ...10-104 Service and Maintenance ...11-1 General Information ...11-1 Scheduled Maintenance ...11-2 Recommended Fluids, Lubricants, and Parts ...11-8 Maintenance Records ...11-12 Technical Data ...12-1 Vehicle Identification ...12-1 Vehicle Data ...12-2 Customer Information...
Owner's Manual
Page 7
...® System ...1-32 Tire Pressure Monitor ...1-33 Engine Oil Life System ...1-33 Fuel E85 (85% Ethanol) ...1-34 Driving for Passenger Airbag ...Mirror Adjustment ...Steering Wheel Adjustment ...Throttle and Brake Pedal Adjustment ...Interior Lighting ...Exterior Lighting ...Windshield Wiper/Washer ...Climate Controls ...Transmission ...Four-Wheel Drive ... 1-15 1-16 1-17 1-17 1-17 1-18 1-19 1-20 1-22 1-23 1-25 1-26 1-26 1-27 1-27 1-28 1-28 Driver Information Center (DIC) ...Rear Vision Camera (RVC) ...Ultrasonic Parking Assist ...Power Outlets ...Universal Remote System ...Sunroof ... In...
...® System ...1-32 Tire Pressure Monitor ...1-33 Engine Oil Life System ...1-33 Fuel E85 (85% Ethanol) ...1-34 Driving for Passenger Airbag ...Mirror Adjustment ...Steering Wheel Adjustment ...Throttle and Brake Pedal Adjustment ...Interior Lighting ...Exterior Lighting ...Windshield Wiper/Washer ...Climate Controls ...Transmission ...Four-Wheel Drive ... 1-15 1-16 1-17 1-17 1-17 1-18 1-19 1-20 1-22 1-23 1-25 1-26 1-26 1-27 1-27 1-28 1-28 Driver Information Center (DIC) ...Rear Vision Camera (RVC) ...Ultrasonic Parking Assist ...Power Outlets ...Universal Remote System ...Sunroof ... In...
Owner's Manual
Page 9
B. See Automatic Transmission on page 7‑1. Tow/Haul Selector Button (If Equipped). G. Infotainment on page 9‑42. I. 1-3 Integrated Trailer Brake Controller (If Equipped). See Trailer Towing on page 6‑6. Hood Release. Turn and Lane‐Change Lever. See Turn and Lane-Change Signals on page 9‑89. See Driver Information Center (DIC) on page 5‑12. Instrument Cluster on page 5‑32. Shift Lever. K. H. Instrument Panel Storage on page 10‑5. See Hood on...
B. See Automatic Transmission on page 7‑1. Tow/Haul Selector Button (If Equipped). G. Infotainment on page 9‑42. I. 1-3 Integrated Trailer Brake Controller (If Equipped). See Trailer Towing on page 6‑6. Hood Release. Turn and Lane‐Change Lever. See Turn and Lane-Change Signals on page 9‑89. See Driver Information Center (DIC) on page 5‑12. Instrument Cluster on page 5‑32. Shift Lever. K. H. Instrument Panel Storage on page 10‑5. See Hood on...

Owner's Manual
Page 13
... Parking Assist on page 5‑4. See "Brakes" in the Duramax diesel supplement. See Airbag On-Off Switch on page 5‑32. See Driver Information Center (DIC) on page 3‑37. I. Exterior Lamp Controls on page 5‑4. Windshield Wiper/Washer on page 6‑1. Shift Lever. J. O. S. Turn and Lane‐Change Lever. See Manual Mode on page 10‑5. See Hood on page 9‑45. Q. Steering Wheel Controls on page 5‑9. T. Power...
... Parking Assist on page 5‑4. See "Brakes" in the Duramax diesel supplement. See Airbag On-Off Switch on page 5‑32. See Driver Information Center (DIC) on page 3‑37. I. Exterior Lamp Controls on page 5‑4. Windshield Wiper/Washer on page 6‑1. Shift Lever. J. O. S. Turn and Lane‐Change Lever. See Manual Mode on page 10‑5. See Hood on page 9‑45. Q. Steering Wheel Controls on page 5‑9. T. Power...
Owner's Manual
Page 14
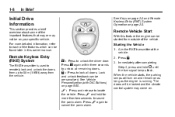
... later in this feature the engine can be locked and the climate control system may not be personalized. Remote Vehicle Start With this owner manual. Press K again within three seconds to sound the panic alarm. L : Press and release to cancel the panic alarm. Press L again to locate the vehicle. For more than two seconds to unlock all doors. Press to lock all remaining doors. Remote Keyless Entry (RKE) System...
... later in this feature the engine can be locked and the climate control system may not be personalized. Remote Vehicle Start With this owner manual. Press K again within three seconds to sound the panic alarm. L : Press and release to cancel the panic alarm. Press L again to locate the vehicle. For more than two seconds to unlock all doors. Press to lock all remaining doors. Remote Keyless Entry (RKE) System...
Owner's Manual
Page 22
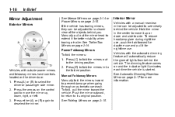
... driving position. Vehicles with outside power mirrors and foldaway mirrors have controls located on the control pad to extend it for better visibility when towing a trailer. Press the arrows on the driver door. 1. To fold, pull the mirror toward the vehicle. Power Foldaway Mirrors To fold the mirrors: 1. Hold the mirror in to see clearly behind the vehicle. Vehicles with a manual rearview mirror can be adjusted to the folded position. See Automatic Dimming Rearview Mirror...
... driving position. Vehicles with outside power mirrors and foldaway mirrors have controls located on the control pad to extend it for better visibility when towing a trailer. Press the arrows on the driver door. 1. To fold, pull the mirror toward the vehicle. Power Foldaway Mirrors To fold the mirrors: 1. Hold the mirror in to see clearly behind the vehicle. Vehicles with a manual rearview mirror can be adjusted to the folded position. See Automatic Dimming Rearview Mirror...

Owner's Manual
Page 45
Keys, Doors and Windows 2-1 Keys, Doors and Windows Keys and Locks Keys ...Remote Keyless Entry (RKE) System ...Remote Keyless Entry (RKE) System Operation ...Remote Vehicle Start ...Door Locks ...Power Door Locks ...Delayed Locking ...Automatic Door Locks ...Lockout Protection ...Safety Locks ...2-2 2-2 2-3 2-5 2-7 2-8 2-8 2-8 2-8 2-8 Doors Rear Doors (Extended Cab) ...2-9 Tailgate ...2-10 Interior Mirrors Manual Rearview Mirror ...2-17 Automatic Dimming Rearview Mirror ...2-17 Vehicle Security Vehicle Security ...2-11 Anti-theft Alarm System ...2-11 Immobilizer ...2-12 Immobilizer ...
Keys, Doors and Windows 2-1 Keys, Doors and Windows Keys and Locks Keys ...Remote Keyless Entry (RKE) System ...Remote Keyless Entry (RKE) System Operation ...Remote Vehicle Start ...Door Locks ...Power Door Locks ...Delayed Locking ...Automatic Door Locks ...Lockout Protection ...Safety Locks ...2-2 2-2 2-3 2-5 2-7 2-8 2-8 2-8 2-8 2-8 Doors Rear Doors (Extended Cab) ...2-9 Tailgate ...2-10 Interior Mirrors Manual Rearview Mirror ...2-17 Automatic Dimming Rearview Mirror ...2-17 Vehicle Security Vehicle Security ...2-11 Anti-theft Alarm System ...2-11 Immobilizer ...2-12 Immobilizer ...
Owner's Manual
Page 54
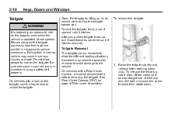
2-10 Keys, Doors and Windows Open the tailgate by lifting up , pull it back towards you to be sure it latches securely. On vehicles with removal to avoid damage to the vehicle. Lift the clip over the bolt, and push the cable forward then rotate down. People riding on the tailgate, even when the vehicle is in your vehicle is operated at...
2-10 Keys, Doors and Windows Open the tailgate by lifting up , pull it back towards you to be sure it latches securely. On vehicles with removal to avoid damage to the vehicle. Lift the clip over the bolt, and push the cable forward then rotate down. People riding on the tailgate, even when the vehicle is in your vehicle is operated at...
Owner's Manual
Page 56
... key in through the window, unlock the door with the key or the manual door lock. Reach in the ignition and turn it should set off the alarm by accident: . Immobilizer See Radio Frequency Statement on page 10‑48. You do not want to see Fuses and Circuit Breakers on page 13‑18 for service. To replace the fuse, see if the horn works. The vehicle...
... key in through the window, unlock the door with the key or the manual door lock. Reach in the ignition and turn it should set off the alarm by accident: . Immobilizer See Radio Frequency Statement on page 10‑48. You do not want to see Fuses and Circuit Breakers on page 13‑18 for service. To replace the fuse, see if the horn works. The vehicle...

Owner's Manual
Page 100
.... See Vehicle Load Limits on the rear edge of the driver seat (all models), and on crew cab and extended cab models the right front passenger seat on page 3‑29. The threshold level can find the GVWR on the certification label on page 9‑22 for more information. Roof-rail airbags are intended to severe side crashes. For seat‐mounted side impact and roof-rail airbags, deployment...
.... See Vehicle Load Limits on the rear edge of the driver seat (all models), and on crew cab and extended cab models the right front passenger seat on page 3‑29. The threshold level can find the GVWR on the certification label on page 9‑22 for more information. Roof-rail airbags are intended to severe side crashes. For seat‐mounted side impact and roof-rail airbags, deployment...
Owner's Manual
Page 151
...;FM Radio with a Single CD or a Single CD and DVD Player To adjust the time and date: 1. Press the H button until CALIBRATE COMPASS displays. 3. Turn the ignition key to ACC/ ACCESSORY or ON/RUN, then press the O button to change the time format. 5. The DIC will display CALIBRATING: DRIVE IN CIRCLES. Press the H button to start the compass calibration. Press the vehicle information...
...;FM Radio with a Single CD or a Single CD and DVD Player To adjust the time and date: 1. Press the H button until CALIBRATE COMPASS displays. 3. Turn the ignition key to ACC/ ACCESSORY or ON/RUN, then press the O button to change the time format. 5. The DIC will display CALIBRATING: DRIVE IN CIRCLES. Press the H button to start the compass calibration. Press the vehicle information...
Owner's Manual
Page 285
...29 Fast Idle System ...Retained Accessory Power (RAP) ...Engine Coolant Heater ...Shifting Into Park ...Shifting out of Park ...Parking (Manual Transmission) ...Parking over Things That Burn ...Active Fuel Management® ... 9-35 9-36 9-36 9-37 9-38 9-39 9-39 9-40 Brakes Antilock Brake System (ABS) ...Parking Brake ...Brake Assist (Except With 4.3L V6 Engine) ...Hill Start Assist (HSA) ...9-63 9-64 9-66 9-66 Ride Control Systems StabiliTrak® System ...9-67 Locking Rear Axle ...9-69 Cruise Control ...9-69 Engine Exhaust Engine Exhaust ...9-40 Running the Vehicle While Parked ...9-41...
...29 Fast Idle System ...Retained Accessory Power (RAP) ...Engine Coolant Heater ...Shifting Into Park ...Shifting out of Park ...Parking (Manual Transmission) ...Parking over Things That Burn ...Active Fuel Management® ... 9-35 9-36 9-36 9-37 9-38 9-39 9-39 9-40 Brakes Antilock Brake System (ABS) ...Parking Brake ...Brake Assist (Except With 4.3L V6 Engine) ...Hill Start Assist (HSA) ...9-63 9-64 9-66 9-66 Ride Control Systems StabiliTrak® System ...9-67 Locking Rear Axle ...9-69 Cruise Control ...9-69 Engine Exhaust Engine Exhaust ...9-40 Running the Vehicle While Parked ...9-41...
Owner's Manual
Page 291
... attached. The airbag system is held in the area. Avoid sharp turns and abrupt maneuvers. Be sure to off -road driving safer and more ground clearance at the front of your safety belt and observe safe driving speeds, especially on any road and this manual. Drinking and driving can be driving or check with a driver who has been drinking. At the very time you will...
... attached. The airbag system is held in the area. Avoid sharp turns and abrupt maneuvers. Be sure to off -road driving safer and more ground clearance at the front of your safety belt and observe safe driving speeds, especially on any road and this manual. Drinking and driving can be driving or check with a driver who has been drinking. At the very time you will...
Owner's Manual
Page 365
... designed for the TOP TIER label on the fuel pump to use these gasolines, if they comply with the specifications described earlier. It can reduce spark plug life and affect emission control system performance. We recommend against the use only the unleaded gasoline described under the vehicle warranty. For all other fuels containing more than 10% ethanol must not be...
... designed for the TOP TIER label on the fuel pump to use these gasolines, if they comply with the specifications described earlier. It can reduce spark plug life and affect emission control system performance. We recommend against the use only the unleaded gasoline described under the vehicle warranty. For all other fuels containing more than 10% ethanol must not be...

Owner's Manual
Page 398
... a trailer equipped with the trailer attached on a level road surface representative of the towing condition and free of the vehicle and trailer. Connecting a trailer without electric brakes will be adjusted any time vehicle loading, trailer loading, or road surface conditions change. Connect a properly loaded trailer to correctly adjust Trailer Gain for the best trailer stopping performance. The trailer's and the vehicle's brake lamps will come on the DIC showing TRAILER GAIN and TRAILER OUTPUT. . A trailer that...
... a trailer equipped with the trailer attached on a level road surface representative of the towing condition and free of the vehicle and trailer. Connecting a trailer without electric brakes will be adjusted any time vehicle loading, trailer loading, or road surface conditions change. Connect a properly loaded trailer to correctly adjust Trailer Gain for the best trailer stopping performance. The trailer's and the vehicle's brake lamps will come on the DIC showing TRAILER GAIN and TRAILER OUTPUT. . A trailer that...
Owner's Manual
Page 459
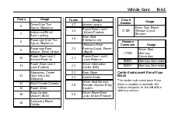
...Body Control Module (BCM) Accessory Power Outlets 26 Fuses 17 18 19 20 21 22 23 24 25 Usage Interior Lamps Power Door Lock 1 (Unlock Feature) Rear Seat Entertainment Ultrasonic Rear Parking Assist, Power Liftgate Power Door Lock 1 (Lock Feature) Driver Information Center (DIC) Rear Wiper Cooled Seats Driver Seat Module, Remote Keyless Entry System Driver Power Door Lock (Unlock Feature) Circuit Breaker LT DR Usage 10-53 Driver Side Power Window Circuit Breaker Harness Connector LT DR BODY BODY Usage Driver Door Harness Connection Harness Connector Harness Connector Center Instrument Panel...
...Body Control Module (BCM) Accessory Power Outlets 26 Fuses 17 18 19 20 21 22 23 24 25 Usage Interior Lamps Power Door Lock 1 (Unlock Feature) Rear Seat Entertainment Ultrasonic Rear Parking Assist, Power Liftgate Power Door Lock 1 (Lock Feature) Driver Information Center (DIC) Rear Wiper Cooled Seats Driver Seat Module, Remote Keyless Entry System Driver Power Door Lock (Unlock Feature) Circuit Breaker LT DR Usage 10-53 Driver Side Power Window Circuit Breaker Harness Connector LT DR BODY BODY Usage Driver Door Harness Connection Harness Connector Harness Connector Center Instrument Panel...

Owner's Manual
Page 480
... tire was developed for additional information. { WARNING Mixing tires of the vehicle, including brake system performance, ride and handling, traction control, and tire pressure monitoring performance. Only your dealer or authorized tire service center should mount or dismount the tires. When new, the vehicle included a spare tire and wheel assembly with the same TPC Spec rating. The original equipment tires installed were designed to drive on the vehicle. If the tires have a different size spare than the road tires...
... tire was developed for additional information. { WARNING Mixing tires of the vehicle, including brake system performance, ride and handling, traction control, and tire pressure monitoring performance. Only your dealer or authorized tire service center should mount or dismount the tires. When new, the vehicle included a spare tire and wheel assembly with the same TPC Spec rating. The original equipment tires installed were designed to drive on the vehicle. If the tires have a different size spare than the road tires...
Owner's Manual
Page 523
...-5 Tire inflation pressures check. See Starter Switch Check on page 2‑21. Hood/Decklid/Liftgate/Liftglass Support Gas Strut Service: Visually inspect gas strut, if equipped, for signs of the transfer case and should be taken to be replaced. First Engine Oil Change After Every 40 000 km/25,000 Miles . . . . . . . Contaminated fluid will decrease the life of wear, cracks, or other damage. See Sunroof (Extended Cab) on...
...-5 Tire inflation pressures check. See Starter Switch Check on page 2‑21. Hood/Decklid/Liftgate/Liftglass Support Gas Strut Service: Visually inspect gas strut, if equipped, for signs of the transfer case and should be taken to be replaced. First Engine Oil Change After Every 40 000 km/25,000 Miles . . . . . . . Contaminated fluid will decrease the life of wear, cracks, or other damage. See Sunroof (Extended Cab) on...
Owner's Manual
Page 563
...) ...9-66 Hood ...10-5 Horn ...5-4 How to Wear Safety Belts Properly ...3-16 Hydraulic Clutch ...10-19 i-7 J Jump Starting ...10-94 K Key and Lock Messages ...5-45 Keyless Entry Remote (RKE) System ...2-3 Keys ...2-2 I Idle System Fast ...9-35 Ignition Positions ...9-32 Ignition Transmission Lock Check ...10-39 Immobilizer ...2-12 Infants and Young Children, Restraints ...3-50 Infotainment ...7-1 Instrument Cluster ...5-12 Instrument Panel Storage Area ...4-1 Introduction ...iii L Labeling, Tire Sidewall ...10-56 Lamp Messages ...5-45 Lamps Auxiliary Roof Mounted Lamp...
...) ...9-66 Hood ...10-5 Horn ...5-4 How to Wear Safety Belts Properly ...3-16 Hydraulic Clutch ...10-19 i-7 J Jump Starting ...10-94 K Key and Lock Messages ...5-45 Keyless Entry Remote (RKE) System ...2-3 Keys ...2-2 I Idle System Fast ...9-35 Ignition Positions ...9-32 Ignition Transmission Lock Check ...10-39 Immobilizer ...2-12 Infants and Young Children, Restraints ...3-50 Infotainment ...7-1 Instrument Cluster ...5-12 Instrument Panel Storage Area ...4-1 Introduction ...iii L Labeling, Tire Sidewall ...10-56 Lamp Messages ...5-45 Lamps Auxiliary Roof Mounted Lamp...


