Owner's Manual
Page 1
2010 Chevrolet Tahoe/Suburban Owner Manual M In Brief ...1-1 Instrument Panel ...1-2 Initial Drive Information ...1-4 Vehicle Features ...1-22 Performance and Maintenance ...1-28 Seats and Restraint System ...2-1 Head Restraints ...2-3 Front Seats ...2-5 Rear Seats ...2-16 ...
2010 Chevrolet Tahoe/Suburban Owner Manual M In Brief ...1-1 Instrument Panel ...1-2 Initial Drive Information ...1-4 Vehicle Features ...1-22 Performance and Maintenance ...1-28 Seats and Restraint System ...2-1 Head Restraints ...2-3 Front Seats ...2-5 Rear Seats ...2-16 ...
Owner's Manual
Page 2
2010 Chevrolet Tahoe/Suburban Owner Manual M Service and Appearance Care ...6-1 Service ...6-4 Fuel ...6-6 Checking Things Under the Hood ...6-14 Rear Axle ...6-51 Four-Wheel Drive ...6-53 Front Axle ...6-54 Headlamp Aiming ...6-55 ...
2010 Chevrolet Tahoe/Suburban Owner Manual M Service and Appearance Care ...6-1 Service ...6-4 Fuel ...6-6 Checking Things Under the Hood ...6-14 Rear Axle ...6-51 Four-Wheel Drive ...6-53 Front Axle ...6-54 Headlamp Aiming ...6-55 ...
Owner's Manual
Page 3
...: GENERAL MOTORS, GM, the GM Emblem, CHEVROLET, the CHEVROLET Emblem, and the names TAHOE, SUBURBAN, and Z71 are options that you did not purchase or due to changes subsequent to confirm each of the features found . © 2010 General Motors LLC. For vehicles first sold in this manual. Box 07130 Detroit, MI 48207 1-800-551...
...: GENERAL MOTORS, GM, the GM Emblem, CHEVROLET, the CHEVROLET Emblem, and the names TAHOE, SUBURBAN, and Z71 are options that you did not purchase or due to changes subsequent to confirm each of the features found . © 2010 General Motors LLC. For vehicles first sold in this manual. Box 07130 Detroit, MI 48207 1-800-551...

Owner's Manual
Page 4
... symbols instead of risk which means "Do Not," "Do not do this," or "Do not let this manual describe hazards and what to do to see a service manual for additional instructions or information. * : This symbol is something that could result in this happen." Vehicle Symbols... is shown when you need to avoid or reduce them. A circle with the text describing the operation or information relating to see your owner manual for additional instructions or information. Warning or Caution indicates a hazard that could hurt you need to a specific component, control, message, gauge, ...
... symbols instead of risk which means "Do Not," "Do not do this," or "Do not let this manual describe hazards and what to do to see a service manual for additional instructions or information. * : This symbol is something that could result in this happen." Vehicle Symbols... is shown when you need to avoid or reduce them. A circle with the text describing the operation or information relating to see your owner manual for additional instructions or information. Warning or Caution indicates a hazard that could hurt you need to a specific component, control, message, gauge, ...

Owner's Manual
Page 10
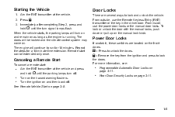
For more than two seconds to lock all remaining doors. Remote Vehicle Start With this owner manual. Press Q to sound the panic alarm. Press K again within three seconds to each of the features which can be found later in this feature the ...
For more than two seconds to lock all remaining doors. Remote Vehicle Start With this owner manual. Press Q to sound the panic alarm. Press K again within three seconds to each of the features which can be found later in this feature the ...
Owner's Manual
Page 11
... . For more information, see: . Turn the ignition on the front doors. Programmable Automatic Door Locks on the manual lock knob. From outside, use the power door locks or the manual door locks. Starting the Vehicle 1. Press Door Locks There are located on and then back off . Immediately after ...and the climate control system may come on. Aim the RKE transmitter at the vehicle. 2. To lock or unlock the door with the manual locks, push down or pull up on page 3‑11. When the vehicle starts, the parking lamps will be extended only once. See...
... . For more information, see: . Turn the ignition on the front doors. Programmable Automatic Door Locks on the manual lock knob. From outside, use the power door locks or the manual door locks. Starting the Vehicle 1. Press Door Locks There are located on and then back off . Immediately after ...and the climate control system may come on. Aim the RKE transmitter at the vehicle. 2. To lock or unlock the door with the manual locks, push down or pull up on page 3‑11. When the vehicle starts, the parking lamps will be extended only once. See...
Owner's Manual
Page 13
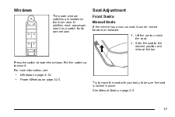
... place. Pull the switch up to unlock the seat. 2. Windows on page 2‑5. 1-7 Slide the seat to lower the window. For more information, see: . . See Manual Seats on page 3‑19. Power Windows on the driver door. Try to move the seat with your body to be moved forward or rearward.... 1. Windows The power window switches are located on page 3‑20. Seat Adjustment Front Seats Manual Seats If the vehicle has a manual seat, it . Press the switch to the desired position and release the bar.
... place. Pull the switch up to unlock the seat. 2. Windows on page 2‑5. 1-7 Slide the seat to lower the window. For more information, see: . . See Manual Seats on page 3‑19. Power Windows on the driver door. Try to move the seat with your body to be moved forward or rearward.... 1. Windows The power window switches are located on page 3‑20. Seat Adjustment Front Seats Manual Seats If the vehicle has a manual seat, it . Press the switch to the desired position and release the bar.

Owner's Manual
Page 14
See Power Seats on page 2‑6. 1-8 Raise or lower the front or rear part of the control up or down . Increase or decrease lumbar support by sliding the control forward or rearward. Move the seat forward or rearward by turning the knob forward or rearward. Raise or lower the entire seat by moving the front or rear part of the cushion by moving the entire control up or down . If equipped, the power seat controls are located on the outboard side of the seat. Power Seats Manual Lumbar If equipped, this control is located on the outboard side of the front seats.
See Power Seats on page 2‑6. 1-8 Raise or lower the front or rear part of the control up or down . Increase or decrease lumbar support by sliding the control forward or rearward. Move the seat forward or rearward by turning the knob forward or rearward. Raise or lower the entire seat by moving the front or rear part of the cushion by moving the entire control up or down . If equipped, the power seat controls are located on the outboard side of the seat. Power Seats Manual Lumbar If equipped, this control is located on the outboard side of the front seats.
Owner's Manual
Page 16
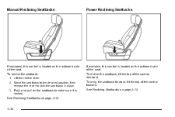
... lever. 2. To recline the seatback, tilt the top of the control forward. If available, this control is located on the outboard side of the seat. Manual Reclining Seatbacks Power Reclining Seatbacks If equipped, this control is located on the outboard side of the seat. To recline the seatback: 1.
... lever. 2. To recline the seatback, tilt the top of the control forward. If available, this control is located on the outboard side of the seat. Manual Reclining Seatbacks Power Reclining Seatbacks If equipped, this control is located on the outboard side of the seat. To recline the seatback: 1.
Owner's Manual
Page 17
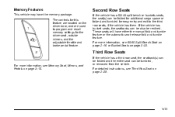
... on page 2‑10. For detailed instructions, see Memory Seat, Mirrors, and Pedals on page 2‑22. Memory Features This vehicle may have either the manual fold and tumble feature or the automatic seat release fold and tumble feature.
... on page 2‑10. For detailed instructions, see Memory Seat, Mirrors, and Pedals on page 2‑22. Memory Features This vehicle may have either the manual fold and tumble feature or the automatic seat release fold and tumble feature.

Owner's Manual
Page 20
... the mirror head to adjust the mirror. 3. Vehicles with manual outside power mirrors and foldaway mirrors have controls located on the control pad to extend it for a clearer view of the objects behind are seen. ...
... the mirror head to adjust the mirror. 3. Vehicles with manual outside power mirrors and foldaway mirrors have controls located on the control pad to extend it for a clearer view of the objects behind are seen. ...

Owner's Manual
Page 21
... the center to move it for more information. See Memory Seat, Mirrors, and Pedals on page 3‑54 for more information. Manual Foldaway Mirrors Manually fold the mirrors inward to the folded position. Press (C) to fold the mirrors out to its original position. 1-15 See Automatic ... to prevent damage when going through an automatic car wash. Power Foldaway Mirrors To fold the mirrors: 1. Interior Mirror Vehicles with a manual rearview mirror can be adjusted to side. The dimming feature comes on and the indicator light illuminates each time the vehicle is started.
... the center to move it for more information. See Memory Seat, Mirrors, and Pedals on page 3‑54 for more information. Manual Foldaway Mirrors Manually fold the mirrors inward to the folded position. Press (C) to fold the mirrors out to its original position. 1-15 See Automatic ... to prevent damage when going through an automatic car wash. Power Foldaway Mirrors To fold the mirrors: 1. Interior Mirror Vehicles with a manual rearview mirror can be adjusted to side. The dimming feature comes on and the indicator light illuminates each time the vehicle is started.

Owner's Manual
Page 25
... heating, cooling, and ventilation in the vehicle can be controlled with these systems. If this vehicle is a Two-mode Hybrid, see the Two-mode Hybrid manual for more information. REAR A. Fan Control B. Rear Window Defogger F. Air Recirculation E. Air Recirculation D. Air Conditioning L.
... heating, cooling, and ventilation in the vehicle can be controlled with these systems. If this vehicle is a Two-mode Hybrid, see the Two-mode Hybrid manual for more information. REAR A. Fan Control B. Rear Window Defogger F. Air Recirculation E. Air Recirculation D. Air Conditioning L.
Owner's Manual
Page 26
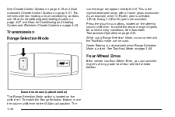
... the column shift lever to the M. The 1-20 For vehicles with all four wheels for current driving conditions. current range will appear next to the M (Manual) position. See Automatic Transmission Operation on page 4‑28. Grade Braking is not available when Range Selection Mode is selected, 1 (First) through 4 (Fourth) gears are...
... the column shift lever to the M. The 1-20 For vehicles with all four wheels for current driving conditions. current range will appear next to the M (Manual) position. See Automatic Transmission Operation on page 4‑28. Grade Braking is not available when Range Selection Mode is selected, 1 (First) through 4 (Fourth) gears are...
Owner's Manual
Page 31
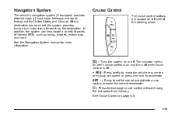
Navigation System The vehicle's navigation system (if equipped) provides detailed maps of the steering wheel. See the Navigation System manual for reaching the destination. See Cruise Control on or off. Cruise Control The cruise control buttons are located on and turns off . + RES : Press briefly ...
Navigation System The vehicle's navigation system (if equipped) provides detailed maps of the steering wheel. See the Navigation System manual for reaching the destination. See Cruise Control on or off. Cruise Control The cruise control buttons are located on and turns off . + RES : Press briefly ...

Owner's Manual
Page 34
... to close the sunroof, fully press and release the front of the passenger side switch to turn off both systems. . Manual-Open/Manual-Close: To open the sunroof, fully press and release the rear of the driver side switch until the sunroof reaches the desired...illuminates and the appropriate DIC message displays. For more information, see StabiliTrak® System on page 4‑62. Vent: From the closed manually. See DIC Warnings and Messages on page 5‑6. 1-28 See Sunroof on both traction control and Electronic Stability Control, press and hold ...
... to close the sunroof, fully press and release the front of the passenger side switch to turn off both systems. . Manual-Open/Manual-Close: To open the sunroof, fully press and release the rear of the driver side switch until the sunroof reaches the desired...illuminates and the appropriate DIC message displays. For more information, see StabiliTrak® System on page 4‑62. Vent: From the closed manually. See DIC Warnings and Messages on page 5‑6. 1-28 See Sunroof on both traction control and Electronic Stability Control, press and hold ...
Owner's Manual
Page 36
... advisors who will assess your problem, contact Roadside Assistance, and relay exact location to 85% ethanol (E85). Driving for long periods of a new Chevrolet, you need. . ... Here are some driving tips to get you the help you are available 24 hours a day, 365 days a year,...... Avoid idling the engine for Better Fuel Economy Driving habits can use either unleaded gasoline or ethanol fuel containing up today at: www.gmownercenter.com/chevrolet (U.S.) or www.gm.ca (Canada). . 1-30 See Fuel E85 (85% Ethanol) on page 8‑7. Fuel E85 (85% Ethanol) Vehicles ...
... advisors who will assess your problem, contact Roadside Assistance, and relay exact location to 85% ethanol (E85). Driving for long periods of a new Chevrolet, you need. . ... Here are some driving tips to get you the help you are available 24 hours a day, 365 days a year,...... Avoid idling the engine for Better Fuel Economy Driving habits can use either unleaded gasoline or ethanol fuel containing up today at: www.gmownercenter.com/chevrolet (U.S.) or www.gm.ca (Canada). . 1-30 See Fuel E85 (85% Ethanol) on page 8‑7. Fuel E85 (85% Ethanol) Vehicles ...

Owner's Manual
Page 39
... Front Seat Position ...2-33 2-33 2-38 2-47 2-55 2-55 2-56 2-57 2-57 2-59 2-63 2-66 2-68 2-75 2-80 2-80 Head Restraints ...2-3 Front Seats ...2-5 Manual Seats ...2-5 Power Seats ...2-6 Manual Lumbar ...2-7 Power Lumbar ...2-7 Heated Seats ...2-8 Heated and Cooled Seats ...2-9 Memory Seat, Mirrors, and Pedals ...2-10 Reclining Seatbacks ...2-12 Center Seat ...2-15 Rear Seats ...2-16...
... Front Seat Position ...2-33 2-33 2-38 2-47 2-55 2-55 2-56 2-57 2-57 2-59 2-63 2-66 2-68 2-75 2-80 2-80 Head Restraints ...2-3 Front Seats ...2-5 Manual Seats ...2-5 Power Seats ...2-6 Manual Lumbar ...2-7 Power Lumbar ...2-7 Heated Seats ...2-8 Heated and Cooled Seats ...2-9 Memory Seat, Mirrors, and Pedals ...2-10 Reclining Seatbacks ...2-12 Center Seat ...2-15 Rear Seats ...2-16...

Owner's Manual
Page 43
Adjust the driver seat only when the vehicle is not moving . The sudden movement could startle and confuse you, or make you push a pedal when you try to adjust a manual driver seat while the vehicle is moving . Try to move the seat with your body to . Front Seats Manual Seats If the vehicle has a manual seat, it can lose control of the vehicle if you do not want to be moved forward or rearward. 1. Lift the bar to the desired position and release the bar. { WARNING: You can be sure the seat is locked in place. 2-5 Slide the seat to unlock the seat. 2.
Adjust the driver seat only when the vehicle is not moving . The sudden movement could startle and confuse you, or make you push a pedal when you try to adjust a manual driver seat while the vehicle is moving . Try to move the seat with your body to . Front Seats Manual Seats If the vehicle has a manual seat, it can lose control of the vehicle if you do not want to be moved forward or rearward. 1. Lift the bar to the desired position and release the bar. { WARNING: You can be sure the seat is locked in place. 2-5 Slide the seat to unlock the seat. 2.

Owner's Manual
Page 45
This vehicle may have 2-way lumbar. . Manual Lumbar Power Lumbar On vehicles with power lumbar, the controls used to operate this feature the control is located on the outboard side of the seats. To increase lumbar support, press and hold the bottom of the control. . 2-7 Increase or decrease lumbar support by turning the knob forward or rearward. On seats with this feature are located on the outboard side of the control. To decrease lumbar support, press and hold the top of the seat.
This vehicle may have 2-way lumbar. . Manual Lumbar Power Lumbar On vehicles with power lumbar, the controls used to operate this feature the control is located on the outboard side of the seats. To increase lumbar support, press and hold the bottom of the control. . 2-7 Increase or decrease lumbar support by turning the knob forward or rearward. On seats with this feature are located on the outboard side of the control. To decrease lumbar support, press and hold the top of the seat.


