Owner's Manual
Page 20
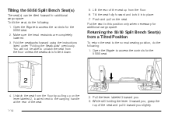
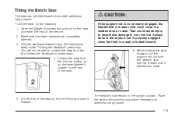
Open the liftgate to access the controls for the 50/50 seat. 4. Unlatch the seat from the floor. 6. Tilting the 50/50 Split Bench Seat(s) The seat(s) ... from the floor by pulling up on the seat. Put the seat in this position only when necessary for additional cargo space. Open the liftgate to access the controls for the 50/50 seat. 2. Fold the seatbacks forward using the instructions listed under "Folding the Seatbacks" previously. Push and pull...
Open the liftgate to access the controls for the 50/50 seat. 4. Unlatch the seat from the floor. 6. Tilting the 50/50 Split Bench Seat(s) The seat(s) ... from the floor by pulling up on the seat. Put the seat in this position only when necessary for additional cargo space. Open the liftgate to access the controls for the 50/50 seat. 2. Fold the seatbacks forward using the instructions listed under "Folding the Seatbacks" previously. Push and pull...
Owner's Manual
Page 21
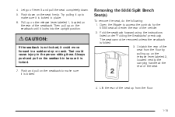
... it is folded. 3. Let go of the vehicle. 2. Try pulling it up to make sure it is locked in a sudden stop or crash. Open the liftgate to access the controls for the 50/50 seat and enter the rear of lever 3 and pull the seat completely down on the seatback to...
... it is folded. 3. Let go of the vehicle. 2. Try pulling it up to make sure it is locked in a sudden stop or crash. Open the liftgate to access the controls for the 50/50 seat and enter the rear of lever 3 and pull the seat completely down on the seatback to...
Owner's Manual
Page 22
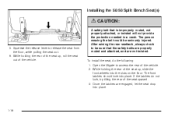
... is improperly routed, not properly attached, or twisted will not provide the protection needed in a crash. The front latches should lock into place. 5. Open the liftgate to release the seat from the floor, while pulling the seat out. 6. After raising the rear seatback, always check to be seriously injured. If...
... is improperly routed, not properly attached, or twisted will not provide the protection needed in a crash. The front latches should lock into place. 5. Open the liftgate to release the seat from the floor, while pulling the seat out. 6. After raising the rear seatback, always check to be seriously injured. If...
Owner's Manual
Page 25
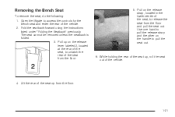
... for additional cargo space. 1-19 Lift the rear of the seat up on the lever labeled 2, located on the rear of the vehicle. 2. Open the liftgate to your vehicle. Fold the seatback forward using the instructions listed under "Folding the Seatback" previously. Place the seat in this position only when necessary...
... for additional cargo space. 1-19 Lift the rear of the seat up on the lever labeled 2, located on the rear of the vehicle. 2. Open the liftgate to your vehicle. Fold the seatback forward using the instructions listed under "Folding the Seatback" previously. Place the seat in this position only when necessary...

Owner's Manual
Page 26
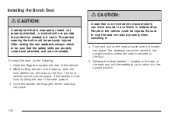
... and push firmly down until it unlatches from a Tilted Position To return the seat to make sure it is locked into place. 6. Open the liftgate to access the controls for the bench seat and enter the rear of the seatback, and then pull up on the seatback to be sure...
... and push firmly down until it unlatches from a Tilted Position To return the seat to make sure it is locked into place. 6. Open the liftgate to access the controls for the bench seat and enter the rear of the seatback, and then pull up on the seatback to be sure...
Owner's Manual
Page 27
... access the controls for the bench seat and enter the rear of the seat from the floor and pull the seat out. Open the liftgate to release the seat from the floor. 5.
... access the controls for the bench seat and enter the rear of the seat from the floor and pull the seat out. Open the liftgate to release the seat from the floor. 5.
Owner's Manual
Page 28
Open the liftgate to be raised to the upright position unless the seat is locked into place. After raising the rear seatback, always check to access the rear ...
Open the liftgate to be raised to the upright position unless the seat is locked into place. After raising the rear seatback, always check to access the rear ...

Owner's Manual
Page 93
... Operation ...2-5 Doors and Locks ...2-8 Door Locks ...2-8 Power Door Locks ...2-9 Delayed Locking ...2-10 Programmable Automatic Door Locks ...2-10 Rear Door Security Locks ...2-12 Lockout Protection ...2-13 Liftgate ...2-13 Windows ...2-14 Power Windows ...2-15 Sun Visors ...2-16 Theft-Deterrent Systems ...2-16 Content Theft-Deterrent ...2-16 Passlock® ...2-18 Starting and Operating Your Vehicle...
... Operation ...2-5 Doors and Locks ...2-8 Door Locks ...2-8 Power Door Locks ...2-9 Delayed Locking ...2-10 Programmable Automatic Door Locks ...2-10 Rear Door Security Locks ...2-12 Lockout Protection ...2-13 Liftgate ...2-13 Windows ...2-14 Power Windows ...2-15 Sun Visors ...2-16 Theft-Deterrent Systems ...2-16 Content Theft-Deterrent ...2-16 Passlock® ...2-18 Starting and Operating Your Vehicle...
Owner's Manual
Page 102
... switch in use. Programmable Automatic Door Locks Your vehicle is equipped with the power lock switch or the keyless entry transmitter and a door or the liftgate is open, the delayed locking feature will hear three chimes to signal that the delayed locking feature is greater than the factory setting. Choose one...
... switch in use. Programmable Automatic Door Locks Your vehicle is equipped with the power lock switch or the keyless entry transmitter and a door or the liftgate is open, the delayed locking feature will hear three chimes to signal that the delayed locking feature is greater than the factory setting. Choose one...
Owner's Manual
Page 105
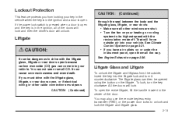
... come into your heating or cooling system to its highest speed with the recirculation mode off. That will force outside , insert the key into the liftgate lock and turn the key clockwise. You may also use the remote keyless entry transmitter (RKE), or the power door locks to drive with the... rear doors: • Make sure all other windows are shut. • Turn the fan on or under the instrument panel, open the entire liftgate, lift the handle located in the ignition, all the way. All the doors will unlock. To lock, turn it counterclockwise. Lockout Protection This feature protects...
... come into your heating or cooling system to its highest speed with the recirculation mode off. That will force outside , insert the key into the liftgate lock and turn the key clockwise. You may also use the remote keyless entry transmitter (RKE), or the power door locks to drive with the... rear doors: • Make sure all other windows are shut. • Turn the fan on or under the instrument panel, open the entire liftgate, lift the handle located in the ignition, all the way. All the doors will unlock. To lock, turn it counterclockwise. Lockout Protection This feature protects...
Owner's Manual
Page 214
...occur. Turn off the vehicle, check the door for obstacles, and close the door again. Stop and turn off the vehicle and check the liftgate. REPLACE LIFTGATE FUSE This message will be displayed on the DIC and a chime will acknowledge the message and clear it from the DIC display. Do not...will hear a chime. For more information. REDUCED ENGINE POWER This message is corrected. See Engine Oil on the DIC. REAR ACCESS OPEN If the liftgate is open while the ignition is not fully closed, this message will appear on page 5-109. OIL PRESSURE LOW Notice: If you drive your ...
...occur. Turn off the vehicle, check the door for obstacles, and close the door again. Stop and turn off the vehicle and check the liftgate. REPLACE LIFTGATE FUSE This message will be displayed on the DIC and a chime will acknowledge the message and clear it from the DIC display. Do not...will hear a chime. For more information. REDUCED ENGINE POWER This message is corrected. See Engine Oil on the DIC. REAR ACCESS OPEN If the liftgate is open while the ignition is not fully closed, this message will appear on page 5-109. OIL PRESSURE LOW Notice: If you drive your ...
Owner's Manual
Page 221
... five seconds after the last door is closed . Press the customization button until five seconds after the last door or the liftgate is closed . To select your preference for more information. Pressing the select button will scroll through the following choices: DOOR LOCK DELAY: OFF... (default): The doors will delay locking the doors and liftgate until DOOR LOCK DELAY appears in the display. You can still program the delayed locking feature. LOCK FEEDBACK: HORN: The horn will chirp...
... five seconds after the last door is closed . Press the customization button until five seconds after the last door or the liftgate is closed . To select your preference for more information. Pressing the select button will scroll through the following choices: DOOR LOCK DELAY: OFF... (default): The doors will delay locking the doors and liftgate until DOOR LOCK DELAY appears in the display. You can still program the delayed locking feature. LOCK FEEDBACK: HORN: The horn will chirp...
Owner's Manual
Page 479
.../Stop Trailer Right Turn Signals and Sidemarkers Harness Connector Driver Door Module Rear Cargo Area Power Outlets Power Door Lock System Rear Electronic Climate Control, Liftgate, Tire Pressure Monitoring System Truck Body Controller Flasher Module Left Power Window Circuit Breaker Truck Body Controller Truck Body Controller 5-111
.../Stop Trailer Right Turn Signals and Sidemarkers Harness Connector Driver Door Module Rear Cargo Area Power Outlets Power Door Lock System Rear Electronic Climate Control, Liftgate, Tire Pressure Monitoring System Truck Body Controller Flasher Module Left Power Window Circuit Breaker Truck Body Controller Truck Body Controller 5-111

Owner's Manual
Page 496
... this service. Inspect all key lock cylinders, hood latch assembly, secondary latch, pivots, spring anchor, release pawl, rear compartment hinges, outer liftgate handle pivot points, rear door detent link, roller mechanism, liftgate handle pivot points, latch bolt, fuel door hinge, cargo door hinge, locks, and folding seat hardware. replace with a clean cloth...
... this service. Inspect all key lock cylinders, hood latch assembly, secondary latch, pivots, spring anchor, release pawl, rear compartment hinges, outer liftgate handle pivot points, rear door detent link, roller mechanism, liftgate handle pivot points, latch bolt, fuel door hinge, cargo door hinge, locks, and folding seat hardware. replace with a clean cloth...

Owner's Manual
Page 529
... L Labeling, Tire Sidewall ...Lamps Auxiliary Roof Mounted Lamp ...Battery Run-Down Protection ...Dome ...Dome Lamp Override ...Fog ...Front Reading ...LATCH System Child Restraints ...Level Control ...Liftgate ...Light Airbag Readiness ...Anti-Lock Brake System Warning ...Battery Warning ...Brake System Warning ...Cruise Control ...Four-Wheel-Drive ...Highbeam On ...Low Fuel Warning ...Malfunction Indicator...
... L Labeling, Tire Sidewall ...Lamps Auxiliary Roof Mounted Lamp ...Battery Run-Down Protection ...Dome ...Dome Lamp Override ...Fog ...Front Reading ...LATCH System Child Restraints ...Level Control ...Liftgate ...Light Airbag Readiness ...Anti-Lock Brake System Warning ...Battery Warning ...Brake System Warning ...Cruise Control ...Four-Wheel-Drive ...Highbeam On ...Low Fuel Warning ...Malfunction Indicator...


