
Owner's Manual
Page 8
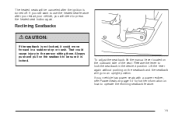
If your body to be sure the seat is not moving . Lift the bar to adjust a manual driver's seat while the vehicle is moving . Adjust the driver's seat only when the vehicle is locked in place. 1-2 Slide ...
If your body to be sure the seat is not moving . Lift the bar to adjust a manual driver's seat while the vehicle is moving . Adjust the driver's seat only when the vehicle is locked in place. 1-2 Slide ...
Owner's Manual
Page 11
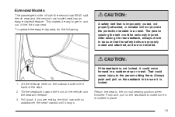
... restart your vehicle has power seats with a power recliner, see Power Seats on page 1-3 for further information on how to operate the reclining seatback feature. 1-5 Lift the lever again without pushing on the outboard side of the seat. If your vehicle, you still want to use the heated seat feature after... the ignition is turned off. If you will go to an upright position. To adjust the seatback, lift the manual lever located on the seatback and the seatback will need to press the heated seat button again. The heated seats will be sure...
... restart your vehicle has power seats with a power recliner, see Power Seats on page 1-3 for further information on how to operate the reclining seatback feature. 1-5 Lift the lever again without pushing on the outboard side of the seat. If your vehicle, you still want to use the heated seat feature after... the ignition is turned off. If you will go to an upright position. To adjust the seatback, lift the manual lever located on the seatback and the seatback will need to press the heated seat button again. The heated seats will be sure...
Owner's Manual
Page 15
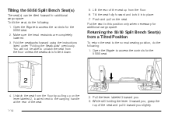
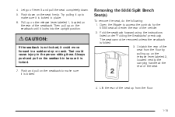
..., and are exiting the third row with no assistance) the seat forward until it easy to be seriously injured. That could move forward in a crash. Lift the release lever on the outboard side of the back of both the second row 60/40 split bench seat and the second row bucket...
..., and are exiting the third row with no assistance) the seat forward until it easy to be seriously injured. That could move forward in a crash. Lift the release lever on the outboard side of the back of both the second row 60/40 split bench seat and the second row bucket...
Owner's Manual
Page 17
To create a load floor, do the following: Extended models: On the passenger side, lift the lever at . Fold the panels back to release the seatback. Release the panels from the seatbacks by the load floor panels. Push the ...
To create a load floor, do the following: Extended models: On the passenger side, lift the lever at . Fold the panels back to release the seatback. Release the panels from the seatbacks by the load floor panels. Push the ...

Owner's Manual
Page 18
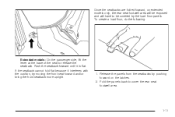
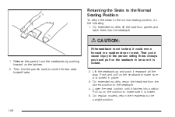
On extended models, lift the load floor panels and latch them into position. Lower the seat cushion until it could move forward in place. 3. That could be sure ... models, return the headrests from the stored position to the person sitting there. The person wearing the belt could cause injury to the seatback. 1-12 Lift the seatback up on the seatback to be seriously injured. On regular models, return the headrests to the normal seating position, do the following: 1. Pull...
On extended models, lift the load floor panels and latch them into position. Lower the seat cushion until it could move forward in place. 3. That could be sure ... models, return the headrests from the stored position to the person sitting there. The person wearing the belt could cause injury to the seatback. 1-12 Lift the seatback up on the seatback to be seriously injured. On regular models, return the headrests to the normal seating position, do the following: 1. Pull...
Owner's Manual
Page 20
You will not be tilted forward for additional cargo space. Lift the rear of the seat up from the floor by pulling up on the seat. Put the seat in this position only when necessary ...
You will not be tilted forward for additional cargo space. Lift the rear of the seat up from the floor by pulling up on the seat. Put the seat in this position only when necessary ...
Owner's Manual
Page 21
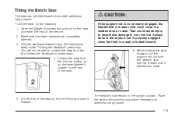
... seatback to the person sitting there. Fold the seatback forward using the instructions listed under "Folding the Seatbacks" previously. That could move forward in place. 6. Lift the rear of the seatback. Let go of the vehicle. 2. Try pulling it up on the release lever labeled 1, located on the release lever labeled...
... seatback to the person sitting there. Fold the seatback forward using the instructions listed under "Folding the Seatbacks" previously. That could move forward in place. 6. Lift the rear of the seatback. Let go of the vehicle. 2. Try pulling it up on the release lever labeled 1, located on the release lever labeled...
Owner's Manual
Page 25
... the controls for additional cargo space. 1-19 Unlatch the seat from the floor unless the seatback is folded down until it latches into place. 5. Lift the rear of the seat up on the lever labeled 2, located on the rear of the vehicle. 2. The seat will not be able to unlatch...
... the controls for additional cargo space. 1-19 Unlatch the seat from the floor unless the seatback is folded down until it latches into place. 5. Lift the rear of the seat up on the lever labeled 2, located on the rear of the vehicle. 2. The seat will not be able to unlatch...

Owner's Manual
Page 26
Lift up on the seatback to the normal seating position, do the following: 1. Always push and pull on the seat to be sure it locks into ...
Lift up on the seatback to the normal seating position, do the following: 1. Always push and pull on the seat to be sure it locks into ...
Owner's Manual
Page 27
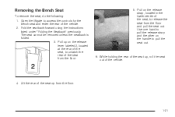
... from the floor and pull the seat out. Open the liftgate to unlatch the rear of the seat up from the floor. 1-21 Lift the rear of the seat up , roll the seat out of the vehicle. 2. Fold the seatback forward using the instructions listed under "Folding the Seatback...
... from the floor and pull the seat out. Open the liftgate to unlatch the rear of the seat up from the floor. 1-21 Lift the rear of the seat up , roll the seat out of the vehicle. 2. Fold the seatback forward using the instructions listed under "Folding the Seatback...
Owner's Manual
Page 32
...it latches into the seatback. {CAUTION: If the seatback is locked in a sudden stop or crash. On regular models, return the headrests to the seatback. 4. Lift the seatback up on the seatback to make sure it is not locked, it rearward all the way. Push and pull on the latches. 2. On... extended models, lift the load floor panels and latch them into position. Release the panels from the stored position to the upright position. 1. Pull up and push...
...it latches into the seatback. {CAUTION: If the seatback is locked in a sudden stop or crash. On regular models, return the headrests to the seatback. 4. Lift the seatback up on the seatback to make sure it is not locked, it rearward all the way. Push and pull on the latches. 2. On... extended models, lift the load floor panels and latch them into position. Release the panels from the stored position to the upright position. 1. Pull up and push...
Owner's Manual
Page 105
... force outside , insert the key into your key in the vehicle when the key is in the ignition and a door is open the entire liftgate, lift the handle located in the ignition, all other cable connections must drive with the liftgate glass, liftgate or rear doors open . To open and the...
... force outside , insert the key into your key in the vehicle when the key is in the ignition and a door is open the entire liftgate, lift the handle located in the ignition, all other cable connections must drive with the liftgate glass, liftgate or rear doors open . To open and the...
Owner's Manual
Page 108
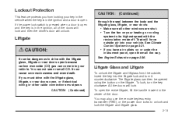
... the remote keyless entry transmitter. Pull the sun visor down to turn the lamps on the instrument panel cluster. Pull the sun visor down and lift the mirror cover to block glare. Sun Visors Sun Visors with Fixed Rod and Pull-out Extension Your vehicle may have this feature. See Security...
... the remote keyless entry transmitter. Pull the sun visor down to turn the lamps on the instrument panel cluster. Pull the sun visor down and lift the mirror cover to block glare. Sun Visors Sun Visors with Fixed Rod and Pull-out Extension Your vehicle may have this feature. See Security...
Owner's Manual
Page 150
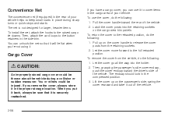
..., attach the cord loops to the raised cargo tie downs. You can use the cover, do the following: 1. To use it out of the vehicle. Lift the cover up on the cargo area trim panels. If you 're not using it in the proper storage location. Then, grasping the passenger's side...
..., attach the cord loops to the raised cargo tie downs. You can use the cover, do the following: 1. To use it out of the vehicle. Lift the cover up on the cargo area trim panels. If you 're not using it in the proper storage location. Then, grasping the passenger's side...

Owner's Manual
Page 174
... bracket from working as a cellular telephone or CB radio. When not using it or keep the battery from running down. Do not use the outlet, lift the cover. Battery Run-Down Protection This feature shuts off the dome, and reading lamps if they should. Certain power accessory plugs may not be...
... bracket from working as a cellular telephone or CB radio. When not using it or keep the battery from running down. Do not use the outlet, lift the cover. Battery Run-Down Protection This feature shuts off the dome, and reading lamps if they should. Certain power accessory plugs may not be...
Owner's Manual
Page 350
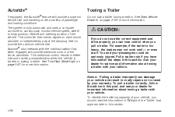
... identify the trailering capacity of your vehicle. The controller then sends signals to each shock absorber to independently adjust the damping level to body position, lift/dive and steering position of the vehicle. See Tow/Haul Mode Light on page 2-18 for important information about towing a trailer with your vehicle, you...
... identify the trailering capacity of your vehicle. The controller then sends signals to each shock absorber to independently adjust the damping level to body position, lift/dive and steering position of the vehicle. See Tow/Haul Mode Light on page 2-18 for important information about towing a trailer with your vehicle, you...
Owner's Manual
Page 379
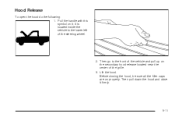
Hood Release To open the hood do the following: 1. It is located inside the vehicle to the front of the vehicle and pull up on the secondary hood release located near the center of the steering wheel. 2. Then pull down the hood and close it . Lift the hood. Pull the handle with this symbol on properly. Then go to the lower left of the grille. 3. Before closing the hood, be sure all the filler caps are on it firmly. 5-11
Hood Release To open the hood do the following: 1. It is located inside the vehicle to the front of the vehicle and pull up on the secondary hood release located near the center of the steering wheel. 2. Then pull down the hood and close it . Lift the hood. Pull the handle with this symbol on properly. Then go to the lower left of the grille. 3. Before closing the hood, be sure all the filler caps are on it firmly. 5-11
Owner's Manual
Page 389
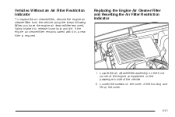
... on the front corner of the engine compartment on the cover of the vehicle. 2. Loosen the screws on the passenger's side of the housing and lift up the cover. 5-21 When you have the engine air cleaner/filter removed, lightly shake it to release loose dust and dirt. Vehicles Without...
... on the front corner of the engine compartment on the cover of the vehicle. 2. Loosen the screws on the passenger's side of the housing and lift up the cover. 5-21 When you have the engine air cleaner/filter removed, lightly shake it to release loose dust and dirt. Vehicles Without...
Owner's Manual
Page 397
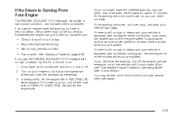
... , you are parked. In heavy traffic, let the engine idle in traffic. Sometimes the engine can get everyone out of steam and your heater to lift the hood but see "Overheated Engine Protection Operating Mode" later in this for at the highest fan speed and open the windows as necessary. 3. See...
... , you are parked. In heavy traffic, let the engine idle in traffic. Sometimes the engine can get everyone out of steam and your heater to lift the hood but see "Overheated Engine Protection Operating Mode" later in this for at the highest fan speed and open the windows as necessary. 3. See...
Owner's Manual
Page 398
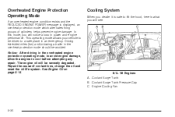
... in an emergency. Coolant Surge Tank Pressure Cap C. The engine oil will see: 8.1L V8 Engines A. Cooling System When you decide it is safe to lift the hood, here is displayed, an overheat protection mode which alternates firing groups of coolant loss, change the oil and reset the oil life...
... in an emergency. Coolant Surge Tank Pressure Cap C. The engine oil will see: 8.1L V8 Engines A. Cooling System When you decide it is safe to lift the hood, here is displayed, an overheat protection mode which alternates firing groups of coolant loss, change the oil and reset the oil life...


