
Owner's Manual
Page 1
2006 Chevrolet Cobalt Owner Manual Seats and Restraint Systems ...1-1 Front Seats ...1-2 Rear Seats ...1-8 Safety Belts ...1-9 Child Restraints ...1-29 Airbag System ...1-51 Restraint System Check ...1-66 Features and Controls ...2-1 Keys ...2-2 Doors and Locks ...2-7 Windows ...2-12 Theft-Deterrent Systems ...2-14 Starting and Operating Your Vehicle ...2-17 Mirrors ...2-33 OnStar® System ...2-35 Storage Areas ...2-37 Sunroof ...2-38 Instrument Panel ...3-1 Instrument Panel Overview ...3-4 Climate Controls ...3-17 Warning Lights, Gages, and Indicators ...3-22 Driver Information Center (...
2006 Chevrolet Cobalt Owner Manual Seats and Restraint Systems ...1-1 Front Seats ...1-2 Rear Seats ...1-8 Safety Belts ...1-9 Child Restraints ...1-29 Airbag System ...1-51 Restraint System Check ...1-66 Features and Controls ...2-1 Keys ...2-2 Doors and Locks ...2-7 Windows ...2-12 Theft-Deterrent Systems ...2-14 Starting and Operating Your Vehicle ...2-17 Mirrors ...2-33 OnStar® System ...2-35 Storage Areas ...2-37 Sunroof ...2-38 Instrument Panel ...3-1 Instrument Panel Overview ...3-4 Climate Controls ...3-17 Warning Lights, Gages, and Indicators ...3-22 Driver Information Center (...
Owner's Manual
Page 13
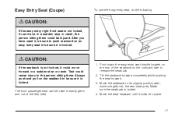
... push and pull on the rear of the rear seat. 1. Push down the easy entry seat handle located on the seatback to its original position after someone gets into place. 1-7 That could cause injury to be sure it locks into the rear seat area. Move the seat rearward until it is locked. In a sudden stop or crash. After you have used to...
... push and pull on the rear of the rear seat. 1. Push down the easy entry seat handle located on the seatback to its original position after someone gets into place. 1-7 That could cause injury to be sure it locks into the rear seat area. Move the seat rearward until it is locked. In a sudden stop or crash. After you have used to...
Owner's Manual
Page 75
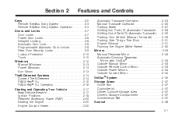
... ...2-31 Running the Engine While Parked ...2-32 Mirrors ...2-33 Manual Rearview Mirror ...2-33 Automatic Dimming Rearview Mirror with OnStar® ...2-33 Outside Manual Mirror ...2-33 Outside Remote Control Mirror ...2-33 Outside Power Mirrors ...2-34 Outside Convex Mirror ...2-34 OnStar® System ...2-35 Storage Areas ...2-37 Glove Box ...2-37 Cupholder(s) ...2-37 Center Console Storage Area ...2-37 Driver's Storage Compartment ...2-37 Convenience Net ...2-37 Sunroof ...2-38 2-1 Keys ...2-2 Remote Keyless Entry System ...2-3 Remote Keyless Entry System Operation ...2-4 Doors and Locks...
... ...2-31 Running the Engine While Parked ...2-32 Mirrors ...2-33 Manual Rearview Mirror ...2-33 Automatic Dimming Rearview Mirror with OnStar® ...2-33 Outside Manual Mirror ...2-33 Outside Remote Control Mirror ...2-33 Outside Power Mirrors ...2-34 Outside Convex Mirror ...2-34 OnStar® System ...2-35 Storage Areas ...2-37 Glove Box ...2-37 Cupholder(s) ...2-37 Center Console Storage Area ...2-37 Driver's Storage Compartment ...2-37 Convenience Net ...2-37 Sunroof ...2-38 2-1 Keys ...2-2 Remote Keyless Entry System ...2-3 Remote Keyless Entry System Operation ...2-4 Doors and Locks...
Owner's Manual
Page 84
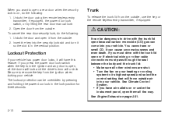
... the key from the outside air into your vehicle has power door locks, it will unlock. Open the door from the outside . See Engine Exhaust on , do the following : 1. Unlock the door using the remote keyless entry transmitter, if equipped, the power door lock switch, or by pressing and holding the power door lock in the lock position for three seconds. 2-10 It can be overridden by lifting the rear door manual lock. 2. Trunk To release the trunk lid...
... the key from the outside air into your vehicle has power door locks, it will unlock. Open the door from the outside . See Engine Exhaust on , do the following : 1. Unlock the door using the remote keyless entry transmitter, if equipped, the power door lock switch, or by pressing and holding the power door lock in the lock position for three seconds. 2-10 It can be overridden by lifting the rear door manual lock. 2. Trunk To release the trunk lid...
Owner's Manual
Page 89
... press the unlock, lock, or trunk release buttons on . This will re-arm itself . • Turn the ignition on the remote keyless transmitter, it on a radio frequency subject to Federal Communications Commission (FCC) Rules and with Part 15 of horn and lights. • Opening any other door. The system will immediately cause a full alarm of the following: • Press the remote keyless entry transmitter unlock button...
... press the unlock, lock, or trunk release buttons on . This will re-arm itself . • Turn the ignition on the remote keyless transmitter, it on a radio frequency subject to Federal Communications Commission (FCC) Rules and with Part 15 of horn and lights. • Opening any other door. The system will immediately cause a full alarm of the following: • Press the remote keyless entry transmitter unlock button...
Owner's Manual
Page 90
... start and the security light on the instrument panel cluster comes on, the key may be not damaged, try again. PASS-Key® III+ uses a radio frequency transponder in the key that operates the system. Turn the ignition off and try another ignition key. At this equipment. If your vehicle needs service. Up to check the fuse, see your dealer who can service PASS-Key® III+ to arm...
... start and the security light on the instrument panel cluster comes on, the key may be not damaged, try again. PASS-Key® III+ uses a radio frequency transponder in the key that operates the system. Turn the ignition off and try another ignition key. At this equipment. If your vehicle needs service. Up to check the fuse, see your dealer who can service PASS-Key® III+ to arm...

Owner's Manual
Page 94
... driver's door is opened . Place your finger into PARK (P) with the vehicle moving , use NEUTRAL (N) only. Starting the Engine 3. Have your vehicle serviced at your vehicle is a safety feature. Shift into PARK (P) only when your GM dealer as soon as possible. Automatic Transaxle Move the shift lever to LOCK. To restart when you are already moving could damage the transaxle. Once the key is turned from RUN to LOCK, the radio...
... driver's door is opened . Place your finger into PARK (P) with the vehicle moving , use NEUTRAL (N) only. Starting the Engine 3. Have your vehicle serviced at your vehicle is a safety feature. Shift into PARK (P) only when your GM dealer as soon as possible. Automatic Transaxle Move the shift lever to LOCK. To restart when you are already moving could damage the transaxle. Once the key is turned from RUN to LOCK, the radio...
Owner's Manual
Page 98
... the brake pedal, your vehicle is running at high speed may damage the transaxle. If you need more power for normal driving with the wheels. accelerator all the way down . • Going about halfway down . 2-24 The repairs would not be covered by your warranty. Shift to back up. AUTOMATIC OVERDRIVE (D): This position is dangerous. Do not shift into a drive gear while your engine is being towed...
... the brake pedal, your vehicle is running at high speed may damage the transaxle. If you need more power for normal driving with the wheels. accelerator all the way down . • Going about halfway down . 2-24 The repairs would not be covered by your warranty. Shift to back up. AUTOMATIC OVERDRIVE (D): This position is dangerous. Do not shift into a drive gear while your engine is being towed...

Owner's Manual
Page 99
... use the brakes, or parking brake to operate your shift pattern. • When driving on hilly, winding roads. • When towing a trailer, so there is going less than 20 mph (32 km/h). If the shift lever is your manual transaxle: FIRST (1): Press the clutch pedal and shift into FIRST (1). Notice: Spinning the tires or holding the vehicle in deep snow or mud. Then shift into FIRST...
... use the brakes, or parking brake to operate your shift pattern. • When driving on hilly, winding roads. • When towing a trailer, so there is going less than 20 mph (32 km/h). If the shift lever is your manual transaxle: FIRST (1): Press the clutch pedal and shift into FIRST (1). Notice: Spinning the tires or holding the vehicle in deep snow or mud. Then shift into FIRST...
Owner's Manual
Page 100
.... Up-Shift Light If you have a manual transaxle, you downshift. 2-26 While you could injure yourself or others. REVERSE (R): To back up the ring on and off if you . Also, use REVERSE (R), along with the 2.0L Supercharged engine, press down more than one gear at a time when you do for parking your vehicle is normal for the best fuel economy...
.... Up-Shift Light If you have a manual transaxle, you downshift. 2-26 While you could injure yourself or others. REVERSE (R): To back up the ring on and off if you . Also, use REVERSE (R), along with the 2.0L Supercharged engine, press down more than one gear at a time when you do for parking your vehicle is normal for the best fuel economy...
Owner's Manual
Page 130
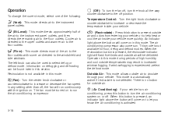
... the air conditioning is pressed, the recirculate indicator light will be turned on to run the air conditioning compressor. #(Air Conditioning): If your vehicle. When the recirculation button is activated. 3-18 This mode is no button for floor, defog and defrost modes. The fan must be delivered. There is not available for outside air will flash five times and outside air. 9(Fan): Turn the center...
... the air conditioning is pressed, the recirculate indicator light will be turned on to run the air conditioning compressor. #(Air Conditioning): If your vehicle. When the recirculation button is activated. 3-18 This mode is no button for floor, defog and defrost modes. The fan must be delivered. There is not available for outside air will flash five times and outside air. 9(Fan): Turn the center...
Owner's Manual
Page 149
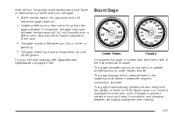
.... This gage indicates vacuum during light to RUN. This gage is automatically centered at zero every time the ignition is located near the driver's side of these show a problem with your fuel tank capacity, see Capacities and Specifications on page 5-102. Actual vacuum or boost is displayed from this gage is turned to moderate throttle and boost under heavier throttle. For your fuel gage: Boost Gage...
.... This gage indicates vacuum during light to RUN. This gage is automatically centered at zero every time the ignition is located near the driver's side of these show a problem with your fuel tank capacity, see Capacities and Specifications on page 5-102. Actual vacuum or boost is displayed from this gage is turned to moderate throttle and boost under heavier throttle. For your fuel gage: Boost Gage...

Owner's Manual
Page 205
... steer a vehicle on wet ice, you suspect steering system problems and/or the POWER STEERING message comes on curves. If you turn the front wheels. The electric power steering system does not require regular maintenance. Steering Tips It is the one of the tires against the road surface makes it stops, or hold the steering wheel in the same direction. Steering Electric Power Steering If the engine stalls while you are driving, the power steering...
... steer a vehicle on wet ice, you suspect steering system problems and/or the POWER STEERING message comes on curves. If you turn the front wheels. The electric power steering system does not require regular maintenance. Steering Tips It is the one of the tires against the road surface makes it stops, or hold the steering wheel in the same direction. Steering Electric Power Steering If the engine stalls while you are driving, the power steering...

Owner's Manual
Page 231
... long they can be towed. Set the parking brake. 2. Release the parking brake. Here are some important things to be towed? Just as you tow? Turn the ignition key to ACC to NEUTRAL (N). 4. Shift your vehicle from the front following fuse from draining while the vehicle is being towed, remove the following these steps: • What is prepared to be towed in these ways. See Floor Console Fuse Block on page...
... long they can be towed. Set the parking brake. 2. Release the parking brake. Here are some important things to be towed? Just as you tow? Turn the ignition key to ACC to NEUTRAL (N). 4. Shift your vehicle from the front following fuse from draining while the vehicle is being towed, remove the following these steps: • What is prepared to be towed in these ways. See Floor Console Fuse Block on page...
Owner's Manual
Page 298
... of a tire's height to its width. 5-58 Aspect Ratio: The relationship of optional accessories are, automatic transmission, power steering, power brakes, power windows, power seats, and air conditioning. The load index represents the load carry capacity a tire is certified to carry a load. The speed rating is the maximum speed a tire is certified to carry. Tire and Rim Association. Tire Terminology and Definitions Air Pressure: The amount of air inside the tire pressing...
... of a tire's height to its width. 5-58 Aspect Ratio: The relationship of optional accessories are, automatic transmission, power steering, power brakes, power windows, power seats, and air conditioning. The load index represents the load carry capacity a tire is certified to carry a load. The speed rating is the maximum speed a tire is certified to carry. Tire and Rim Association. Tire Terminology and Definitions Air Pressure: The amount of air inside the tire pressing...
Owner's Manual
Page 335
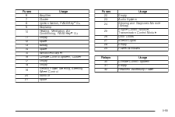
... 18 19 20 21 Usage Amplifier Cluster Ignition Switch, PASS-Key® III+ Stoplamp Heating, Ventilation, Air Conditioning, PASS-Key® III+ Empty Spare Airbag Spare Windshield Wiper Climate Control System, Cluster Empty Empty Electric Power Steering, Steering Wheel Control Sunroof Spare Fuses 22 23 24 25 26 27 28 29 Relays 30 31 32 Usage Empty Audio System Sensing and Diagnostic Module (Airbag) Engine Control Module, Transmission Control Module Door Locks Interior Lights Empty Power Windows Usage Climate Control System Empty Retained Accessory Power 5-95
... 18 19 20 21 Usage Amplifier Cluster Ignition Switch, PASS-Key® III+ Stoplamp Heating, Ventilation, Air Conditioning, PASS-Key® III+ Empty Spare Airbag Spare Windshield Wiper Climate Control System, Cluster Empty Empty Electric Power Steering, Steering Wheel Control Sunroof Spare Fuses 22 23 24 25 26 27 28 29 Relays 30 31 32 Usage Empty Audio System Sensing and Diagnostic Module (Airbag) Engine Control Module, Transmission Control Module Door Locks Interior Lights Empty Power Windows Usage Climate Control System Empty Retained Accessory Power 5-95

Owner's Manual
Page 337
... Driver's Side High Beam Passenger's Side Low Beam Driver's Side Low Beam Not Used Fuel Pump Emissions Fuses Blank INJ Blank ABS PCM/ECM EPS AIR PMP PRK LPS WPR IP IGN A/C CLTCH AIR SOL ABS2 PRK/NEUT ECM/TRANS BCK UP TRUNK/ OUTLET Usage Not Used Injectors Not Used Anti-lock Brake System Powertrain Control Module/Engine Control Module Electric Power Steering Air Pump Park Lamps Windshield Wiper Ignition Air Conditioning Clutch Air Solenoid Anti-lock Brake System 2 Park, Neutral Engine Control Module, Transmission Back-Up Lamps Trunk, Accessory Power...
... Driver's Side High Beam Passenger's Side Low Beam Driver's Side Low Beam Not Used Fuel Pump Emissions Fuses Blank INJ Blank ABS PCM/ECM EPS AIR PMP PRK LPS WPR IP IGN A/C CLTCH AIR SOL ABS2 PRK/NEUT ECM/TRANS BCK UP TRUNK/ OUTLET Usage Not Used Injectors Not Used Anti-lock Brake System Powertrain Control Module/Engine Control Module Electric Power Steering Air Pump Park Lamps Windshield Wiper Ignition Air Conditioning Clutch Air Solenoid Anti-lock Brake System 2 Park, Neutral Engine Control Module, Transmission Back-Up Lamps Trunk, Accessory Power...

Owner's Manual
Page 381
... or Chrome-Plated Wheels ...Care of Safety Belts ...Chemical Paint Spotting ...Cleaning Exterior Lamps/Lenses ...Cleaning the Inside of Your Vehicle ...Fabric/Carpet ...Finish Care ...Finish Damage ...Instrument Panel, Vinyl, and Other Plastic Surfaces ...Leather ...Sheet Metal Damage ...Tires ...Underbody Maintenance ...Vehicle Care/Appearance Materials ...Washing Your Vehicle ...Weatherstrips ...Windshield and Wiper Blades ...Ashtray(s) ...Audio System(s) ...Audio Steering Wheel Controls ...Care of Your CD Player ...Care of Your CDs ...Fixed Mast Antenna ...Radio with...
... or Chrome-Plated Wheels ...Care of Safety Belts ...Chemical Paint Spotting ...Cleaning Exterior Lamps/Lenses ...Cleaning the Inside of Your Vehicle ...Fabric/Carpet ...Finish Care ...Finish Damage ...Instrument Panel, Vinyl, and Other Plastic Surfaces ...Leather ...Sheet Metal Damage ...Tires ...Underbody Maintenance ...Vehicle Care/Appearance Materials ...Washing Your Vehicle ...Weatherstrips ...Windshield and Wiper Blades ...Ashtray(s) ...Audio System(s) ...Audio Steering Wheel Controls ...Care of Your CD Player ...Care of Your CDs ...Fixed Mast Antenna ...Radio with...
Owner's Manual
Page 388
...14 Owner Checks and Services ...6-8 Recommended Fluids and Lubricants ...6-12 Scheduled Maintenance ...6-4 Using ...6-3 Your Vehicle and the Environment ...6-2 Malfunction Indicator Light ...3-32 Manual Lumbar Controls ...1-3 Manual Seats ...1-2 Manual Transaxle Fluid ...5-23 Operation ...2-25 Manual Windows ...2-13 Message DIC Warnings and Messages ...3-40 Mirror Reading Lamps ...3-16 Mirrors Automatic Dimming Rearview with OnStar® ...2-33 Manual Rearview Mirror ...2-33 Outside Convex Mirror ...2-34 Outside Manual Mirror ...2-33 Outside Power Mirrors ...2-34 Outside Remote Control Mirror...
...14 Owner Checks and Services ...6-8 Recommended Fluids and Lubricants ...6-12 Scheduled Maintenance ...6-4 Using ...6-3 Your Vehicle and the Environment ...6-2 Malfunction Indicator Light ...3-32 Manual Lumbar Controls ...1-3 Manual Seats ...1-2 Manual Transaxle Fluid ...5-23 Operation ...2-25 Manual Windows ...2-13 Message DIC Warnings and Messages ...3-40 Mirror Reading Lamps ...3-16 Mirrors Automatic Dimming Rearview with OnStar® ...2-33 Manual Rearview Mirror ...2-33 Outside Convex Mirror ...2-34 Outside Manual Mirror ...2-33 Outside Power Mirrors ...2-34 Outside Remote Control Mirror...
Owner's Manual
Page 392
Signals, Turn and Lane-Change ...3-8 Spare Tire Compact ...5-83 Installing ...5-76 Removing ...5-72 Storing ...5-80 Specifications, Capacities ...5-102 Speedometer ...3-24 Split Folding Rear Seat ...1-8 Starting Your Engine ...2-20 Steering ...4-11 Steering Wheel Controls, Audio ...3-79 Steering Wheel, Tilt Wheel ...3-6 Storage Areas Center Console Storage Area ...2-37 Convenience Net ...2-37 Cupholder(s) ...2-37 Driver's Storage Compartment ...2-37 Glove Box ...2-37 Stuck in Sand, Mud, Ice or Snow ...4-30 Sun Visors ...2-13 Sunroof ...2-38...
Signals, Turn and Lane-Change ...3-8 Spare Tire Compact ...5-83 Installing ...5-76 Removing ...5-72 Storing ...5-80 Specifications, Capacities ...5-102 Speedometer ...3-24 Split Folding Rear Seat ...1-8 Starting Your Engine ...2-20 Steering ...4-11 Steering Wheel Controls, Audio ...3-79 Steering Wheel, Tilt Wheel ...3-6 Storage Areas Center Console Storage Area ...2-37 Convenience Net ...2-37 Cupholder(s) ...2-37 Driver's Storage Compartment ...2-37 Glove Box ...2-37 Stuck in Sand, Mud, Ice or Snow ...4-30 Sun Visors ...2-13 Sunroof ...2-38...


