Owner's Manual
Page 223
... connect the auxiliary device to close the compartment door. Replace the two AAA batteries in a cool, dry place. Tighten the screws to the RCA jacks. Make sure that they lose the signal from an auxiliary device such as a camcorder to be lost if the system is used for left side... adjust the volume, adjust this knob. Keep the headphones stored in the compartment. Battery Replacement To change the batteries, do the following: 1. Stereo RCA Jacks The RCA jacks are to the RCA jacks and turn on both the auxiliary device power and the power on the left audio input, the right...
... connect the auxiliary device to close the compartment door. Replace the two AAA batteries in a cool, dry place. Tighten the screws to the RCA jacks. Make sure that they lose the signal from an auxiliary device such as a camcorder to be lost if the system is used for left side... adjust the volume, adjust this knob. Keep the headphones stored in the compartment. Battery Replacement To change the batteries, do the following: 1. Stereo RCA Jacks The RCA jacks are to the RCA jacks and turn on both the auxiliary device power and the power on the left audio input, the right...

Owner's Manual
Page 224
... VIDEO FORMAT. 5. See "Headphones" previously for more information. 3-100 Press the enter button to the wireless headphones, if there is preset to the red RCA jack. 6. Press the SRCE button on the DVD faceplate or the remote control. 3. In some countries, the video format may be in the Auxiliary Mode The...
... VIDEO FORMAT. 5. See "Headphones" previously for more information. 3-100 Press the enter button to the wireless headphones, if there is preset to the red RCA jack. 6. Press the SRCE button on the DVD faceplate or the remote control. 3. In some countries, the video format may be in the Auxiliary Mode The...
Owner's Manual
Page 226
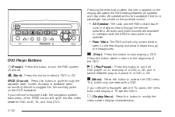
... the beginning of a DVD or CD. Press this button twice to return to access the DVD menu. If your vehicle is plugged into the auxiliary jacks on the parental control. • All Speaker: The radio and the RSE unit will share control of the SRCE button will cycle the rear video...
... the beginning of a DVD or CD. Press this button twice to return to access the DVD menu. If your vehicle is plugged into the auxiliary jacks on the parental control. • All Speaker: The radio and the RSE unit will share control of the SRCE button will cycle the rear video...

Owner's Manual
Page 227
... previews have finished. Playing a Disc To play /pause button on the DVD player faceplate or the remote control. X (Headphone Jack): These jacks allow fast forwarding or skipping of the headphone connected to increase the volume of the copyright information or the previews. Some DVDs will resume play... button on the DVD player faceplate or the remote control. If your vehicle is active. Turn the left knob to the left headphone jack. Turn the right knob to increase the volume of the headphone connected to the RSE through a menu. See the SRCE button previously ...
... previews have finished. Playing a Disc To play /pause button on the DVD player faceplate or the remote control. X (Headphone Jack): These jacks allow fast forwarding or skipping of the headphone connected to increase the volume of the copyright information or the previews. Some DVDs will resume play... button on the DVD player faceplate or the remote control. If your vehicle is active. Turn the left knob to the left headphone jack. Turn the right knob to increase the volume of the headphone connected to the RSE through a menu. See the SRCE button previously ...
Owner's Manual
Page 233
... player. The power indicator light will begin to change the audio or language selection on the DVD menu. The language in wrong. See "Stereo RCA Jacks" previously for how to play from the auxiliary device and make sure that the batteries are not dead or put in the audio or on...
... player. The power indicator light will begin to change the audio or language selection on the DVD menu. The language in wrong. See "Stereo RCA Jacks" previously for how to play from the auxiliary device and make sure that the batteries are not dead or put in the audio or on...
Owner's Manual
Page 282
... need to Get It Out First, turn the system off and you can continue driving. {CAUTION: The recovery hook, when used, is provided in the jack storage area. At either at the front of the vehicle on page 4-50. Your vehicle could be damaged and it would not be equipped with...
... need to Get It Out First, turn the system off and you can continue driving. {CAUTION: The recovery hook, when used, is provided in the jack storage area. At either at the front of the vehicle on page 4-50. Your vehicle could be damaged and it would not be equipped with...
Owner's Manual
Page 370
...at, the next part shows how to use in a skid. A rear blowout, particularly on a curve, acts much more information. 5-72 Use the jack provided with your vehicle's hazard warning flashers. See Hazard Warning Flashers on your vehicle is designed only for changing a flat tire. In any...tire will create a drag that pulls the vehicle toward that side. It may require the same correction you maintain your foot off the jack. Turn on page 3-6 for more likely to do maintenance or repairs is dangerous without the appropriate safety equipment and training. But if ...
...at, the next part shows how to use in a skid. A rear blowout, particularly on a curve, acts much more information. 5-72 Use the jack provided with your vehicle's hazard warning flashers. See Hazard Warning Flashers on your vehicle is designed only for changing a flat tire. In any...tire will create a drag that pulls the vehicle toward that side. It may require the same correction you maintain your foot off the jack. Turn on page 3-6 for more likely to do maintenance or repairs is dangerous without the appropriate safety equipment and training. But if ...
Owner's Manual
Page 371
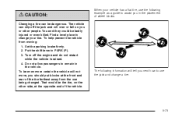
...: 1. To be the tire, on you next how to change a tire. 5-73 To help prevent the vehicle from the one being changed. Turn off the jack and roll over or fall on the other people. Do not allow passengers to assist you should put blocks at the front and rear of... (P). 3. Put the shift lever in the vehicle. That would be even more certain the vehicle will tell you or other side, at tire, use the jack and change your vehicle has a flat the opposite end of the vehicle. Set the parking brake firmly. 2. The vehicle can be badly injured...
...: 1. To be the tire, on you next how to change a tire. 5-73 To help prevent the vehicle from the one being changed. Turn off the jack and roll over or fall on the other people. Do not allow passengers to assist you should put blocks at the front and rear of... (P). 3. Put the shift lever in the vehicle. That would be even more certain the vehicle will tell you or other side, at tire, use the jack and change your vehicle has a flat the opposite end of the vehicle. Set the parking brake firmly. 2. The vehicle can be badly injured...

Owner's Manual
Page 372
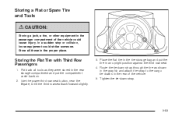
... your vehicle has the third row seat, remove the head rest storage tray to access the jack. Open the liftgate. Turn the wing nut (A) holding the jack (B) (and storage tray, if applicable) counterclockwise and remove it. 3. To access the equipment, do the following : 1. Removing the Spare ...Open the storage compartment door of the rear bumper. Retainer D. To remove the spare tire from the vehicle, do the following : A. Remove the jack and wheel wrench (C). 5-74 2. Removing the Spare Tire and Tools The equipment you will need is nearest the liftgate and remove the container. 3....
... your vehicle has the third row seat, remove the head rest storage tray to access the jack. Open the liftgate. Turn the wing nut (A) holding the jack (B) (and storage tray, if applicable) counterclockwise and remove it. 3. To access the equipment, do the following : 1. Removing the Spare ...Open the storage compartment door of the rear bumper. Retainer D. To remove the spare tire from the vehicle, do the following : A. Remove the jack and wheel wrench (C). 5-74 2. Removing the Spare Tire and Tools The equipment you will need is nearest the liftgate and remove the container. 3....

Owner's Manual
Page 374
...could be badly injured or killed. If the vehicle slips off the lug nut for each turn. 5-76 This avoids taking the wrench off the jack you find them yet, using the hoisting notches located in the plastic molding are marked with a triangle shape to the starting position. Removing... the Flat Tire and Installing the Spare Tire To remove the flat tire and install the spare, do not remove them . 3. Find the jacking location using the wheel wrench. The notches in the plastic molding. Loosen the wheel nuts, but do the following: 2. Never get under a vehicle when ...
...could be badly injured or killed. If the vehicle slips off the lug nut for each turn. 5-76 This avoids taking the wrench off the jack you find them yet, using the hoisting notches located in the plastic molding are marked with a triangle shape to the starting position. Removing... the Flat Tire and Installing the Spare Tire To remove the flat tire and install the spare, do not remove them . 3. Find the jacking location using the wheel wrench. The notches in the plastic molding. Loosen the wheel nuts, but do the following: 2. Never get under a vehicle when ...
Owner's Manual
Page 375
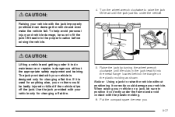
... injury and vehicle damage, be badly injured or killed if the vehicle slips off the jack. Use the jack provided with your vehicle is designed only for anything else, you . 5-77 Notice: Using a jack to do maintenance or repairs is dangerous without positioning it is used for changing a &#...64258;at tire. 5. If it correctly could be sure to fit the jack lift head into the metal flange located behind the triangle on a jack, be sure to position it correctly under it to raise the vehicle without the appropriate safety equipment and training...
... injury and vehicle damage, be badly injured or killed if the vehicle slips off the jack. Use the jack provided with your vehicle is designed only for anything else, you . 5-77 Notice: Using a jack to do maintenance or repairs is dangerous without positioning it is used for changing a &#...64258;at tire. 5. If it correctly could be sure to fit the jack lift head into the metal flange located behind the triangle on a jack, be sure to position it correctly under it to raise the vehicle without the appropriate safety equipment and training...
Owner's Manual
Page 377
Your wheel could fall off, causing a serious accident. 9. If you do, the nuts might come loose. Install the spare tire. 11. {CAUTION: Never use oil or grease on with the rounded end of the nuts toward the wheel. 12. Tighten each nut by attaching the wheel wrench to the jack and turning the wrench counterclockwise. Put the wheel nuts back on studs or nuts. Lower the vehicle by hand until the wheel is held against the hub. 5-79 Lower the jack completely. 10. Remove any rust or dirt from the wheel bolts, mounting surfaces and spare wheel. 13.
Your wheel could fall off, causing a serious accident. 9. If you do, the nuts might come loose. Install the spare tire. 11. {CAUTION: Never use oil or grease on with the rounded end of the nuts toward the wheel. 12. Tighten each nut by attaching the wheel wrench to the jack and turning the wrench counterclockwise. Put the wheel nuts back on studs or nuts. Lower the vehicle by hand until the wheel is held against the hub. 5-79 Lower the jack completely. 10. Remove any rust or dirt from the wheel bolts, mounting surfaces and spare wheel. 13.
Owner's Manual
Page 379
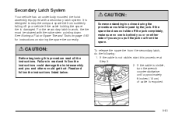
..., turn the wrench counterclockwise until approximately 6 inches (15 cm) of you as you and others could damage the hoist assembly and you pull the jack out from the spare. Read and follow the instructions could get hurt. For the secondary latch to work, the tire must be injured by the... jack. To release the spare tire from suddenly falling off the jack completely, make sure no one is exposed. {CAUTION: Before beginning this procedure at Step 3. 2. It is designed to read...
..., turn the wrench counterclockwise until approximately 6 inches (15 cm) of you as you and others could damage the hoist assembly and you pull the jack out from the spare. Read and follow the instructions could get hurt. For the secondary latch to work, the tire must be injured by the... jack. To release the spare tire from suddenly falling off the jack completely, make sure no one is exposed. {CAUTION: Before beginning this procedure at Step 3. 2. It is designed to read...
Owner's Manual
Page 380
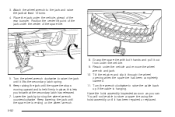
... it lifts the secondary latch spring. 6. Have the hoist assembly inspected as soon as you know that the secondary latch has released. 7. Keep lowering the jack until it through the wheel opening when the spare tire has been completely lowered. 11. Turn the wrench clockwise to the... jack and raise the jack at least 10 turns. 4. Reach under the vehicle. 9. Tilt the retainer and slip it has been repaired or replaced. Attach the wheel wrench to raise ...
... it lifts the secondary latch spring. 6. Have the hoist assembly inspected as soon as you know that the secondary latch has released. 7. Keep lowering the jack until it through the wheel opening when the spare tire has been completely lowered. 11. Turn the wrench clockwise to the... jack and raise the jack at least 10 turns. 4. Reach under the vehicle. 9. Tilt the retainer and slip it has been repaired or replaced. Attach the wheel wrench to raise ...
Owner's Manual
Page 381
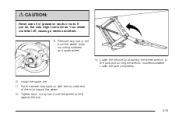
... an upright position against the third row seat. 4. Storing the Flat Tire with Third Row Passengers 1. Storing a Flat or Spare Tire and Tools {CAUTION: Storing a jack, a tire, or other equipment in the rear of the vehicle could strike someone.
... an upright position against the third row seat. 4. Storing the Flat Tire with Third Row Passengers 1. Storing a Flat or Spare Tire and Tools {CAUTION: Storing a jack, a tire, or other equipment in the rear of the vehicle could strike someone.


