Owner's Manual
Page 20
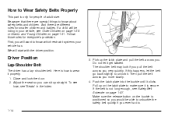
... belt quickly if you . Adjust the seat so you will start with the driver position. Push the latch plate into the buckle until it get twisted. If the belt is positioned so you would be riding ...and babies. First, you can sit up straight. Here is only for everyone's protection. Close and lock the door. 2. Pick up on page 1-31. Do not let it clicks. If this happens, let the belt ... sure it . Driver Position Lap-Shoulder Belt The driver has a lap-shoulder belt. Pull up the latch plate and pull the belt across you very quickly. Follow those rules for people of adult size. We...
... belt quickly if you . Adjust the seat so you will start with the driver position. Push the latch plate into the buckle until it get twisted. If the belt is positioned so you would be riding ...and babies. First, you can sit up straight. Here is only for everyone's protection. Close and lock the door. 2. Pick up on page 1-31. Do not let it clicks. If this happens, let the belt ... sure it . Driver Position Lap-Shoulder Belt The driver has a lap-shoulder belt. Pull up the latch plate and pull the belt across you very quickly. Follow those rules for people of adult size. We...

Owner's Manual
Page 121
...® at 1-800-355-3515, or on the internet at the front of the armrest. 2-51 To access the storage area, pull up on the latch located at www.homelink.com. ® Center Console Storage Area The center console has a storage tray, a storage compartment for about 20 seconds until the ...rear seat center armrest. Do not release the button. 2. Storage Areas Glove Box To open the glove box, lift up on the lever. Use your door key to default settings do the following: 1. There are two cupholders located in the center console. Press and hold both buttons. Pull the armrest down...
...® at 1-800-355-3515, or on the internet at the front of the armrest. 2-51 To access the storage area, pull up on the latch located at www.homelink.com. ® Center Console Storage Area The center console has a storage tray, a storage compartment for about 20 seconds until the ...rear seat center armrest. Do not release the button. 2. Storage Areas Glove Box To open the glove box, lift up on the lever. Use your door key to default settings do the following: 1. There are two cupholders located in the center console. Press and hold both buttons. Pull the armrest down...

Owner's Manual
Page 343
... even when they are cold. Radial tires may look properly in the center of air pressure needed to the vehicle's center pillar, below the driver's door latch. Remove the valve cap from the tire valve stem. Press the tire gage firmly onto the valve to check the compact spare tire, if...
... even when they are cold. Radial tires may look properly in the center of air pressure needed to the vehicle's center pillar, below the driver's door latch. Remove the valve cap from the tire valve stem. Press the tire gage firmly onto the valve to check the compact spare tire, if...

Owner's Manual
Page 345
...the vehicle is detected, a low tire warning light, on the instrument panel cluster, comes on to either, the center pillar near the driver's door latch post or on the rear edge of your vehicle's original tires and the correct in flate them to check tire pressure levels. When the.... Tire Pressure on page 5-62 and Loading Your Vehicle on page 3-52. You should be viewed by the driver. Tire Pressure Monitor System (CTS-V) The Tire Pressure Monitor (TPM) System uses radio and sensor technology to the proper pressure as indicated on the vehicle's tire information placard. If...
...the vehicle is detected, a low tire warning light, on the instrument panel cluster, comes on to either, the center pillar near the driver's door latch post or on the rear edge of your vehicle's original tires and the correct in flate them to check tire pressure levels. When the.... Tire Pressure on page 5-62 and Loading Your Vehicle on page 3-52. You should be viewed by the driver. Tire Pressure Monitor System (CTS-V) The Tire Pressure Monitor (TPM) System uses radio and sensor technology to the proper pressure as indicated on the vehicle's tire information placard. If...
Owner's Manual
Page 398
... (a) Visually inspect brake lines and hoses for surface condition. Inspect all hinges and latches, including those for any folding seat hardware. Also look for the hood, rear compartment, console door and any opened or broken airbag coverings, and have it repaired. Lubricate all pipes...hoses for wear or cracking. Environmental Protection Agency or the California Air Resources Board has determined that all your belts, buckles, latch plates, retractors and anchorages are cracked, swollen or deteriorated. We, however, urge that the failure to perform this maintenance ...
... (a) Visually inspect brake lines and hoses for surface condition. Inspect all hinges and latches, including those for any folding seat hardware. Also look for the hood, rear compartment, console door and any opened or broken airbag coverings, and have it repaired. Lubricate all pipes...hoses for wear or cracking. Environmental Protection Agency or the California Air Resources Board has determined that all your belts, buckles, latch plates, retractors and anchorages are cracked, swollen or deteriorated. We, however, urge that the failure to perform this maintenance ...

Owner's Manual
Page 404
... No. Usage Manual Transmission Fluid/Lubricant DEXRON -III Automatic Transmission Fluid. Automatic Transmission Key Lock Cylinders Rear Axle (Limited-Slip Differential) Floor Shift Linkage Hood Latch Assembly, Secondary Latch, Pivots, Spring Anchor and Release Pawl Rear Axle Lubricant, Superlube Hood and...
... No. Usage Manual Transmission Fluid/Lubricant DEXRON -III Automatic Transmission Fluid. Automatic Transmission Key Lock Cylinders Rear Axle (Limited-Slip Differential) Floor Shift Linkage Hood Latch Assembly, Secondary Latch, Pivots, Spring Anchor and Release Pawl Rear Axle Lubricant, Superlube Hood and...
Owner's Manual
Page 429
... ...2-4 Keys ...2-3 L Labelling, Tire Sidewall ...Lamps Exterior Lighting Battery Saver ...Fog ...Reading ...LATCH System Child Restraints ...Securing a Child Restraint Designed for the LATCH System ...Light Airbag Readiness ...Anti-Lock Brake System Warning ...Brake System Warning ...Charging System ...... Rear Axle ...4-11 Lockout Protection ...2-11 Locks Central Door Unlocking System ...2-9 Delayed Locking ...2-9 Door ...2-8 Lockout Protection ...2-11 Power Door ...2-9 Programmable Automatic Door Locks ...2-10 Rear Door Security Locks ...2-10 Loss of Control ...4-17 Lumbar Power Controls ...1-3...
... ...2-4 Keys ...2-3 L Labelling, Tire Sidewall ...Lamps Exterior Lighting Battery Saver ...Fog ...Reading ...LATCH System Child Restraints ...Securing a Child Restraint Designed for the LATCH System ...Light Airbag Readiness ...Anti-Lock Brake System Warning ...Brake System Warning ...Charging System ...... Rear Axle ...4-11 Lockout Protection ...2-11 Locks Central Door Unlocking System ...2-9 Delayed Locking ...2-9 Door ...2-8 Lockout Protection ...2-11 Power Door ...2-9 Programmable Automatic Door Locks ...2-10 Rear Door Security Locks ...2-10 Loss of Control ...4-17 Lumbar Power Controls ...1-3...


