Owner's Manual
Page 1
2004 Cadillac CTS Owner Manual Seats and Restraint Systems ...1-1 Front Seats ...1-2 Rear Seats ...1-7 Safety Belts ...1-9 Child Restraints ...1-29 Air Bag Systems ...1-48 Restraint System Check ...1-59 Features and Controls ...2-1 Keys ...2-3 Doors and Locks ...2-8 Windows ...2-14 Theft-Deterrent Systems ...2-18 Starting and Operating Your Vehicle ...2-21 Mirrors ...2-40 OnStar® System ...2-45 HomeLink® Transmitter ...2-47...
2004 Cadillac CTS Owner Manual Seats and Restraint Systems ...1-1 Front Seats ...1-2 Rear Seats ...1-7 Safety Belts ...1-9 Child Restraints ...1-29 Air Bag Systems ...1-48 Restraint System Check ...1-59 Features and Controls ...2-1 Keys ...2-3 Doors and Locks ...2-8 Windows ...2-14 Theft-Deterrent Systems ...2-18 Starting and Operating Your Vehicle ...2-21 Mirrors ...2-40 OnStar® System ...2-45 HomeLink® Transmitter ...2-47...

Owner's Manual
Page 68
Section 2 Features and Controls Assist Handles ...2-52 Garment Hooks ...2-52 Roof Rack Provisions ...2-53 Convenience Net ...2-53 Sunroof ...2-54 Vehicle Personalization ...2-55 Memory Seat and Mirrors ...2-55 OnStar® System ...2-45 HomeLink® Transmitter ...2-47 Programming the HomeLink® Transmitter ...2-48 Storage Areas ...2-52 Glove Box ...2-52 Cupholder(s) ...2-52 Center Console Storage Area ...2-52 Map Pocket ...2-52 2-2
Section 2 Features and Controls Assist Handles ...2-52 Garment Hooks ...2-52 Roof Rack Provisions ...2-53 Convenience Net ...2-53 Sunroof ...2-54 Vehicle Personalization ...2-55 Memory Seat and Mirrors ...2-55 OnStar® System ...2-45 HomeLink® Transmitter ...2-47 Programming the HomeLink® Transmitter ...2-48 Storage Areas ...2-52 Glove Box ...2-52 Cupholder(s) ...2-52 Center Console Storage Area ...2-52 Map Pocket ...2-52 2-2
Owner's Manual
Page 83
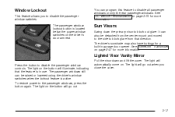
... detached from the center mount and moved to the side to disable the passenger window switches. The light on page 2-47 for more information. See HomeLink® Transmitter on the button will go out. The light will illuminate, indicating that direction. It can program this feature to block out glare. Pull...
... detached from the center mount and moved to the side to disable the passenger window switches. The light on page 2-47 for more information. See HomeLink® Transmitter on the button will go out. The light will illuminate, indicating that direction. It can program this feature to block out glare. Pull...

Owner's Manual
Page 113
...;cations to the following two conditions: (1) this device may cause undesired operation. This device complies with Part 15 of the FCC Rules. HomeLink®, a combined universal transmitter and receiver, provides a way to replace up to three hand-held transmitters used to the following two conditions... or by other than an authorized service facility could void authorization to use this equipment. HomeLink® Transmitter If your vehicle is equipped with the HomeLink® Transmitter, it complies with RSS-210 of Industry Canada. Operation is subject to activate devices such as ...
...;cations to the following two conditions: (1) this device may cause undesired operation. This device complies with Part 15 of the FCC Rules. HomeLink®, a combined universal transmitter and receiver, provides a way to replace up to three hand-held transmitters used to the following two conditions... or by other than an authorized service facility could void authorization to use this equipment. HomeLink® Transmitter If your vehicle is equipped with the HomeLink® Transmitter, it complies with RSS-210 of Industry Canada. Operation is subject to activate devices such as ...

Owner's Manual
Page 114
...the two outside of the steps involved, it is advised to park outside buttons, releasing only when the indicator light begins to the remaining two HomeLink® buttons. 2. Simultaneously press and hold down the buttons for longer than 30 seconds and do not repeat this section. 2-48 Read ... a second and/or third transmitter to flash, after 20 seconds. Press and hold both the desired button on the internet at: www.homelink.com or by calling 1-800-355-3515. Be sure that a new battery be turned off while programming the transmitter. Your vehicle's engine should ...
...the two outside of the steps involved, it is advised to park outside buttons, releasing only when the indicator light begins to the remaining two HomeLink® buttons. 2. Simultaneously press and hold down the buttons for longer than 30 seconds and do not repeat this section. 2-48 Read ... a second and/or third transmitter to flash, after 20 seconds. Press and hold both the desired button on the internet at: www.homelink.com or by calling 1-800-355-3515. Be sure that a new battery be turned off while programming the transmitter. Your vehicle's engine should ...

Owner's Manual
Page 115
...brand of the garage door opener (or other rolling code device), repeat this sequence a third time to a constant light, continue with Step 2 under "Programming HomeLink®." Do not repeat Step 1 as this will erase all of a rolling-code equipped device (most commonly, a garage door opener). 6. Locate the "... complete the programming of the programmed channels. The indicator light will have 30 seconds to the vehicle. Press and hold the programmed HomeLink® button for two seconds and then turns to complete the programming. This can usually be found where the hanging antenna wire ...
...brand of the garage door opener (or other rolling code device), repeat this sequence a third time to a constant light, continue with Step 2 under "Programming HomeLink®." Do not repeat Step 1 as this will erase all of a rolling-code equipped device (most commonly, a garage door opener). 6. Locate the "... complete the programming of the programmed channels. The indicator light will have 30 seconds to the vehicle. Press and hold the programmed HomeLink® button for two seconds and then turns to complete the programming. This can usually be found where the hanging antenna wire ...

Owner's Manual
Page 116
...-held transmitter until the indicator light begins to flash, after several seconds of transmission. If you live), replace Step 3 under "Programming HomeLink®" to complete. The indicator light will flash slowly at least half of where you live in the same manner. This may not... be programmed at any time beginning with Step 4 under "Programming HomeLink®" with the following : 1. Using HomeLink® Press and hold down the two outside buttons until the frequency signal has been successfully accepted by using the "...
...-held transmitter until the indicator light begins to flash, after several seconds of transmission. If you live), replace Step 3 under "Programming HomeLink®" to complete. The indicator light will flash slowly at least half of where you live in the same manner. This may not... be programmed at any time beginning with Step 4 under "Programming HomeLink®" with the following : 1. Using HomeLink® Press and hold down the two outside buttons until the frequency signal has been successfully accepted by using the "...

Owner's Manual
Page 117
...the indicator light begins to flash. 2. Reprogramming a Single HomeLink® Button To program a device to flash after 20 seconds. Hold down the two outside buttons for about 20 seconds until the HomeLink® indicator light turns off. 3. Continue to default settings ... hold both buttons. While still holding the HomeLink® button, proceed with Step 2 under "Programming HomeLink®." ® ® Resetting Defaults To reset HomeLink® to hold the desired HomeLink® button. For questions or comments, contact HomeLink® at 1-800-355-3515, or on...
...the indicator light begins to flash. 2. Reprogramming a Single HomeLink® Button To program a device to flash after 20 seconds. Hold down the two outside buttons for about 20 seconds until the HomeLink® indicator light turns off. 3. Continue to default settings ... hold both buttons. While still holding the HomeLink® button, proceed with Step 2 under "Programming HomeLink®." ® ® Resetting Defaults To reset HomeLink® to hold the desired HomeLink® button. For questions or comments, contact HomeLink® at 1-800-355-3515, or on...
Owner's Manual
Page 431
... - Stop Engine ...3-67 Engine Power Reduced ...3-67 Engine Specifications ...5-107 Engine Speed Limiter ...3-37 Entering the Personalization Menu ...3-80 Entry Lighting ...3-23 Erasing HomeLink® Buttons ...2-50 Event Data Records (EDR) ...7-10 Exiting the Personalization Menu ...3-99 Express-Down Window ...2-15 5
... - Stop Engine ...3-67 Engine Power Reduced ...3-67 Engine Specifications ...5-107 Engine Speed Limiter ...3-37 Entering the Personalization Menu ...3-80 Entry Lighting ...3-23 Erasing HomeLink® Buttons ...2-50 Event Data Records (EDR) ...7-10 Exiting the Personalization Menu ...3-99 Express-Down Window ...2-15 5
Owner's Manual
Page 433
... Discharge (HID) Lighting ...5-52 Headlamps Suggested ...3-68 Heated Seats ...1-3 Highbeam On Light ...3-49 Highway Hypnosis ...4-24 Hill and Mountain Roads ...4-24 Hitches ...4-41 HomeLink® Transmitter ...2-47 HomeLink® Transmitter, Programming ...2-48 Hood Checking Things Under ...5-10 Release ...5-11 Horn ...3-7 How to Add Coolant to the Coolant Surge Tank ...5-35 How to...
... Discharge (HID) Lighting ...5-52 Headlamps Suggested ...3-68 Heated Seats ...1-3 Highbeam On Light ...3-49 Highway Hypnosis ...4-24 Hill and Mountain Roads ...4-24 Hitches ...4-41 HomeLink® Transmitter ...2-47 HomeLink® Transmitter, Programming ...2-48 Hood Checking Things Under ...5-10 Release ...5-11 Horn ...3-7 How to Add Coolant to the Coolant Surge Tank ...5-35 How to...

Owner's Manual
Page 436
......3-69 Older Children, Restraints ...1-29 Online Owner Center ...7-3 OnStar® Personal Calling ...2-46 OnStar® Services ...2-45 OnStar® Steering Wheel Controls (CTS) ...2-46 OnStar® System ...2-45 OnStar® Virtual Advisor ...2-46 Other Warning Devices ...3-7 Outlet Adjustment ...3-31 Outside Convex Mirror ...2-44 Curb View Assist... Seat ...1-2 Steering Fluid ...5-39 Windows ...2-15 Power Steering ...4-11 Pretensioners, Safety Belt ...1-28 Programmable Automatic Door Locks ...2-10 Programming the HomeLink® Transmitter ...2-48 Programming the Power Windows ...2-16
......3-69 Older Children, Restraints ...1-29 Online Owner Center ...7-3 OnStar® Personal Calling ...2-46 OnStar® Services ...2-45 OnStar® Steering Wheel Controls (CTS) ...2-46 OnStar® System ...2-45 OnStar® Virtual Advisor ...2-46 Other Warning Devices ...3-7 Outlet Adjustment ...3-31 Outside Convex Mirror ...2-44 Curb View Assist... Seat ...1-2 Steering Fluid ...5-39 Windows ...2-15 Power Steering ...4-11 Pretensioners, Safety Belt ...1-28 Programmable Automatic Door Locks ...2-10 Programming the HomeLink® Transmitter ...2-48 Programming the Power Windows ...2-16

Owner's Manual
Page 437
... System Parts ...5-43 Replacing Restraint System Parts After a Crash ...1-60 Reporting Safety Defects Canadian Government ...7-11 General Motors ...7-11 United States Government ...7-11 Reprogramming a Single HomeLink® Button ...2-51 Resetting Defaults ...2-51 Restraint System Check Checking Your Restraint Systems ...1-59 Replacing Restraint System Parts After a Crash ...1-60 11
... System Parts ...5-43 Replacing Restraint System Parts After a Crash ...1-60 Reporting Safety Defects Canadian Government ...7-11 General Motors ...7-11 United States Government ...7-11 Reprogramming a Single HomeLink® Button ...2-51 Resetting Defaults ...2-51 Restraint System Check Checking Your Restraint Systems ...1-59 Replacing Restraint System Parts After a Crash ...1-60 11
Owner's Manual
Page 441
... U Underhood Fuse Block ...5-95 Understanding Radio Reception ...3-119 Uniform Tire Quality Grading ...5-69 United States - Customer Assistance ...7-4 Used Replacement Wheels ...5-72 Using DSP ...3-107 Using HomeLink® ...2-50 Using the Single CD Player ...3-112 Using the Six-CD CD Changer ...3-113 Vehicle (cont.) Loading ...4-33 Parking Your ...2-37 Symbols ...iv Vehicle...
... U Underhood Fuse Block ...5-95 Understanding Radio Reception ...3-119 Uniform Tire Quality Grading ...5-69 United States - Customer Assistance ...7-4 Used Replacement Wheels ...5-72 Using DSP ...3-107 Using HomeLink® ...2-50 Using the Single CD Player ...3-112 Using the Six-CD CD Changer ...3-113 Vehicle (cont.) Loading ...4-33 Parking Your ...2-37 Symbols ...iv Vehicle...


