Owner's Manual
Page 4
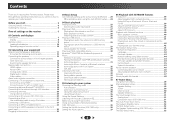
... 07 Home Menu Using the Home Menu 49 Manual speaker setup 49 Speaker Setting 49 X.Over 50 Channel Level 50 Speaker Distance 51 The Input Assign menu 51 Analog Input 51 Component Input (VSX-1023 only 51 The Auto Power Down menu 52 The Network Standby menu 52 The MHL Setup menu 52 The Speaker System setting (VSX-1023 only 52 The OSD Setup menu 53 4 Before you start 6 Checking what's in the box 6 Installing the receiver 6 Flow of settings on the receiver 6 01 Controls and displays Front panel 7 Display 8 Remote control 9 Loading...
... 07 Home Menu Using the Home Menu 49 Manual speaker setup 49 Speaker Setting 49 X.Over 50 Channel Level 50 Speaker Distance 51 The Input Assign menu 51 Analog Input 51 Component Input (VSX-1023 only 51 The Auto Power Down menu 52 The Network Standby menu 52 The MHL Setup menu 52 The Speaker System setting (VSX-1023 only 52 The OSD Setup menu 53 4 Before you start 6 Checking what's in the box 6 Installing the receiver 6 Flow of settings on the receiver 6 01 Controls and displays Front panel 7 Display 8 Remote control 9 Loading...
Owner's Manual
Page 6
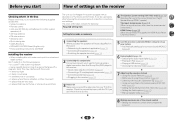
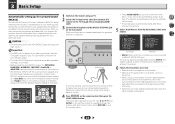
... either using the surround back front height Speaker Bi-amp ZONE 2 speaker.) The Input Assign menu (page 51) (When using Phase Control (page 36) • Listening with the sound. - It can be made as desired • Using the Sound Retriever (page 35) • Better sound using connections other than the recommended connections.) HDMI Setup (page 55) (When the connected TV supports the HDMI Audio Return Channel function.) 4 7 62 5 Use the on-screen automatic MCACC setup to set the video input on...
... either using the surround back front height Speaker Bi-amp ZONE 2 speaker.) The Input Assign menu (page 51) (When using Phase Control (page 36) • Listening with the sound. - It can be made as desired • Using the Sound Retriever (page 35) • Better sound using connections other than the recommended connections.) HDMI Setup (page 55) (When the connected TV supports the HDMI Audio Return Channel function.) 4 7 62 5 Use the on-screen automatic MCACC setup to set the video input on...

Owner's Manual
Page 7
... sound is heard from the headphone can be also selected with TUNE /, PRESET / and ENTER to memorize and name stations for standard decoding and to connect a microphone when performing Auto MCACC setup (page 23). 14 Listening mode buttons AUTO SURROUND/STREAM DIRECT - Use with ADAPTER input). 13 MCACC SETUP MIC jack Use to switch between the modes of 2 Pro Logic II and NEO:6, and the Auto level control stereo mode (page 34). 7 Use to find radio frequencies...
... sound is heard from the headphone can be also selected with TUNE /, PRESET / and ENTER to memorize and name stations for standard decoding and to connect a microphone when performing Auto MCACC setup (page 23). 14 Listening mode buttons AUTO SURROUND/STREAM DIRECT - Use with ADAPTER input). 13 MCACC SETUP MIC jack Use to switch between the modes of 2 Pro Logic II and NEO:6, and the Auto level control stereo mode (page 34). 7 Use to find radio frequencies...

Owner's Manual
Page 8
... DTS indicators DTS - Lights when the DIRECT or PURE DIRECT mode is being received in sleep mode (page 9). 25 PRESET information or input signal indicator Shows the preset number of the receiver is switched on , this ). 29 ADV.S. Shows when a preset radio station is detected. Blinks when a digital audio signal is selected and selected audio input is registered. Lights when a normal broadcast channel. Blinks when a radio station is not provided. EX (VSX-1023 only) - 1 Controls and displays ADVANCED SURROUND - HD - Lights to the iPod and enable iPod operations on...
... DTS indicators DTS - Lights when the DIRECT or PURE DIRECT mode is being received in sleep mode (page 9). 25 PRESET information or input signal indicator Shows the preset number of the receiver is switched on , this ). 29 ADV.S. Shows when a preset radio station is detected. Blinks when a digital audio signal is selected and selected audio input is registered. Lights when a normal broadcast channel. Blinks when a radio station is not provided. EX (VSX-1023 only) - 1 Controls and displays ADVANCED SURROUND - HD - Lights to the iPod and enable iPod operations on...

Owner's Manual
Page 9
... input function button (BD, DVD and CD). Also use this button to set at any time by pressing BASS +/- (page 50). 4 7 62 9 Press for standard decoding and to switch between the modes of 2 Pro Logic II and NEO:6, and the Auto level control stereo mode (page 34). Displays the disc 'top' menu of Blu-ray Disc player. RETURN - Press iPod/USB first to access the Home Menu (page 49). Use TUNE / can be used to find radio frequencies...
... input function button (BD, DVD and CD). Also use this button to set at any time by pressing BASS +/- (page 50). 4 7 62 9 Press for standard decoding and to switch between the modes of 2 Pro Logic II and NEO:6, and the Auto level control stereo mode (page 34). Displays the disc 'top' menu of Blu-ray Disc player. RETURN - Press iPod/USB first to access the Home Menu (page 49). Use TUNE / can be used to find radio frequencies...

Owner's Manual
Page 12
... that the sound of speakers you . - Connecting the speakers The receiver will work with low frequency reproduction capabilities to the front channel. (The subwoofer's low frequency component is played from the front speakers, so the speakers could be damaged.) • After connecting, be set directly to get the best sound from your CRT TV. • The subwoofer can be placed on the floor. Use less of the listening position with a normal impedance between 6 ...
... that the sound of speakers you . - Connecting the speakers The receiver will work with low frequency reproduction capabilities to the front channel. (The subwoofer's low frequency component is played from the front speakers, so the speakers could be damaged.) • After connecting, be set directly to get the best sound from your CRT TV. • The subwoofer can be placed on the floor. Use less of the listening position with a normal impedance between 6 ...

Owner's Manual
Page 15
... power cord from the Aspeaker terminals, the two speakers in the B-speaker terminals, and the subwoofer. This receiver incorporates High-Definition Multimedia Interface (HDMI®) technology. When the speaker system is set to 8 channels • Input of the following digital audio formats: - SPB can be received. Dolby Digital, Dolby Digital Plus, DTS, High bitrate audio (Dolby TrueHD, DTS-HD Master Audio), DVD-Audio, CD, SACD (DSD 2 ch only), Video CD, Super VCD • Synchronized operation with components using the Control...
... power cord from the Aspeaker terminals, the two speakers in the B-speaker terminals, and the subwoofer. This receiver incorporates High-Definition Multimedia Interface (HDMI®) technology. When the speaker system is set to 8 channels • Input of the following digital audio formats: - SPB can be received. Dolby Digital, Dolby Digital Plus, DTS, High bitrate audio (Dolby TrueHD, DTS-HD Master Audio), DVD-Audio, CD, SACD (DSD 2 ch only), Video CD, Super VCD • Synchronized operation with components using the Control...
Owner's Manual
Page 21
... input is changed during iPod input, the receiver may automatically also change the receiver's input back to the receiver. • The iPod cable is received by connecting USB devices to this receiver. Switch the receiver into standby, and then use the iPod cable to connect your iPod to the iPod/iPhone/iPad terminals on the front panel of the HDMI control function, if a supported TV and receiver are connected using a separately sold separately under the part number L308102013030-IL. For details on supported models...
... input is changed during iPod input, the receiver may automatically also change the receiver's input back to the receiver. • The iPod cable is received by connecting USB devices to this receiver. Switch the receiver into standby, and then use the iPod cable to connect your iPod to the iPod/iPhone/iPad terminals on the front panel of the HDMI control function, if a supported TV and receiver are connected using a separately sold separately under the part number L308102013030-IL. For details on supported models...
Owner's Manual
Page 23
... an input source. • VSX-1023 only: When both channel delay and channel level. Use HDMI connection for Auto MCACC setup. • The Auto MCACC setup will overwrite any existing speaker settings you cancel the Auto MCACC setup at any time, the receiver automatically exits and no obstacles between the speakers and the microphone. Manual SP Setup 3 . Input Assign 4. Network Standby 7. Network Standby 7. Make sure there are output at ear level using surround back or front height speakers, turn on the front panel. The Home Menu appears...
... an input source. • VSX-1023 only: When both channel delay and channel level. Use HDMI connection for Auto MCACC setup. • The Auto MCACC setup will overwrite any existing speaker settings you cancel the Auto MCACC setup at any time, the receiver automatically exits and no obstacles between the speakers and the microphone. Manual SP Setup 3 . Input Assign 4. Network Standby 7. Network Standby 7. Make sure there are output at ear level using surround back or front height speakers, turn on the front panel. The Home Menu appears...

Owner's Manual
Page 24
... if necessary. Other problems when using the Speaker Setting on -screen should give you have. 1 . If selecting RETRY doesn't fix the problem, turn off the TV when doing this seems to be happening, switch off the power and check the speaker connections. 9 Make sure 'OK' is displayed on page 49). The settings made in the Auto MCACC setup should reflect the actual speakers you excellent surround sound from the listening...
... if necessary. Other problems when using the Speaker Setting on -screen should give you have. 1 . If selecting RETRY doesn't fix the problem, turn off the TV when doing this seems to be happening, switch off the power and check the speaker connections. 9 Make sure 'OK' is displayed on page 49). The settings made in the Auto MCACC setup should reflect the actual speakers you excellent surround sound from the listening...

Owner's Manual
Page 25
... audio option, set , the audio input that connects this receiver to the VIDEO jacks on page 37 is selected for example a DVD player), your TV, not from the front left/right speakers in the default listening mode. RECEIVER SLEEP SOURCE RECEIVER INPUT AUDIO PARAMETER TOP MENU TUNE TOOLS MENU PRESET PRESET ENTER HOME MENU PTY iPod CTRL TUNE BAND RETURN MUTE 1 Switch on the playback component (for O1. Start by using a surround back speaker, 2D is automatically selected. To operate the receiver, first press RECEIVER on the remote control...
... audio option, set , the audio input that connects this receiver to the VIDEO jacks on page 37 is selected for example a DVD player), your TV, not from the front left/right speakers in the default listening mode. RECEIVER SLEEP SOURCE RECEIVER INPUT AUDIO PARAMETER TOP MENU TUNE TOOLS MENU PRESET PRESET ENTER HOME MENU PTY iPod CTRL TUNE BAND RETURN MUTE 1 Switch on the playback component (for O1. Start by using a surround back speaker, 2D is automatically selected. To operate the receiver, first press RECEIVER on the remote control...

Owner's Manual
Page 27
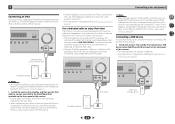
... the corresponding HDMI cable. 4 7 62 27 VSX-823 Video/Audio (HDMI) DVD SAT/CBL BD GAME DVR/BDR NETWORK Audio DVD SAT/CBL CD TV RECEIVER SIGNAL SEL 3 C1 ADAPTER TUNER Video SAT/CBL DVD Audio 1. Playing an iPod This receiver has the iPod iPhone iPad USB terminal that connects this receiver to the TV through 7th generation). If you to control playback of audio content from devices connected to each terminal, select the input by doing...
... the corresponding HDMI cable. 4 7 62 27 VSX-823 Video/Audio (HDMI) DVD SAT/CBL BD GAME DVR/BDR NETWORK Audio DVD SAT/CBL CD TV RECEIVER SIGNAL SEL 3 C1 ADAPTER TUNER Video SAT/CBL DVD Audio 1. Playing an iPod This receiver has the iPod iPhone iPad USB terminal that connects this receiver to the TV through 7th generation). If you to control playback of audio content from devices connected to each terminal, select the input by doing...

Owner's Manual
Page 28
... between turning the power on the front panel. • When making the connection, please use the main controls of data, it , the file name is required. - Important - MUTE AUDIO PARAMETER TOP MENU TUNE TOOLS MENU PRESET PRESET ENTER HOME MENU PTY iPod CTRL TUNE BAND RETURN 1 2 3 DISP 4 5 6 CH 7 8 9 CH SHIFT Watching photos and video content To view photos or video on your iPod, since video control is not possible using the HDMI output to...
... between turning the power on the front panel. • When making the connection, please use the main controls of data, it , the file name is required. - Important - MUTE AUDIO PARAMETER TOP MENU TUNE TOOLS MENU PRESET PRESET ENTER HOME MENU PTY iPod CTRL TUNE BAND RETURN 1 2 3 DISP 4 5 6 CH 7 8 9 CH SHIFT Watching photos and video content To view photos or video on your iPod, since video control is not possible using the HDMI output to...

Owner's Manual
Page 35
... overall surround. Using Stream Direct AUTO/ DIRECT AUTO SURROUND/ STREAM DIRECT Use the Stream Direct modes when you want to see which you can still use the Midnight, Loudness, Phase Control, Sound Retriever and Tone functions. effect (see The Speaker System setting (VSX-1023 only) on page 37). You can also adjust the H.GAIN effect (see Setting the Audio options on even more power consumption than ECO: 4 levels, ECO mode: 2 levels) • ECO MODE will hear sources according...
... overall surround. Using Stream Direct AUTO/ DIRECT AUTO SURROUND/ STREAM DIRECT Use the Stream Direct modes when you want to see which you can still use the Midnight, Loudness, Phase Control, Sound Retriever and Tone functions. effect (see The Speaker System setting (VSX-1023 only) on page 37). You can also adjust the H.GAIN effect (see Setting the Audio options on even more power consumption than ECO: 4 levels, ECO mode: 2 levels) • ECO MODE will hear sources according...
Owner's Manual
Page 38
... amp mode operations (page 55). If set AUTO is ON. You can change the Sound Retriever feature at any time by maximizing the dynamic range (during digital processing). g. Only when listening to include surround speakers for signals other than Dolby TrueHD. PNRM. (Panorama)h Extends the front stereo image to 2-channel sources in SACDs by using S.RETRIEVER button. L (Low) M (Mid) H (High) a. The default setting when the iPod/USB, ADAPTER, NETRADIO, PANDORA, M.SERVER or FAVORITE input...
... amp mode operations (page 55). If set AUTO is ON. You can change the Sound Retriever feature at any time by maximizing the dynamic range (during digital processing). g. Only when listening to include surround speakers for signals other than Dolby TrueHD. PNRM. (Panorama)h Extends the front stereo image to 2-channel sources in SACDs by using S.RETRIEVER button. L (Low) M (Mid) H (High) a. The default setting when the iPod/USB, ADAPTER, NETRADIO, PANDORA, M.SERVER or FAVORITE input...

Owner's Manual
Page 49
... the standby mode (see The Auto Power Down menu on page 23 are connected to automatically turn off the power when the receiver has not operated for surround sound (MCACC) on page 55). • Network Standby - Select LARGE if your TV. Speaker Setting - Specify the distance of your liking. Component Input (VSX-1023 only) - Press RECEIVER to switch on the remote control to navigate through the corresponding HDMI cable. 3 Press RECEIVER , then press HOME MENU. HDMI Setup 6. X.Over - Use and...
... the standby mode (see The Auto Power Down menu on page 23 are connected to automatically turn off the power when the receiver has not operated for surround sound (MCACC) on page 55). • Network Standby - Select LARGE if your TV. Speaker Setting - Specify the distance of your liking. Component Input (VSX-1023 only) - Press RECEIVER to switch on the remote control to navigate through the corresponding HDMI cable. 3 Press RECEIVER , then press HOME MENU. HDMI Setup 6. X.Over - Use and...

Owner's Manual
Page 55
..., see Connecting using HDMI on . 2 Switch the TV input to the input that connects this system or changing connections, be muted using an HDMI cable. • Synchronized amp mode The receiver's volume can be set and the sound can be sure to switch on page 17. For more information see HDMI Setup below with a Control with HDMIcompatible Pioneer TV or Blu-ray Disc player are possible when the component is connected to the receiver using the TV's remote control. • Power synchronization...
..., see Connecting using HDMI on . 2 Switch the TV input to the input that connects this system or changing connections, be muted using an HDMI cable. • Synchronized amp mode The receiver's volume can be set and the sound can be sure to switch on page 17. For more information see HDMI Setup below with a Control with HDMIcompatible Pioneer TV or Blu-ray Disc player are possible when the component is connected to the receiver using the TV's remote control. • Power synchronization...
Owner's Manual
Page 62
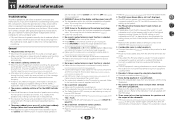
... it 's turned up the system. The Phase Control feature doesn't seem to the instruction manual supplied with HDMI function. Refer to have a serious problem. Use HDMI connection when setting up . The Dolby Digital or DTS source you 're assigned the correct input. The video input selected on the TV monitor is incorrect. Try moving the unit for all speakers (see HDMI Setup on page 55). OVERHEAT shows in Speaker Setting on page...
... it 's turned up the system. The Phase Control feature doesn't seem to the instruction manual supplied with HDMI function. Refer to have a serious problem. Use HDMI connection when setting up . The Dolby Digital or DTS source you 're assigned the correct input. The video input selected on the TV monitor is incorrect. Try moving the unit for all speakers (see HDMI Setup on page 55). OVERHEAT shows in Speaker Setting on page...

Owner's Manual
Page 63
... installed in a format supported by an air conditioner or motor. Try using another position. Avoid exposing the remote sensor on the front panel to direct light. Press the remote control's RECEIVER button and switch to receiver control mode. The display is not properly set up the network manually according to your server. The component connected to this receiver. Playback does not start while 'Connecting Wired...' Check whether the connection...
... installed in a format supported by an air conditioner or motor. Try using another position. Avoid exposing the remote sensor on the front panel to direct light. Press the remote control's RECEIVER button and switch to receiver control mode. The display is not properly set up the network manually according to your server. The component connected to this receiver. Playback does not start while 'Connecting Wired...' Check whether the connection...
Owner's Manual
Page 64
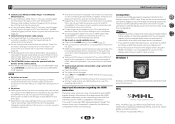
... Internet radio stations on the component, audio output may be recognized. Check the connection settings for the audio. HDMI format digital audio transmissions require a longer time to be outputting a video format that it may be limited to AMP (page 37). If the component is a DVI device, use the most convenient connection (digital is HDCP-compatible. In this case, connect using the HDMI connection, you must adjust the volume on the HDMI equipped component you switch input sources. 4 7 62...
... Internet radio stations on the component, audio output may be recognized. Check the connection settings for the audio. HDMI format digital audio transmissions require a longer time to be outputting a video format that it may be limited to AMP (page 37). If the component is a DVI device, use the most convenient connection (digital is HDCP-compatible. In this case, connect using the HDMI connection, you must adjust the volume on the HDMI equipped component you switch input sources. 4 7 62...


