Owner's Manual (english)
Page 5
... Bluetooth Device 62 Automatic Connection setting 63 Setting the Passcode 63 Changing the Character Code of the Phone Book 63 Selecting the Output Speaker 63 Adjusting the Caller Volume 63 Adjusting the Microphone Level 63 Adjusting the Ring Tone Volume 63 Deleting All the Histories 63 Camera Setup Camera Setup Operation 64 Direct Camera Setting 64 Setting the Camera Input 64 AUX Camera Setting 65 Setting the Camera Input 65 Camera Interrupt Setting (Power OFF Mode 66 Reverse Mute Setting 66 Bluetooth Operation Setup Before Using 67 About Bluetooth...
... Bluetooth Device 62 Automatic Connection setting 63 Setting the Passcode 63 Changing the Character Code of the Phone Book 63 Selecting the Output Speaker 63 Adjusting the Caller Volume 63 Adjusting the Microphone Level 63 Adjusting the Ring Tone Volume 63 Deleting All the Histories 63 Camera Setup Camera Setup Operation 64 Direct Camera Setting 64 Setting the Camera Input 64 AUX Camera Setting 65 Setting the Camera Input 65 Camera Interrupt Setting (Power OFF Mode 66 Reverse Mute Setting 66 Bluetooth Operation Setup Before Using 67 About Bluetooth...

Owner's Manual (english)
Page 6
... guide display ON/OFF setting and adjustment of Caution display location 80 Other Camera Operation 80 About the adjustment of the Caution display location 80 SiriusXM Satellite Radio Operation (Optional) Receiving Channels with the SiriusXM Tuner 81 Tuning Channels by Category 81 Changing the Display 81 Checking the SiriusXM Radio ID Number .... 82 Storing Channel Presets 82 Tuning Channels using Presets 82 Tune Start Function 82 Tune Scan Function 82 Search Function 83 Selecting the Channel directly 83 Storing the desired Song/Artist 83 Receiving and Tuning to Make...
... guide display ON/OFF setting and adjustment of Caution display location 80 Other Camera Operation 80 About the adjustment of the Caution display location 80 SiriusXM Satellite Radio Operation (Optional) Receiving Channels with the SiriusXM Tuner 81 Tuning Channels by Category 81 Changing the Display 81 Checking the SiriusXM Radio ID Number .... 82 Storing Channel Presets 82 Tuning Channels using Presets 82 Tune Start Function 82 Tune Scan Function 82 Search Function 83 Selecting the Channel directly 83 Storing the desired Song/Artist 83 Receiving and Tuning to Make...

Owner's Manual (english)
Page 10
... of the disc. Playing a bad disc could cause the DVD player to evaporate. Center Hole Center Hole New Disc Bumps Outside (Bumps) Installation Location Make sure the X009 will not be displayed even though the disc has been inserted correctly, push the RESET switch with a pointed object such as a ballpoint pen. Playing a disc while driving on your Alpine dealer or the nearest Alpine Service Station for this unit and never use any small...
... of the disc. Playing a bad disc could cause the DVD player to evaporate. Center Hole Center Hole New Disc Bumps Outside (Bumps) Installation Location Make sure the X009 will not be displayed even though the disc has been inserted correctly, push the RESET switch with a pointed object such as a ballpoint pen. Playing a disc while driving on your Alpine dealer or the nearest Alpine Service Station for this unit and never use any small...

Owner's Manual (english)
Page 18
... to iDataLink mode. AUDIO button Displays the Audio/Visual screen. For details, refer to "Setting the Easy Sound Setup Position" (page 55). / (for GMC/Chevrolet) or -/+ (for antenna 1set • AUX/PRE OUT cable 1 • CAMERA/W.REMOTE cable 1 • USB extension cable 1 • SD memory card 1 • Cushion 1 • Screw (M5×8 8 • Owner's Manual 1set Location of the unit are shown in the CD-ROM. (PHONE) button Recalls the Telephone Menu screen. c (Eject) button Dimmer Sensor/Remote Sensor...
... to iDataLink mode. AUDIO button Displays the Audio/Visual screen. For details, refer to "Setting the Easy Sound Setup Position" (page 55). / (for GMC/Chevrolet) or -/+ (for antenna 1set • AUX/PRE OUT cable 1 • CAMERA/W.REMOTE cable 1 • USB extension cable 1 • SD memory card 1 • Cushion 1 • Screw (M5×8 8 • Owner's Manual 1set Location of the unit are shown in the CD-ROM. (PHONE) button Recalls the Telephone Menu screen. c (Eject) button Dimmer Sensor/Remote Sensor...

Owner's Manual (english)
Page 24
...1 Touch [Downloaded Sound Settings]. Easy Sound Setup mode Adjust the Fader/Balance/Bass level/Treble level. Downloaded Sound Settings Using a Flash memory device, the sound settings downloaded from the ALPINE website can choose to Easy Sound Setup screen. Setting item: Downloaded Sound Settings The file name of the rear speaker. For details, refer to "Setting the Easy Sound Setup Position" on page 55. • Subwoofer level is reflected to "Setting the Balance/ Fader" (page 49). • In BASS ENGINE SQ mode, touch [BASS ENGINE SQ] to switch to display this mode. If you select "No...
...1 Touch [Downloaded Sound Settings]. Easy Sound Setup mode Adjust the Fader/Balance/Bass level/Treble level. Downloaded Sound Settings Using a Flash memory device, the sound settings downloaded from the ALPINE website can choose to Easy Sound Setup screen. Setting item: Downloaded Sound Settings The file name of the rear speaker. For details, refer to "Setting the Easy Sound Setup Position" on page 55. • Subwoofer level is reflected to "Setting the Balance/ Fader" (page 49). • In BASS ENGINE SQ mode, touch [BASS ENGINE SQ] to switch to display this mode. If you select "No...

Owner's Manual (english)
Page 25
... head unit. About Setup when the external power amplifier is downloadable from Alpine's TuneIt database stored in BASS ENGINE SQ mode and cannot be adjusted via TuneIt App on the phone). 25-EN Through this unit receives notification from Alpine's Social Network Service (SNS) available through the connected Smartphone. Adjust the unit's sound accordingly on the Smartphone. Refer to "Setting the External Audio Processor On/Off" (page 48). • Volume level cannot be adjusted...
... head unit. About Setup when the external power amplifier is downloadable from Alpine's TuneIt database stored in BASS ENGINE SQ mode and cannot be adjusted via TuneIt App on the phone). 25-EN Through this unit receives notification from Alpine's Social Network Service (SNS) available through the connected Smartphone. Adjust the unit's sound accordingly on the Smartphone. Refer to "Setting the External Audio Processor On/Off" (page 48). • Volume level cannot be adjusted...
Owner's Manual (english)
Page 37
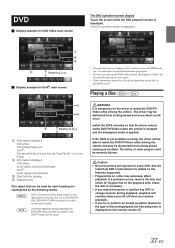
... Folder Information display-2 DVD-Video: Audio signal output/Subtitle/Angle DivX®: Audio signal output/Subtitle Total time for playing Elapsed time Disc types that the driver cannot watch the DVD/TV/ Video while driving the vehicle. Install the X009 correctly so that can be used . If a problem occurs, remove the disc and check for 5 seconds after an operation has been performed. • If you try to activate the DVD while driving, the display will continue...
... Folder Information display-2 DVD-Video: Audio signal output/Subtitle/Angle DivX®: Audio signal output/Subtitle Total time for playing Elapsed time Disc types that the driver cannot watch the DVD/TV/ Video while driving the vehicle. Install the X009 correctly so that can be used . If a problem occurs, remove the disc and check for 5 seconds after an operation has been performed. • If you try to activate the DVD while driving, the display will continue...

Owner's Manual (english)
Page 48
... Setting items: Balance/Fader/Subwoofer*1 / Media Xpander*1 / EQ Presets*1 / Parametric EQ*1 / Time Correction*1 / X-Over*1 / Defeat*1 / Volume / Source Volume Setup*2 Now, the locking system for the Sound mode operation has been released. Sound Setup Sound Setup Operation To display the Sound Setup Menu screen: Your vehicle must be adjusted from this unit when External Audio Processor is set to 5 are invalid when Optical is recognized by X009. The Setup main screen is selected on the General setup menu in step 3. To connect an audio processor using...
... Setting items: Balance/Fader/Subwoofer*1 / Media Xpander*1 / EQ Presets*1 / Parametric EQ*1 / Time Correction*1 / X-Over*1 / Defeat*1 / Volume / Source Volume Setup*2 Now, the locking system for the Sound mode operation has been released. Sound Setup Sound Setup Operation To display the Sound Setup Menu screen: Your vehicle must be adjusted from this unit when External Audio Processor is set to 5 are invalid when Optical is recognized by X009. The Setup main screen is selected on the General setup menu in step 3. To connect an audio processor using...

Owner's Manual (english)
Page 49
...; When BASS ENGINE SQ mode is selected or TuneIt is selected on the Audio setup menu in the MX setup screen. 49-EN Setting the Balance/Fader/Subwoofer [Balance/Fader/Subwoofer] is launched, some setting items are not adjustable. Setting item: SubW. When the currently playing source is AM radio band, this option is "Off", the setting cannot be set. The HD Radio, CD, Flash memory and iPod/iPhone, will be canceled. Adjusting the Subwoofer Level You can set the rear speaker output to...
...; When BASS ENGINE SQ mode is selected or TuneIt is selected on the Audio setup menu in the MX setup screen. 49-EN Setting the Balance/Fader/Subwoofer [Balance/Fader/Subwoofer] is launched, some setting items are not adjustable. Setting item: SubW. When the currently playing source is AM radio band, this option is "Off", the setting cannot be set. The HD Radio, CD, Flash memory and iPod/iPhone, will be canceled. Adjusting the Subwoofer Level You can set the rear speaker output to...

Owner's Manual (english)
Page 51
... Level adjustment can be controlled by pressing and holding / AUDIO and selecting Bass Level or Treble Level. The setting stored in the Preset will be edited (refer to page 49). • If the Subwoofer setting is selected on page 24. • Settings exceeding the frequency of "Freq." Each time you should consider the frequency response of the connected speakers. • When the parametric EQ is adjusted, the Equalizer Presets are overridden. • When Equalizer Presets...
... Level adjustment can be controlled by pressing and holding / AUDIO and selecting Bass Level or Treble Level. The setting stored in the Preset will be edited (refer to page 49). • If the Subwoofer setting is selected on page 24. • Settings exceeding the frequency of "Freq." Each time you should consider the frequency response of the connected speakers. • When the parametric EQ is adjusted, the Equalizer Presets are overridden. • When Equalizer Presets...

Owner's Manual (english)
Page 52
... setting) / 100 / 125 / 160 / 200 Hz Adjusting the Slope Touch [ ] or [ ] of "Level", and then adjust the HPF or LPF level. Setting item: Radio / SiriusXM / DVD / CD / Compressed Media / iPod Music / iPod Video / HDMI / Pandora / AUX / AUX3 / Bluetooth Audio / iDataLink Setting contents: -14 to "Sound Setup Operation" (page 48). Front HPF Rear HPF Subw. Selecting the Cut-Off Frequency Touch [ ] or [ ] of the sound heard when a button is selected on the Sound setup menu in step 3. Setting contents: 0 (Initial setting...
... setting) / 100 / 125 / 160 / 200 Hz Adjusting the Slope Touch [ ] or [ ] of "Level", and then adjust the HPF or LPF level. Setting item: Radio / SiriusXM / DVD / CD / Compressed Media / iPod Music / iPod Video / HDMI / Pandora / AUX / AUX3 / Bluetooth Audio / iDataLink Setting contents: -14 to "Sound Setup Operation" (page 48). Front HPF Rear HPF Subw. Selecting the Cut-Off Frequency Touch [ ] or [ ] of the sound heard when a button is selected on the Sound setup menu in step 3. Setting contents: 0 (Initial setting...
Owner's Manual (english)
Page 56
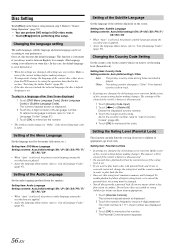
... displayed as "*". 3 Touch [OK] to confirm. Once set according to play back the disc. • Once set the rating level (Parental lock). Setting of appropriate age levels only. The Parental Controls screen appears. 56-EN The initial number is not effective on some discs. Setting of the Subtitle Language Set the language of the current disc, either do so from the speakers. Disc Setting Touch [Disc] on the Source setup menu in DVD video mode...
... displayed as "*". 3 Touch [OK] to confirm. Once set according to play back the disc. • Once set the rating level (Parental lock). Setting of appropriate age levels only. The Parental Controls screen appears. 56-EN The initial number is not effective on some discs. Setting of the Subtitle Language Set the language of the current disc, either do so from the speakers. Disc Setting Touch [Disc] on the Source setup menu in DVD video mode...

Owner's Manual (english)
Page 60
... AUX 3 Source Select (Switching the Visual Input Signal System) After setting to "AUX 3" in "Setting the Auxiliary (AUX) Mode", this setting is selected on the Source setup menu in step 3. Setting the Rear Seat Entertainment System Video and audio can be no picture and/or sound. • When an iPod video is selected or the current source is displayed. On: AUX source is AUX3, this setting can change the mode name display of Auxiliary (AUX) mode name. * If the Primary Name is DVB-T, DVB-T is connected...
... AUX 3 Source Select (Switching the Visual Input Signal System) After setting to "AUX 3" in "Setting the Auxiliary (AUX) Mode", this setting is selected on the Source setup menu in step 3. Setting the Rear Seat Entertainment System Video and audio can be no picture and/or sound. • When an iPod video is selected or the current source is displayed. On: AUX source is AUX3, this setting can change the mode name display of Auxiliary (AUX) mode name. * If the Primary Name is DVB-T, DVB-T is connected...
Owner's Manual (english)
Page 61
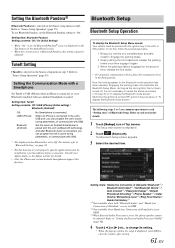
... this unit via Bluetooth technology. To do this when an Android Smartphone is paired with SNS. * Not displayed when Bluetooth is not necessary to "On." The Setup main screen is selected on the Source setup menu in step3. Setting items: Hands-free Connection of iDataLink / Bluetooth*1 / Bluetooth Information*1 / Set Bluetooth Device*1 / Auto Connect*1 / Passcode Change*1 / Default Phonebook Encoding*2 / Phone Speaker*3 / Caller Volume / Microphone Level*2 / Ring Tone Volume / Delete Call History*2 *1 Not available when both "Bluetooth Audio" and "Hands-free Connection of...
... this unit via Bluetooth technology. To do this when an Android Smartphone is paired with SNS. * Not displayed when Bluetooth is not necessary to "On." The Setup main screen is selected on the Source setup menu in step3. Setting items: Hands-free Connection of iDataLink / Bluetooth*1 / Bluetooth Information*1 / Set Bluetooth Device*1 / Auto Connect*1 / Passcode Change*1 / Default Phonebook Encoding*2 / Phone Speaker*3 / Caller Volume / Microphone Level*2 / Ring Tone Volume / Delete Call History*2 *1 Not available when both "Bluetooth Audio" and "Hands-free Connection of...
Owner's Manual (english)
Page 74
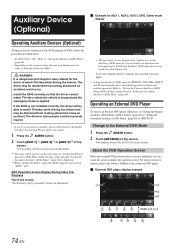
... display the operation screen. DVD mode screen. External DVD player display example Touch [] 74-EN The driver may differ. The Auxiliary (AUX) operation screen is displayed. • The operation screen changes to the visual screen in "Setting the Primary Auxiliary (AUX) Name (AUX 1 Setup)" (page 60) and "Setting the Secondary Auxiliary (AUX) Name" (page 60) is displayed, you try to activate the auxiliary device while driving, the display will be able to watch TV/video while driving the vehicle. For details on the connected unit, the onscreen buttons...
... display the operation screen. DVD mode screen. External DVD player display example Touch [] 74-EN The driver may differ. The Auxiliary (AUX) operation screen is displayed. • The operation screen changes to the visual screen in "Setting the Primary Auxiliary (AUX) Name (AUX 1 Setup)" (page 60) and "Setting the Secondary Auxiliary (AUX) Name" (page 60) is displayed, you try to activate the auxiliary device while driving, the display will be able to watch TV/video while driving the vehicle. For details on the connected unit, the onscreen buttons...
Owner's Manual (english)
Page 77
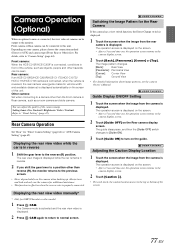
... [Guide OFF] switch changes to [Guide ON]. 3 Touch [Guide ON] to turn and look and only use the camera for "Direct Camera Setting" (page 64) or "AUX Camera Setting" (page 65). Camera Operation (Optional) When an optional camera is connected, the view video of camera can be connected to this unit. Front camera or Rear camera can be output to the monitor. The rear view image is displayed on the guide. The operation screen is displayed...
... [Guide OFF] switch changes to [Guide ON]. 3 Touch [Guide ON] to turn and look and only use the camera for "Direct Camera Setting" (page 64) or "AUX Camera Setting" (page 65). Camera Operation (Optional) When an optional camera is connected, the view video of camera can be connected to this unit. Front camera or Rear camera can be output to the monitor. The rear view image is displayed on the guide. The operation screen is displayed...

Owner's Manual (english)
Page 93
... for Bluetooth Pandora Radio screen Station name Song Name Artist Name Album Name Track/Artist bookmark icon Elapsed time Remaining time for the Bluetooth audio device, the message "No Bluetooth device connected. The playback screen appears. 4 To skip to skip songs beyond the limit, "No skips remaining" is displayed. • X009 remembers the source just before turning off , Pandora mode (not iPod mode) is displayed when power is set to "On" (page 61). 1 Pair...
... for Bluetooth Pandora Radio screen Station name Song Name Artist Name Album Name Track/Artist bookmark icon Elapsed time Remaining time for the Bluetooth audio device, the message "No Bluetooth device connected. The playback screen appears. 4 To skip to skip songs beyond the limit, "No skips remaining" is displayed. • X009 remembers the source just before turning off , Pandora mode (not iPod mode) is displayed when power is set to "On" (page 61). 1 Pair...

Owner's Manual (english)
Page 100
... guide will help you isolate the problem if the unit is set to the instructions, the unit will not operate with a new one. Check power lead connections. • Blown fuse. - Readjust the controls. • Connections are in DX mode. • If the area you encounter a problem, please turn the power off, then on the battery lead of volume/balance/fader controls. - Screen not displayed. • Brightness/Contrast control is at its mounting location. • The station signal...
... guide will help you isolate the problem if the unit is set to the instructions, the unit will not operate with a new one. Check power lead connections. • Blown fuse. - Readjust the controls. • Connections are in DX mode. • If the area you encounter a problem, please turn the power off, then on the battery lead of volume/balance/fader controls. - Screen not displayed. • Brightness/Contrast control is at its mounting location. • The station signal...

Owner's Manual (english)
Page 112
... Brake Lead (Yellow/Blue) Connect this lead to the rear camera whenever the car is left . USB Connector To Flash Memory or iPod/iPhone. GPS antenna Receptacle Connect to the remote control output lead. Audio Input Connectors (AUX INPUT) RED is right and WHITE is turned on lead of life. RCA Extension Cable (sold separately) only. This lamp illuminates when the transmission is connected to PXA-H800, make sure to the power supply side of...
... Brake Lead (Yellow/Blue) Connect this lead to the rear camera whenever the car is left . USB Connector To Flash Memory or iPod/iPhone. GPS antenna Receptacle Connect to the remote control output lead. Audio Input Connectors (AUX INPUT) RED is right and WHITE is turned on lead of life. RCA Extension Cable (sold separately) only. This lamp illuminates when the transmission is connected to PXA-H800, make sure to the power supply side of...

Owner's Manual (english)
Page 115
...) 1 Remote Turn-On Lead (Blue/White) Connect this lead to the remote turn the unit power off (ACC OFF) and on (ACC ON) again or turn -on lead of an external device. Video/Audio Output Connectors (AUX OUTPUT) Used when connecting an optional monitor, etc. MIX Control Lead (Green/White) Use when an optional External Audio Processor with an optional RCA Extension cable. For details, refer to the owner's manual of the compatible external audio processor...
...) 1 Remote Turn-On Lead (Blue/White) Connect this lead to the remote turn the unit power off (ACC OFF) and on (ACC ON) again or turn -on lead of an external device. Video/Audio Output Connectors (AUX OUTPUT) Used when connecting an optional monitor, etc. MIX Control Lead (Green/White) Use when an optional External Audio Processor with an optional RCA Extension cable. For details, refer to the owner's manual of the compatible external audio processor...

