Operation Manual
Page 2
... Arrange wiring and cables in cars with a 12 volts negative (-) ground. (Check with the manual to disassemble or alter may result in fire or electric shock. Using such parts could disable control of the battery. DO NOT DAMAGE PIPE OR WIRING WHEN DRILLING HOLES When drilling holes in locations which might create hazards for the vehicle occupants or hinder vehicle operation (such...
... Arrange wiring and cables in cars with a 12 volts negative (-) ground. (Check with the manual to disassemble or alter may result in fire or electric shock. Using such parts could disable control of the battery. DO NOT DAMAGE PIPE OR WIRING WHEN DRILLING HOLES When drilling holes in locations which might create hazards for the vehicle occupants or hinder vehicle operation (such...
Operation Manual
Page 3
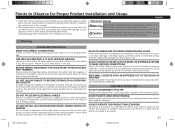
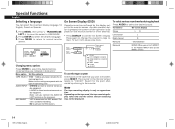
... ! 15.....4 pcs.) s DC power cable s AV cable s Remote control unit s Battery s External Remote Eye (including Velcro) s Remote Control Input Wire Note Do not leave the Remote Control on the tape. Other uses may not securely install the unit in place causing parts to become loose resulting in an accident. Features s 4 Head Hi-Fi Stereo Mobile Video Cassette Recorder. DO NOT INSTALL IN LOCATIONS WITH HIGH MOISTURE OR DUST Avoid installing the unit in either a vertical...
... ! 15.....4 pcs.) s DC power cable s AV cable s Remote control unit s Battery s External Remote Eye (including Velcro) s Remote Control Input Wire Note Do not leave the Remote Control on the tape. Other uses may not securely install the unit in place causing parts to become loose resulting in an accident. Features s 4 Head Hi-Fi Stereo Mobile Video Cassette Recorder. DO NOT INSTALL IN LOCATIONS WITH HIGH MOISTURE OR DUST Avoid installing the unit in either a vertical...
Operation Manual
Page 4
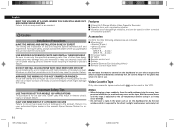
... VCR using the Remote Control. • Places where the unit is likely to be damaged from the effects of problems when installing your VCR, please contact your authorized ALPINE dealer. Mount on the luggage compartment wall, etc. Peel off all when using Velcro only. • If this unit in the luggage compartment, etc.) Set the unit vertically. 1. Bracket Installation Location Do not use or place this unit...
... VCR using the Remote Control. • Places where the unit is likely to be damaged from the effects of problems when installing your VCR, please contact your authorized ALPINE dealer. Mount on the luggage compartment wall, etc. Peel off all when using Velcro only. • If this unit in the luggage compartment, etc.) Set the unit vertically. 1. Bracket Installation Location Do not use or place this unit...

Operation Manual
Page 5
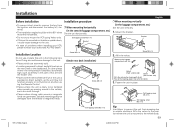
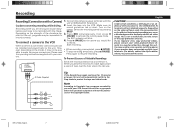
...; Remote Control Input Wire When connecting to the CVA-1005 or TME-M750A monitors, it is difficult to operate using the Remote Control. Fuse VIDEO Cable (Not supplied) OUT IN RIGHT AUDIO LEFT VIDEO Connecting other location which is running . Velcro (Hard surface side) Black Ground Wire. Affix this unit with a 5A (Ampere) fuse connected to the DC power cable. Connections English Connecting the Power Cord Ë Connecting directly to the vehicle's power supply Disconnection Connection with a higher rating than 5A under any Video Monitor...
...; Remote Control Input Wire When connecting to the CVA-1005 or TME-M750A monitors, it is difficult to operate using the Remote Control. Fuse VIDEO Cable (Not supplied) OUT IN RIGHT AUDIO LEFT VIDEO Connecting other location which is running . Velcro (Hard surface side) Black Ground Wire. Affix this unit with a 5A (Ampere) fuse connected to the DC power cable. Connections English Connecting the Power Cord Ë Connecting directly to the vehicle's power supply Disconnection Connection with a higher rating than 5A under any Video Monitor...
Operation Manual
Page 6
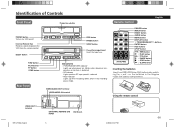
... Receives signals to the diagram inside the battery compartment. EJECT button REC button PAUSE button SP/EP button Cassette compartment Insert the tape here. Blinks when in the recording pause mode. on /off. Blinks when abnormal temperature or moisture is detected. • SP indicator Lights up when SP tape speed is selected. • REC indicator Lights up when power on. Using the remote control VIDEO OUT 2 terminal EXTERNAL REMOTE...
... Receives signals to the diagram inside the battery compartment. EJECT button REC button PAUSE button SP/EP button Cassette compartment Insert the tape here. Blinks when in the recording pause mode. on /off. Blinks when abnormal temperature or moisture is detected. • SP indicator Lights up when SP tape speed is selected. • REC indicator Lights up when power on. Using the remote control VIDEO OUT 2 terminal EXTERNAL REMOTE...

Operation Manual
Page 7
... The noise on another VCR. Protection shutter 2. To Still picture Frame advance Operation Press (PAUSE) Press again to resume playback Press (PLAY) during still picture to resume playback Adjusting the picture Adjusting the tracking Although the unit automatically adjusts the tracking when playing a tape and blinks on the monitor screen, distortion may not be completely removed depending on the tape used, especially when the tape...
... The noise on another VCR. Protection shutter 2. To Still picture Frame advance Operation Press (PAUSE) Press again to resume playback Press (PLAY) during still picture to resume playback Adjusting the picture Adjusting the tracking Although the unit automatically adjusts the tracking when playing a tape and blinks on the monitor screen, distortion may not be completely removed depending on the tape used, especially when the tape...
Operation Manual
Page 8
... CAUTION Under certain conditions, a DVD player or an additional VCR connected to activate the record pause mode. Connect the camera's output terminals with the image. Press again to make the proper connections. VIDEO CAMERA 1. The REC indicator will automatically switch to the Stop mode to record. Recording while you would like to protect the tape and video heads. Depending on the video software used for 10 minutes or longer, this unit's VIDEO/AUDIO IN...
... CAUTION Under certain conditions, a DVD player or an additional VCR connected to activate the record pause mode. Connect the camera's output terminals with the image. Press again to make the proper connections. VIDEO CAMERA 1. The REC indicator will automatically switch to the Stop mode to record. Recording while you would like to protect the tape and video heads. Depending on the video software used for 10 minutes or longer, this unit's VIDEO/AUDIO IN...
Operation Manual
Page 9
... the desired sound. To select various sound modes during playback Press AUDIO to the counter. Depending on the tape used . • STEREO to listen to call the On Screen Display. Press MENU to return to LANGUAGE. 2. LECT to move the cursor to normal monitor screen. Press again to change the counter to "L/MONO" in the monitor screen resets to deactivate the REC buttons. Make sure the setting corresponds...
... the desired sound. To select various sound modes during playback Press AUDIO to the counter. Depending on the tape used . • STEREO to listen to call the On Screen Display. Press MENU to return to LANGUAGE. 2. LECT to move the cursor to normal monitor screen. Press again to change the counter to "L/MONO" in the monitor screen resets to deactivate the REC buttons. Make sure the setting corresponds...
Operation Manual
Page 10
... desired program is pressed, the number decreases or increases respectively. 3. Auto play after rewinding. The indicator appears on the monitor screen. When the MOISTURE indicator blinks, leave the unit on -screen message will start playback automatically after rewinding • Press POWER during recording. Then the function repeats while the auto repeat mode is pressed. Auto operation function Auto Repeat When the tape ends, it to turn off . The indicator appears...
... desired program is pressed, the number decreases or increases respectively. 3. Auto play after rewinding. The indicator appears on the monitor screen. When the MOISTURE indicator blinks, leave the unit on -screen message will start playback automatically after rewinding • Press POWER during recording. Then the function repeats while the auto repeat mode is pressed. Auto operation function Auto Repeat When the tape ends, it to turn off . The indicator appears...
Operation Manual
Page 11
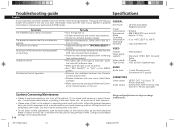
.../SELECT buttons. • Check the connection between the Remote Control and the VCR. • Replace batteries with a soft cloth. Insert them correctly. • Make sure you isolate the problem if the unit is not clear. AUDIO Audio track : 1 track (Normal-mono) 2 channels (Hi-Fi sound) CONNECTORS Video output : VIDEO OUT, 1.0 V (p-p), 75Ω (Phono type jack) Audio output : AUDIO OUT, 300 mV (rms), less than 80% RH VIDEO Format Video signal system Video heads Tape format : VHS...
.../SELECT buttons. • Check the connection between the Remote Control and the VCR. • Replace batteries with a soft cloth. Insert them correctly. • Make sure you isolate the problem if the unit is not clear. AUDIO Audio track : 1 track (Normal-mono) 2 channels (Hi-Fi sound) CONNECTORS Video output : VIDEO OUT, 1.0 V (p-p), 75Ω (Phono type jack) Audio output : AUDIO OUT, 300 mV (rms), less than 80% RH VIDEO Format Video signal system Video heads Tape format : VHS...


