
eMachines ET1161 Support Question
eMachines ET1161 Support Question
Find answers below for this question about eMachines ET1161.Need a eMachines ET1161 manual? We have 5 online manuals for this item!
Question posted by welcom on May 27th, 2012
Upgrade
cpu upgrade, what will fit at around 3.00mhz to 3.5mhz
video card what will fit and do i have an express slot.
Current Answers
Answer #1: Posted by marceloher68 on September 13th, 2012 9:46 PM
marceloher68

Member since:
January 28th, 2012 Points: 140
Member since:
January 28th, 2012 Points: 140
I upgraded mine with an Athlon 64 x2 5600+ 2.9 , that is about the best Brisbane AM2 cpu you can get within the same power requirements ( 65w) , there is a 6000+ 3.1 but it goes up to 89w and you only have a 250w psu
I also installed an EVGA Nvidia 440 gt 1gb ddr3 , can play games prefectly now on medium settings ( Call of Duty MW3 and Dirt3 )
Related eMachines ET1161 Manual Pages
8512161 - eMachines Desktop Hardware Reference Guide - Page 4
Contents
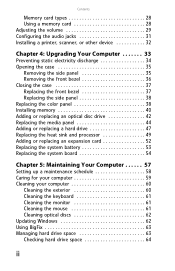
Memory card types 28 Using a memory card 28 Adjusting the volume 29 Configuring the audio jacks 31 Installing a printer, scanner, or other device 32
Chapter 4: Upgrading Your Computer 33
... hard drive 47 Replacing the heat sink and processor 49 Adding or replacing an expansion card 52 Replacing the system battery 53 Replacing the system board 54
Chapter 5: Maintaining Your ...
8512161 - eMachines Desktop Hardware Reference Guide - Page 39
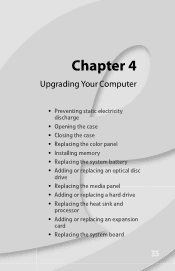
Chapter 4
Upgrading Your Computer
• Preventing static electricity discharge
• Opening the case • Closing the case • Replacing the color panel • Installing memory •...8226; Replacing the media panel • Adding or replacing a hard drive • Replacing the heat sink and
processor • Adding or replacing an expansion
card • Replacing the system board
33
8512161 - eMachines Desktop Hardware Reference Guide - Page 40
...8226; Always hold expansion cards by following ESD guidelines every time you are extremely sensitive to use them. Before opening the case.
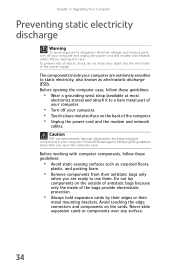
Chapter 4: Upgrading Your Computer
Preventing static ... parts, turn off your computer. • Touch a bare metal surface on the cards.
Before working with computer components, follow these guidelines:
• Avoid static-causing surfaces...
8512161 - eMachines Desktop Hardware Reference Guide - Page 42
Chapter 4: Upgrading Your Computer
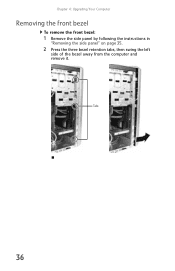
Removing the front bezel
To remove the front bezel:
1 Remove the side panel by following the instructions in
"Removing the side panel" on page 35.
2 Press the three bezel retention tabs, then swing the left
side of the bezel away from the computer and remove it. Tabs
36
8512161 - eMachines Desktop Hardware Reference Guide - Page 44
Chapter 4: Upgrading Your Computer
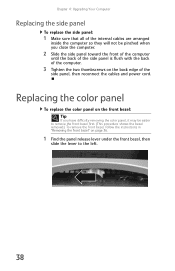
Replacing the side panel
To replace the side panel:
1 Make sure that all of the
side panel, then reconnect the cables and power ...
8512161 - eMachines Desktop Hardware Reference Guide - Page 46
... Computer
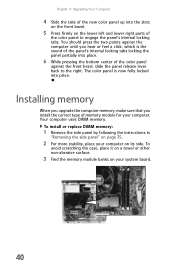
4 Slide the tabs of the new color panel up into place. Installing memory
When you upgrade the computer memory, make sure that you hear or feel a click, which is now fully locked into the slots
on the front bezel.
5 Press firmly on the lower left and lower right parts of
the...
8512161 - eMachines Desktop Hardware Reference Guide - Page 48
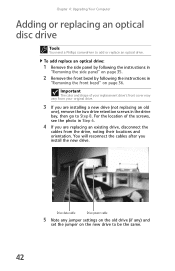
... drive bay, then go to add or replace an optical drive. For the location of your original drive.
3 If you install the new drive.
Chapter 4: Upgrading Your Computer
Adding or replacing an optical disc drive
Tools
You need a Phillips screwdriver to Step 8.
8512161 - eMachines Desktop Hardware Reference Guide - Page 50
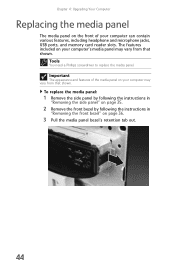
... the front bezel" on your computer can contain various features, including headphone and microphone jacks, USB ports, and memory card reader slots. Tools
You need a Phillips screwdriver to replace the media panel. Chapter 4: Upgrading Your Computer
Replacing the media panel
The media panel on the front of the media panel on your computer...
8512161 - eMachines Desktop Hardware Reference Guide - Page 52

Cable clip
8 Remove the media panel from the cable clip on page 38.
46
Chapter 4: Upgrading Your Computer
7 Remove the cables from your computer. 9 Guide the cables of the new media panel through the
hole in the front of the case, ...
8512161 - eMachines Desktop Hardware Reference Guide - Page 54
Chapter 4: Upgrading Your Computer
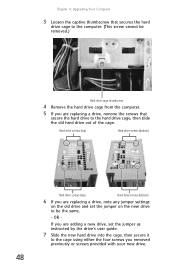
3 Loosen the captive thumbscrew that
secure the hard drive to be the same.
- Hard drive screws (top)
Hard drive screws (bottom)
Hard drive ...
8512161 - eMachines Desktop Hardware Reference Guide - Page 56

Chapter 4: Upgrading Your Computer
3 Unplug the heat sink fan cable from the system board.
Processor fan cable
4 Loosen the four captive screws that secure the heat sink
...
8512161 - eMachines Desktop Hardware Reference Guide - Page 58
... on page 35.
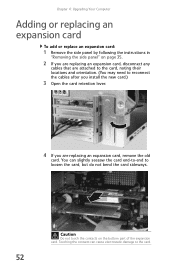
2 If you are replacing an expansion card, disconnect any
cables that are attached to the card, noting their locations and orientation. (You may need to the card. Chapter 4: Upgrading Your Computer
Adding or replacing an expansion card
To add or replace an expansion card:
1 Remove the side panel by following the instructions in...
8512161 - eMachines Desktop Hardware Reference Guide - Page 60
...panel by following the instructions in
"Removing the side panel" on page 35.
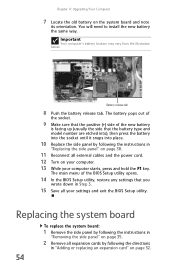
2 Remove all expansion cards by following the directions
in
"Replacing the side panel" on page 38.
11 Reconnect all your computer....
10 Replace the side panel by following the instructions in "Adding or replacing an expansion card" on your computer. 13 While your settings and exit the BIOS Setup utility. You will...
8512161 - eMachines Desktop Hardware Reference Guide - Page 62
Chapter 4: Upgrading Your Computer
11 Connect all power and data cables using your notes
from Step 4.
12 Reinstall any memory modules you removed previously. 13 Reinstall any expansion cards you removed previously. 14 Replace the side panel by following the instructions in
"Replacing the side panel" on page 38.
56
8512161 - eMachines Desktop Hardware Reference Guide - Page 101
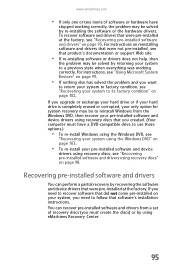
... re-installing software or drivers does not help, then
the problem may be solved by re-installing the software or the hardware drivers. If you upgrade or exchange your hard drive or if your hard drive is completely erased or corrupted, your only option for system recovery may be solved by...
8513042 - eMachines Desktop Computer User Guide - Page 77
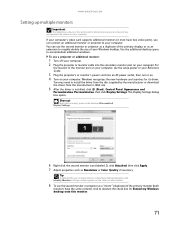
Use the additional desktop space to your computer's video card supports additional monitors (it on. 4 Turn on your ...Control Panel, Appearance and
Personalization, Personalization, then click Display Settings. You may not represent the screens on your Windows desktop. The Display Settings dialog box opens.
Tip
To help identify your computer. To use a projector or additional monitor:...
8513152 - eMachines Desktop Hardware Reference Guide - Page 4

...
Memory card types 27 Using a memory card 27 Adjusting the volume 27 Configuring the audio jacks 29 Installing a printer, scanner, or other device 30
Chapter 4: Upgrading Your ...replacing a hard drive 45 Replacing the heat sink and processor 47 Adding or replacing an expansion card 50 Replacing the system battery 51 Replacing the system board 52
Chapter 5: Maintaining Your Computer ....
8513152 - eMachines Desktop Hardware Reference Guide - Page 37

Chapter 4
Upgrading Your Computer
• Preventing static electricity discharge • Opening the case • Closing the case • Replacing the color panel • Installing memory •...8226; Replacing the media panel • Adding or replacing a hard drive • Replacing the heat sink and
processor • Adding or replacing an expansion
card • Replacing the system board
31
8513152 - eMachines Desktop Hardware Reference Guide - Page 38
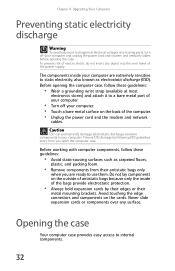
... on the back of the bags provide electrostatic protection.
• Always hold expansion cards by following ESD guidelines every time you are extremely sensitive to static electricity, also ... their
metal mounting brackets. Do not lay components on the cards.
Before opening the case. Chapter 4: Upgrading Your Computer
Preventing static electricity discharge
Warning
To avoid exposure to...
8513152 - eMachines Desktop Hardware Reference Guide - Page 40

Chapter 4: Upgrading Your Computer
2 Press the three bezel retention tabs, then swing the left
side of the bezel away from the computer and remove it.
Tabs
34
Similar Questions

How To Instructions For Installing A Video Card On Emachine Et1161-07
(Posted by dinekentps 10 years ago)


Can A Et Machine Series Et1161 Support Two Video Cards
i want two montiors with different docs up
i want two montiors with different docs up
(Posted by tgeist 10 years ago)

'can I Upgrade The Video Card Of El1850? Please Recommend One. Thanks'
"can I upgrade the video card of el1850? Please recommend one. Thanks"
"can I upgrade the video card of el1850? Please recommend one. Thanks"
(Posted by rhodaramos06 11 years ago)
What Type Of Video Card Fit My W3507 Emachine
what type of video card fits my emachine w3507
what type of video card fits my emachine w3507
(Posted by jweese11 11 years ago)