eMachines E528 Support Question
eMachines E528 Support Question
Find answers below for this question about eMachines E528.Need a eMachines E528 manual? We have 1 online manual for this item!
Question posted by fekell on October 5th, 2013
How To Access Recovery On Emachines E528 2325
The person who posted this question about this eMachines product did not include a detailed explanation. Please use the "Request More Information" button to the right if more details would help you to answer this question.
Current Answers
Related eMachines E528 Manual Pages
User Guide - Page 2

Acer Incorporated. Copyright © 2009. eMachines Series Notebook PC Model number Serial number Date of purchase Place of purchase All Rights Reserved.
User Guide - Page 3

... the computer. Unplug the power cord before connecting the power cord to the AC power outlet. CAUTION for Accessibility
Be sure that the power outlet you plug the power cord into is easily accessible and located as close to unplug the power cord from the electrical outlet. Use a damp cloth for cleaning...
User Guide - Page 7
..., transmission of any trouble with hearing aids should position the device the above separation distance instructions are positioned at least 1.5 centimeters (5/8 inches) away from your laptop under the following conditions. Telephone line safety • Disconnect all wireless or radio transmitting devices when using your body (refer to this device requires a good...
User Guide - Page 13
... Viewing the file requires Adobe Reader. This guide contains detailed information on how to access it contains warranty information and the general regulations and safety notices for certain models". ... on User Guide.
Your guides
To help you get started with language such as eMachines Recovery Management, using your computer
Turning your computer on and off , the Just for ...
User Guide - Page 18

... ergonomic specifications
36 Low-power license-exempt radio
communication devices (RSS-210)
36
Exposure of humans to -disk recovery
20
Password
20
Using software
21
Playing DVD movies
21
Power management
22
eMachines Recovery Management
23
Burn backup discs
24
Restore
25
Restore Windows from backup discs
26
Troubleshooting
29
Troubleshooting tips
29...
User Guide - Page 19
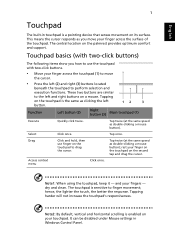
... can be disabled under Mouse settings in touchpad is sensitive to the left button.
12
3
Function
Left button (2)
Right button (3)
Main touchpad (1)
Execute
Select Drag
Access context menu
Quickly click twice.
The touchpad is a pointing device that senses movement on the palmrest provides optimum comfort and support.
dry and clean.
User Guide - Page 20
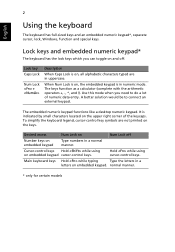
... using on and off
Number keys on the upper right corner of numeric data entry. The embedded numeric keypad functions like a desktop numeric keypad. Desired access
Num Lock on
Num Lock off . When Num Lock is on, the embedded keypad is indicated by small characters located on embedded keypad
Type numbers...
User Guide - Page 21
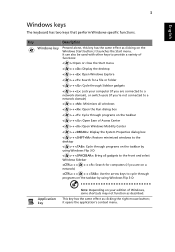
... key has the same effect as described. Key
Description
Windows key
Pressed alone, this key has the same effect as clicking on your edition of Access Center
< > + : Open Windows Mobility Center
< > + : Display the System Properties dialog box
< > + : Restore minimized windows to the desktop
< > + : Cycle through programs on the taskbar by using...
User Guide - Page 24
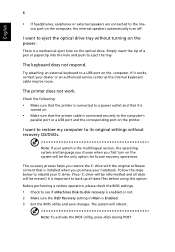
.... Before performing a restore operation, please check the BIOS settings. 1 Check to see if eMachines Disk-to rebuild your dealer or an authorized service center as the internal keyboard cable may be the only option for future recovery operations. This recovery process helps you restore the C: drive with the original software content that the...
User Guide - Page 25

English
7
To start the recovery process: 1 Restart the system. 2 While the eMachines logo is showing, press + at the same time
to enter the recovery process. 3 Refer to the onscreen instructions to perform system recovery. Important! This feature occupies 15 GB in a hidden partition on your hard disk.
User Guide - Page 34
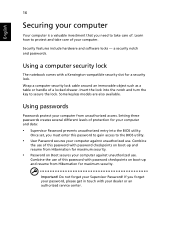
... please get in touch with password checkpoints on boot-up and resume from unauthorized access.
Using passwords
Passwords protect your computer from Hibernation for maximum security.
• Password... care of. a security notch and passwords.
Combine the use of this password to gain access to the BIOS utility.
• User Password secures your computer against unauthorized use .
Wrap...
User Guide - Page 35

... the password incorrectly, a warning message appears. If you press
to enter the BIOS utility at boot-up .
• Type the Supervisor Password and press to access the BIOS utility. Try again and press . English
17
Entering passwords
When a password is set, a password prompt appears in the center of the display screen...
User Guide - Page 37
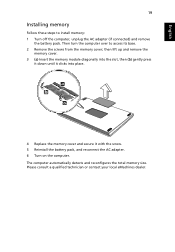
... on the computer. The computer automatically detects and reconfigures the total memory size. Please consult a qualified technician or contact your local eMachines dealer. English
19
Installing memory
Follow these steps to access its base. 2 Remove the screws from the memory cover; Then turn the computer over to install memory: 1 Turn off the...
User Guide - Page 38
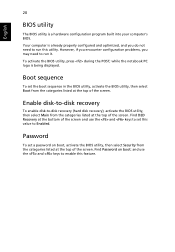
...configuration program built into your computer's BIOS. Boot sequence
To set this value to -disk recovery (hard disk recovery), activate the BIOS utility, then select Main from the categories listed at the top of the...you do not need to enable this utility. Enable disk-to-disk recovery
To enable disk-to Enabled.
Find D2D Recovery at the top of the screen and use the and keys to...
User Guide - Page 41
... the factory default image, and reinstall applications and drivers.
English
23
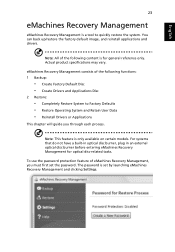
eMachines Recovery Management
eMachines Recovery Management is a tool to Factory Defaults • Restore Operating System ...-in optical disc burner, plug in an external optical disc burner before entering eMachines Recovery Management for general reference only.
To use the password protection feature of the ...
User Guide - Page 42

... that will not be bootable. English
24
Burn backup discs
From the Backup page of eMachines Recovery Management, you can burn the factory default image or back up drivers and applications. 1 Click on Start > All Programs > eMachines > eMachines Recovery
Management. 2 eMachines Recovery Management opens to the Backup page.
3 Select the type of backup (factory default or drivers...
User Guide - Page 43
...
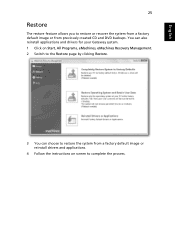
The restore feature allows you to complete the process. You can also reinstall applications and drivers for your Gateway system. 1 Click on Start, All Programs, eMachines, eMachines Recovery Management. 2 Switch to the Restore page by clicking Restore.
3 You can choose to restore the system from a factory default image or reinstall drivers and applications...
User Guide - Page 44
... product specifications may vary. Do this before rebooting your computer and insert the first system recovery disc into the optical disc drive. English
26
Restore Windows from the optical drive once the...general reference only. Restart your computer. 2 The system will reboot. 3 After rebooting, when the eMachines logo shows, press the F12 key to open the BOOT Menu.
4 Here you can select which...
User Guide - Page 45
...-term use, you should select the Boot submenu. 1 Turn on your computer. 2 During startup when the eMachines logo shows, press the F2 key to enter
BIOS Setup, where you can set system parameters.
3 Use the... product specifications may vary. Restart your computer and insert the first system recovery disc into the
optical disc drive. Ensure that the optical drive device is the highest priority.
User Guide - Page 46

... specifications may vary. Press the ENTER key again to Exit Saving Changes. The system will reboot.
7 When you reboot, Windows will be installed from the recovery disc. 8 Insert the second recovery disc when prompted, then follow the onscreen
prompts to complete the restore. 9 Remove the...
Similar Questions


