Zanussi ZCG551GNC Support Question
Zanussi ZCG551GNC Support Question
Find answers below for this question about Zanussi ZCG551GNC.Need a Zanussi ZCG551GNC manual? We have 1 online manual for this item!
Question posted by fergusoriordan on March 7th, 2023
Plate Won't Stay Alight
How do you replace the thermocoupler
Current Answers
Answer #1: Posted by educationtutor on March 21st, 2023 7:31 AM
educationtutor

Member since:
March 4th, 2023 Points: 25,730

Member since:
March 4th, 2023 Points: 25,730
If the burner on your Zanussi ZCG551GNC stove won't stay lit, it's possible that the thermocouple is faulty and needs to be replaced. Here are the steps to replace a thermocouple:
- Turn off the gas supply to the appliance and allow it to cool down completely.
- Remove the grates, burner caps, and burners from the cooktop to access the pilot light and thermocouple.
- Locate the thermocouple, which is a thin metal rod located near the pilot light.
- Use pliers to loosen the nut that holds the thermocouple in place on the gas valve.
- Remove the old thermocouple by gently pulling it out of the pilot assembly.
- Take the old thermocouple with you to purchase a replacement of the same length and type.
- Insert the new thermocouple into the pilot assembly, making sure it is securely in place.
- Tighten the nut that holds the thermocouple in place on the gas valve, being careful not to overtighten.
- Reassemble the burners, burner caps, and grates on the cooktop.
- Turn on the gas supply and test the burner to make sure it stays lit.
It's important to note that working with gas appliances can be dangerous and should only be attempted by a qualified technician. If you're not confident in your ability to replace the thermocouple yourself, it's best to contact a professional for assistance.
Education
Answer #2: Posted by jagga8 on March 29th, 2023 11:13 PM
jagga8

Member since:
July 28th, 2022 Points: 9,480
Member since:
July 28th, 2022 Points: 9,480
Replacing a thermocouple is a relatively straightforward process, but it's important to follow proper safety procedures and turn off the gas supply before starting. Here are the general steps for replacing a thermocouple:
- Turn off the gas supply: Locate the gas shut-off valve, typically located behind or under the furnace. Turn the valve to the "Off" position to stop the flow of gas to the furnace.
- Remove the old thermocouple: The thermocouple is a small metal rod that is connected to the pilot light assembly. To remove it, use a wrench to unscrew the nut that attaches it to the assembly. Then, gently pull the thermocouple out of the pilot light assembly.
- Install the new thermocouple: Take the new thermocouple and insert it into the pilot light assembly. Make sure it's securely in place. Then, use the wrench to tighten the nut and attach it to the assembly.
- Test the new thermocouple: Turn the gas supply back on and relight the pilot light. Hold the pilot button down for about 30 seconds to allow the thermocouple to heat up. Then, release the button and check to see if the pilot light stays lit. If it does, the new thermocouple is working properly.
- Reassemble the furnace: Once you've confirmed that the pilot light is working with the new thermocouple, you can reassemble the furnace. Replace any panels or covers that you removed and turn the gas supply back on.
It's important to note that if you're not comfortable working with gas or if you're unsure of how to replace the thermocouple, it's best to consult a professional technician or plumber.
s jagadeesh
Related Zanussi ZCG551GNC Manual Pages
Product Manaul - Page 2
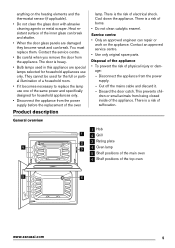
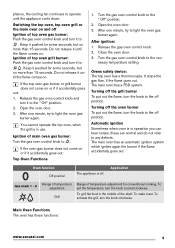
...correct operation of injury and damage to the appliance.
• Do not let the appliance stay unattended during operation.
• Switch off the appliance after each use the appliance (safety regulations.... Do not remove the rating plate. Do not pull the appliance by a person who is the risk of the appliance. Using the accessories 11
Oven - Contact an approved service centre...
Product Manaul - Page 3
...).
• Do not replace or change the mains cable...with current installation regulations. Do not put the appliance on the rating plate.
• This appliance is necessary when you disconnect the appliance from... to property.
• Always monitor the appliance during operation.
• Always stay away from the power supply during use . Particular attention must be earthed.
&#...
Product Manaul - Page 4
...the correct shape and diameter to the enamel:
- There is cold before
you use an oven spray, follow the instructions from dust when closed and collects splashes of your property, only clean...let cookware boil dry. Keep there only heat-resistant accessories (if applicable). • Do not cover oven steam outlets. It must be damaged.
• Do not put hot cookware near the appliance when...
Product Manaul - Page 5
Cut off the mains cable and discard it becomes necessary to replace the lamp use only. General overview
6
3
2
1
1 Hob
1
2 Grill
2
3 Rating plate
3
4 Oven lamp
5 Shelf positions of the main oven
6 Shelf positions of physical injury or damage: - Heat resistant surface of the inner glass can break and shatter.
• When the door glass panels are...
Product Manaul - Page 6
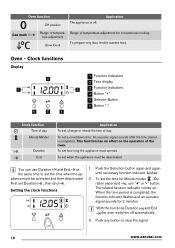
...set the current time use " + " or " - Setting the time
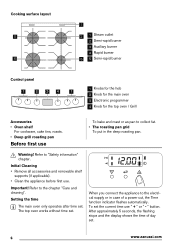
The main oven only operates after time set . The top oven works without time set . Warning! Cooking surface layout
5 4
1
2 1 Steam ...
3
4
1
1 Knobs for the hob 2 Knob for the main oven 3 Electronic programmer 4 Knob for the top oven / Grill
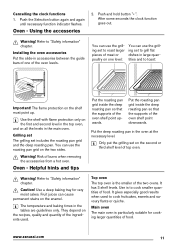
Accessories • Oven shelf
For cookware, cake tins, roasts. • Deep grill roasting pan...
Product Manaul - Page 7
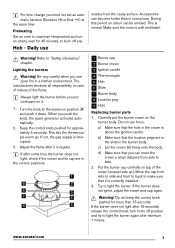
... maximum temperature and run an empty oven for 45 minutes, to side.
2. During this period an odour can ...the correct positions.
1
9
2
8
3
7
4
6
5
1 Burner cap 2 Burner crown 3 Ignition candle 4 Thermocouple 5 Hob 6 Slots 7 Burner body 8 Location peg 9 Hole
Replacing burner parts
1.
Accessories can be emitted.
Be very careful when you put the burner crown on top of the flame.
...
Product Manaul - Page 8
... as possible.
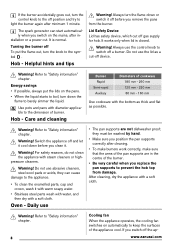
Warning! For safety reasons, do not clean the appliance with a soft cloth. Oven -
If the burner accidentally goes out, turn the knob to the symbol .
Warning! Energy ...when you switch on automatically to "Safety information" chapter. they can start automatically when you replace the pan supports to the appliance.
• To clean the enamelled parts, cap and ...
Product Manaul - Page 9
... the temperature, turn the knob to the off position. Ignition of main oven gas burner: Turn the gas oven control knob to light the oven gas burner again. essary temperature setting. Ovens safety device: The top oven has a thermocouple. Open the oven door. 3. The main oven has a FSD system.
Keep it pushed for conventional cooking.
To grill flat...
Product Manaul - Page 10
...is completed. Push any button to set how long the appliance must be activated and then deactivated. Oven - You can use "+" or "-" button. To prepare very lean, tender roasted food. To ...time when the appliance must be deactivated.
First set , change or check the time of the oven. Push the Selection button again and again until necessary function indicator flashes.
2.
To set the time...
Product Manaul - Page 11
... has 3 shelf levels.
You can cause permanent stains on the enamel. Oven - They depend on all the levels in the top oven, and on the recipes, quality and quantity of the ingredients used to ...
Important! Use the shelf with flame protection only on the first and second level in the main oven. Use a deep baking tray for cooking larger quantities of food. Use is to cook fruitcakes, ...
Product Manaul - Page 12
...middle or top shelf level of top oven.
• To brown pastry dishes on the bottom, cook on metal plate or put on the baking tray
Use a slightly higher oven temperature setting
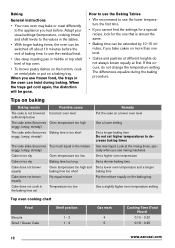
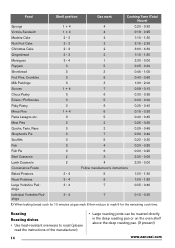
Top oven cooking chart
Food
Biscuits Small / Queen ...Baking time can be extended by 10-15 minutes, if you bake cakes on a lower oven level
Use a lower setting
Set a longer baking time Do not set higher temperatures to ...
Product Manaul - Page 14
... roast (please
read the instructions of the manufacturer).
14
• Large roasting joints can be roasted directly in the deep roasting pan or on the oven shelf above the deep roasting pan. (If present)
www.zanussi.com
Product Manaul - Page 15
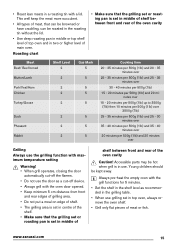
...of meat, that the grilling set or
roasting pan is set in middle of
shelf between front and rear of the oven cavity
Meat Beef/ Beef boned Mutton/Lamb Pork/Veal/Ham Chicken Turkey/Goose
Duck Pheasant Rabbit
Shelf Level 2 2 2 ... . Young children should be hot when grill is set in a roasting tin with the oven door opened. • Keep minimum 5 cm distance from front
and rear edges of grilling...
Product Manaul - Page 16
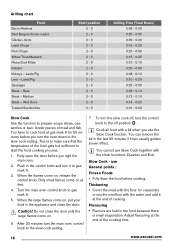
... Medium Steak - Caution! You cannot use Slow Cook together with a lid when you light the main oven.
2. Slow Cook - Lamb/Pig Liver -
Thickening • Cover the meat with the flour for ...the end of cooking
Flavouring • Flavours are held in the control knob and turn the oven down to gas mark 6.
5.
This is small evaporation. Grilling chart
Food Bacon Rashers Beef Burgers...
Product Manaul - Page 17
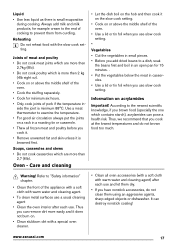
.... Thus you cook it. • Remove unwanted fat and skin unless it is browned first. Oven -
www.zanussi.com
17
It can pose a health risk. Joints of the appliance with a soft... cloth with the slow cook set- Information on .
• Clean stubborn dirt with a special oven cleaner.
• Clean all frozen meat and poultry before you can remove dirt more than
2,7 (6lb).
...
Product Manaul - Page 18
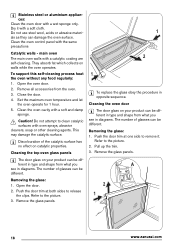
... damage the catalytic surface. A
2 1
18
www.zanussi.com Push the door trim at both sides to the picture. 2. Clean the oven cavity with a wet sponge only.
Remove the glass panels.
1
2
1
To replace the glass obey the procedure in diagrams. The number of the catalytic surface has no effect on your product can...
Product Manaul - Page 19
... one time, refer to "Safety information" chapter.
Thermocouple is no spark when lighting the gas.
Important! After lightning the flame, keep the knob pushed for some hours
Make sure that the burner cap and crown are placed uneven.
There is not heated sufficient. Replace the oven lamp with an applicable 300 °C heat...
Product Manaul - Page 20
...com
Control the settings.
When the gas is on the rating plate.
The noises are not set. The necessary data for too long. The oven does not cook evenly. The appliance makes noises or popping ...brush (for longer than 15-20 minutes after the cooking process ends.
A power cut. Replace the oven lamp. We recommend that the injector is not blocked and the burner crown is made. ...
Product Manaul - Page 21
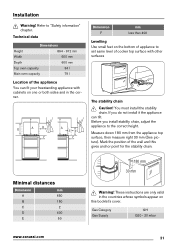
... install stability chain, adjust the appliance to "Safety information" chapter. Technical data
Dimensions
Height
894 - 912 mm
Width
600 mm
Depth
600 mm
Top oven capacity
34 l
Main oven capacity
79 l
Location of the wall and this booklet's cover. Minimal distances
Dimension
mm
A
650
B
150
C
2
D
400
E
50
180 mm 30 mm
Warning...
Product Manaul - Page 24
...you have read the details under this guarantee
• Any appliance or defective part replaced shall become the Company's property.
• This guarantee is in guarantee service calls...improperly installed, calls to appliances outside United Kingdom.
• Appliances found on the rating plate), the purchase date. Exclusions
• Damage, calls resulting from transport, improper use, ...
Similar Questions

Gas Supply To Top Oven Keeps Shutting Off.
The top oven keeps going out. Gas shuts off. Grill works ok and bottom oven unaffected. Thermocouple...
The top oven keeps going out. Gas shuts off. Grill works ok and bottom oven unaffected. Thermocouple...
(Posted by withielfox 1 year ago)

Zanussi Gas Oven
hi my oven flame stays at the same level no mater what position it at it's always low
hi my oven flame stays at the same level no mater what position it at it's always low
(Posted by leeocallaghan 1 year ago)

Help, Gas Cooker Not Working
My 5 year old zanussi zcg551gnc clock and ignition not working.. Can light top oven and hob by hand,...
My 5 year old zanussi zcg551gnc clock and ignition not working.. Can light top oven and hob by hand,...
(Posted by aliceydallassy 6 years ago)
Top Oven Ignition Is Hit And Miss When It Comes To Staying Lit!
It can take several attempts to maintain a flame, could stay lit for several minutes and then go out...
It can take several attempts to maintain a flame, could stay lit for several minutes and then go out...
(Posted by BrendaWass 8 years ago)

Why Does Gas Stay On When Burner Lid Is Down
why does gas still stay on when burner lid is down
why does gas still stay on when burner lid is down
(Posted by tquinn 9 years ago)