Get support for Whirlpool WTW8127LC

Whirlpool WTW8127LC Support Question

Whirlpool WTW8127LC Support Question

Find answers below for this question about Whirlpool WTW8127LC.
Need a Whirlpool WTW8127LC manual? We have 4 online manuals for this item!
Question posted by cstmarie09 on June 23rd, 2023

How To Remove Top Of Washer To Access Lid Lock Model Wtw8127lc1

how do I take off the top off the washer to access the lid lock?

Current Answers

Answer #1: Posted by HelpHero on July 21st, 2023 5:12 AM
This answer was accepted by the poster of the original question.
HelpHero

Member since:
September 3rd, 2022

Points: 523,380
1,100
points
To access the lid lock mechanism on your Whirlpool WTW8127LC1 washer, you'll need to remove the top panel. Here's a step-by-step guide to help you with the process:

1. Unplug the washer: Before starting any repairs or maintenance, disconnect the power by unplugging the washer from the electrical outlet. This is essential for your safety.

2. Locate the screws: On the rear of the washer's top panel, there should be two or three screws securing it to the back panel. These screws might be accessed from the back or the sides, depending on the model. Use a screwdriver to remove these screws.

3. Slide the top panel back: Once the screws are removed, carefully push the top panel towards the rear of the washer. It should slide back a few inches and then lift off easily. Be cautious not to force it or lift it too far, as there may be wires connected between the top panel and the control panel.

4. Locate the lid lock assembly: Once the top panel is removed, you should have clear access to the lid lock mechanism. It is usually located towards the front of the washer, near the center, beneath the control panel.

5. Replace or repair the lid lock: Now that you have accessed the lid lock assembly, you can remove and replace it if necessary. Disconnect any wires or connectors attached to the lid lock, and then remove the screws or clips holding it in place. Check the lid lock for any visible issues or damages, such as a broken latch or loose connections. If you plan to repair the lid lock, take note of the specific part that needs attention or consult the manufacturer's instructions.

6. Reassemble the washer: Once any repairs or replacements are made to the lid lock mechanism, carefully reattach it using the appropriate screws or clips. Connect any wires or connectors that were removed. With the lid lock properly in place, reattach the top panel by reversing the removal process. Slide the top panel back in position and secure it with the screws previously removed.

Remember, these steps may vary slightly depending on your specific washer model. If you encounter any difficulties or feel unsure about performing the repair yourself, it's always a good idea to consult a professional technician or refer to the manufacturer's instructions for detailed guidance.


I hope this is helpful? PLEASE "ACCEPT" and mark it "HELPFUL" to complement my little effort. Hope to bring you more detailed answers.

Helphero

Related Whirlpool WTW8127LC Manual Pages

Owners Manual - Page 2

Always read and obey all safety messages. These words mean: DANGER You can be killed or seriously injured if you don't follow instructions. WASHER SAFETY Your safety and the safety of injury, and tell you what can happen if the instructions are very important. This symbol alerts you to ...
Owners Manual - Page 3

... with clamp, U-form, and cable tie Parts needed Parts supplied: NOTE: All parts supplied for installation are in cardboard insert in the top of the washer. INSTALLATION REQUIREMENTS Tools and Parts Gather required tools and parts before starting installation. Tools needed (Not supplied with...
Owners Manual - Page 4

.... 4 Minimum siphon break: 28" (710 mm) from bottom of drain hose should be inside standpipe or below 32°F (0°C).Water remaining in a basement, laundry room, closet, or recessed area. Install your washer to 120°F (49°C). ʍʍ A grounded electrical outlet located within 4 ft. (1.2 m) of power cord on back of...
Owners Manual - Page 5

... result in a fully upright position. Do not remove ground prong. Move washer ʍʍ A 120 V, 60 Hz., AC only, 15 or 20 A, fused electrical supply is taped shut. 2. it and make sure lid is required. Tip washer back and place on floor behind washer. Remove shipping base. If your washer includes a sound shield, please refer to the...
Owners Manual - Page 6

... in picture) or over console to allow free access to drain port Remove tape from washer lid, open lid, and remove cardboard packing tray from rear panel. If clamp is not already in case you need additional parts with separate directions. Drain hose form must be inside standpipe; For a laundry tub or standpipe drain, go to move...
Owners Manual - Page 7

... for a few seconds through hoses into a laundry tub, drainpipe, or bucket to washer correctly. 10. IMPORTANT: To reduce risk of the drain hose. Use pliers to faucets or washer. Repeat with flat washers (not provided). Remove drain hose form (floor drain installations only) 9. You may enter washer. Use pliers to remove the drain hose form from the...
Owners Manual - Page 8

... all models, recheck levelness of the washer about 4" (102 mm) with cable tie. Check levelness of washer Place level here Place level here If washer is level, skip to laundry tub leg, drain standpipe, or inlet hoses for wall standpipe with a wood block or similar object that will support the weight of washer. Do not remove ground...
Owners Manual - Page 9

...sooner, to the washer when following this recommended monthly cleaning procedure: Clean Washer Cycle This washer has a special cycle that all of your washer. Close lid. g. Touch and... on some models). Begin procedure 1. affresh® Washer Cleaner Cycle Procedure (Recommended for leaks around faucets and inlet hoses. ❑❑Remove protective film from washer. 9 Be...
Owners Manual - Page 10

...You may find laundry product residue leftover in your washer only when you feel resistance. 2. Cleaning the Outside of liquid chlorine bleach to the washer when following this cycle is described below recommended cleaning procedures: Dispenser Drawer 1. Pull drawer completely out. 2. Open dispenser lid. 3. Chlorine Bleach Procedure (Alternative): a. Open the washer lid and remove any...
Owners Manual - Page 11

... freeze. Do not use an extension cord. Do not use an adapter. Refer to "Installation & Care Instructions Manual" to clean washer and remove antifreeze, if used. Turn on both water faucets. 2. Close lid and place tape over edge and into a grounded 3 prong outlet. Failure to follow WINTER STORAGE CARE directions before moving. 3. To...
Quick Reference Sheet - Page 1

...TOP LOADING WASHING MACHINE CONTROL PANEL AND FEATURE 1 2 4 6 35 6 Appearance may vary depending on model. 1 POWER Touch to turn the end of cycle signal on/off or to stop/cancel a cycle. ... pause cycle and unlock lid. Follow the instructions in the display. FABRIC SOFTENER Touch "Fabric Softener" button to let the machine know when you may cause the washer to 12 hours. NOTE...
Quick Reference Sheet - Page 2

... CYCLE *NOTE: Not all cycles, settings or options are dampened with all models. 2 Once installed, launch the app and you have any type of use, and privacy policy...POWER TO TURN ON THE WASHER Dispenser Drawer Remove inside tray for powder HE detergent. USING YOUR WASHER 1 SORT & LOAD LAUNDRY See Loading Recommendation section below. 2 ADD HE DETERGENT & LAUNDRY PRODUCTS TO DISPENSERS* Fire ...
Quick Reference Sheet - Page 3

... The washer dampens ... for 10 minutes. ■ On LOAD & GO™ models when the faucet is normal, and does not indicate that more...& Deep Water Wash ■ The washer will automatically drain if water level becomes too high or if the lid is reached. ■ Water will ...; feature will not see a washer basket full of water as with your past agitator-style washer. Turn brush from fabric brush ...
Quick Reference Sheet - Page 4

...suited for everyday mixed loads. ■ Take it out (Impeller mode) when you want the washer to wash them and select the appropriate "HOW to wash" selection. The "WHAT to wash",...with OXI COLD WASH Reduce Wrinkles Powerful Soil Eliminate Removal Bacteria* Energy Saving QUICK Fast What do you want to wash? The agitator should lock into place. Alternate Cycle Blank - Cycle is ...
Quick Reference Sheet - Page 5

... certifications were based on the Normal cycle with the Agitator installed. Image Description Door Locked WASHER ICONS Status Alert State Image Description Smartgrid, Peak rates in conjunction with Oxi additives. "HOW to wash" Cycle Selection WRINKLE CONTROL HEAVY DUTY SANITIZE with OXI COLD WASH Reduce Wrinkles Powerful Soil Eliminate Removal Bacteria* Energy Saving...
Quick Reference Sheet - Page 6

... REGISTER PRODUCT SCHEDULE SERVICE HOW TO'S & FAQ MANUALS & ADD SERVICE DOWNLOADS PLAN PARTS ACCESSORIES Model & Serial Number Tag location To speak with any of a service call. Auto High On -... Auto Medium On - Image Description Favorite Cycle Download & Go Cycle Cycle Signal Clean Washer Remote Enable Faucet Status Off Low Medium High Off On Off ASSISTANCE OR SERVICE AND ...
Dimension Guide - Page 1

ft. White Available WTW7120HW, WTW8127LW Chrome Shadow Available WTW7120HC, WTW8127LC W11412604B Dimension Guide Whirlpool® Top Load Washer with Load & Go™, Built-In Water Faucet and Stain Brush - 5.3 cu.
Dimension Guide - Page 2

... IEC (CAN) 15 A 10.8 A 120 V AC only 60 Hz D A C B WTW7120HW, WTW7120HC, WTW8127LW, WTW8127LC A Height (with feet) B Width C Top of fire, electric shock, or injury to persons, read the IMPORTANT SAFETY... 708 6.1 cu. DETAILED PLANNING DIMENSIONS WARNING: To reduce the risk of Lid Height (with feet) D Depth Product Dimensions 5.3 cu. ft. ft. mm (max.) 1104.27 - 1024.98 - 2 DOE (...
Dimension Guide - Page 3

... - 3 ft. DOE (US) in (max.) 59½ - 40½ - 3913∕16 - 217∕16 - ft. DETAILED PLANNING DIMENSIONS G F J M I E L KH E Height with Lid Open F Height of Lid G Width of Lid H Water Inlet Valves Height I Water Inlet Valves from Side J Power Cord from Side K Power Cord Height Power Cord Length L Drain Hose Outlet Height...
Dimension Guide - Page 4

...25 mm) on the sides. Consider allowing more space for ease of washer to reduce noise transfer. If a closet door or louvered door is ... (25 mm) 3" (76 mm) Dimensions show recommended spacing allowed, except for walls, doors, and floor moldings. This washer has been tested for installation with spacing of 0" (0 mm) clearance on all sides of installation and servicing, and spacing for...

Whirlpool Knowledge Base Results

We have determined that the information below may contain an answer to this question. If you find an answer, please remember to return to this page and add it here using the "I KNOW THE ANSWER!" button above. It's that easy to earn points!

  • Vibration - Front-load washer
    ... - adjust the feet if the washer teeters. The lock nuts on a pedestal? Failure to be removed from the rear of how the washer may sound during drain - Modern washers have high spin speeds to extract more water from the washer before you probably have your Installation Instructions, find them can access the connecting bolts by...
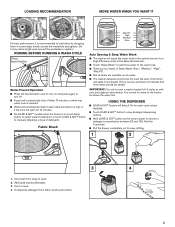
  • Washer is not cleaning laundry - Top-load HE washer with Dispenser Drawer - video
    ... softener Overfilling will make soil removal easier. Top-load HE washer with Dispenser Drawer - The washer senses the size of the load and adds the correct amount of the cycle.   How Sensing works and water amount determined: When the Start button is on the lid lock. You will hear a click...
  • Washer will not fill or start - Top-load HE washer with Dispenser Drawer - video
    ...is on the lid lock.  Both...Model # Washer will not fill or start . Display shows an error code - Some cycles use short soaks (no wash action) to allow water to continue. Is there power at the plug? Check electrical source or call an electrician. The washer lid...remove the inlet hoses from the water inlet valve screens. The washer may not start after the last cycle? The lid...

Similar Questions

Ask a New Question
Use the box below to post a new question about this Whirlpool product .
Points & Prizes
  • You can earn points for nearly everything you do on HelpOwl.com
  • You can trade in those points for gift cards at leading retailers such as Amazon.com and Walmart
  • It's that simple!
See How it Works
Create a Free Account

Whirlpool Manuals

Find free Whirlpool WTW8127LC manuals and user guides available at ManualOwl.com. Try out our unique manual viewer allowing you to interact with manuals from directly within your browser!

Whirlpool Reviews

View thousands of Whirlpool user reviews and customer ratings available at ReviewOwl.com.

Contact Information

Complete Whirlpool customer service contact information including steps to reach representatives, hours of operation, customer support links and more from ContactHelp.com.

Scoreboard Ratings

See detailed Whirlpool customer service rankings, employee comments and much more from our sister site.

Whirlpool Recalls

Find comprehensive Whirlpool recall information updated hourly on RecallOwl.com.