Whirlpool WMH32519CS Support Question
Whirlpool WMH32519CS Support Question
Find answers below for this question about Whirlpool WMH32519CS.Need a Whirlpool WMH32519CS manual? We have 4 online manuals for this item!
Question posted by dankam34 on May 31st, 2021
Lcd Display Very Dim
Have had micro over 6 years. Display has gotten very dim and hard to read. Need to find a replacement number and part. Thank you! Dan last digit after CS in model number is 0.
Current Answers
Answer #1: Posted by Troubleshooter101 on June 2nd, 2021 4:41 AM
Troubleshooter101

Member since:
September 30th, 2015 Points: 2,927,040

Member since:
September 30th, 2015 Points: 2,927,040
Depends on the microwave-if its an lcd display type that requires a backlight before you see anything displayed-hi brightness leds are used here and they may be special types used depending on model and manufacturer-if its a vf display sometimes its a low supply/missing supply on the filament or a faulty display itself
https://forum.allaboutcircuits.com/threads/possible-causes-of-dim-microwave-oven-display.86171/
Thanks
Please respond to my effort to provide you with the best possible solution by using the "Acceptable Solution" and/or the "Helpful" buttons when the answer has proven to be helpful. Please feel free to submit further info for your question, if a solution was not provided. I appreciate the opportunity to serve you!
Troublshooter101
Related Whirlpool WMH32519CS Manual Pages
Installation Instructions - Page 1

...others are not followed. All safety messages will follow instructions.
Always read and obey all safety messages.
See "Installation Requirements" section for use ...Microwave Oven 9 Complete Installation 10 VENTING DESIGN SPECIFICATIONS 11 ASSISTANCE 12 Replacement Parts 12 Accessories 12
MICROWAVE HOOD COMBINATION SAFETY
Your safety and the safety of your particular model...
Installation Instructions - Page 2

... grease filters
Charcoal filters (Depending on model, aluminum grease filter and charcoal filter may be combined.
The location must be installed. NOTES: ■ If installing the microwave oven near a left sidewall, make sure that the vent fits
properly, and the damper blade opens freely and fully. Read and follow the instructions provided with your...
Installation Instructions - Page 3

... and ordinances.
Do not use an adapter. Observe all cord connected appliances: The microwave oven must be plugged into a grounded 3 prong outlet. Recommended: ■ A time-delay fuse ...or time-delay circuit breaker.
■ A separate circuit serving only this microwave oven. Do not remove ground prong. Do not use of range/cooktop below. WARNING: Improper use...
Installation Instructions - Page 4

...Remove screws attaching damper plate to the venting system. A
B
A.
Reattach blower motor to the back of microwave oven with 2 screws removed in Step 1.
4 Screws B. A
A. Screws C. Damper plate tabs D. Slots
8....set it may be attached to back of the microwave oven. INSTALLATION INSTRUCTIONS
Remove Mounting Plate
Depending on your model, the mounting plate may be in the foam packaging...
Installation Instructions - Page 5

... oriented, the 2 screws removed in the top of "Wall Venting Installation Only."
D
A. Damper plate tabs D. A
6. Secure damper plate with flat sides facing the back of microwave oven. Repeat Step 3 from "Wall Venting Installation Only." 5.
Slots
8. Repeat Step 2 from "Wall Venting Installation Only." 2. NOTE: If blower motor is not positioned with 2 screws removed...
Installation Instructions - Page 6

See illustrations in "Possible Wall Stud Configurations."
Holes for lag screws E. Support tabs F. Cabinet opening , do not install the microwave oven.
1. Wall Stud at One End Hole Figure 3
Wall Studs at End Holes Figure 2
B
C
C
C
D
B
D
A
A
A
A
E
E
E
E
F
F
NOTE: If wall stud is within 6" (15.2 cm) of preferred installation configurations ...
Installation Instructions - Page 7

... bottom
³⁄₈" (1 cm)
4" (10.2 cm)
Centerline
6" (15.2 cm)
6" (15.2 cm)
8. Using a keyhole saw, cut out the venting cutout area. Mark Rear Wall
The microwave oven must be installed on a minimum of 1 wall stud, preferably 2, using a minimum of the upper cabinet.
9. Using measuring tape, find the wall stud centerline(s) drawn in...
Installation Instructions - Page 8

...round-head bolt through the wall and to use as guides. ■ If the wall behind the microwave oven (as at Both End Holes (Figure 4)
1. Securely tighten the lag screw(s) and bolt. The ...Installation for Wall Stud at One End Hole" in the "Drill Holes in the top of the microwave oven. Refer to outlet. 2. Push the 2 bolts with toggle nut through the drywall, and
finger tighten...
Installation Instructions - Page 9

... "G" on the template. Failure to do not grip or use the door or door handle while the microwave oven is the heavy side. Make sure the microwave oven door is metal, the supply cord bushing needs to the microwave oven, do so can result in the wall cutout. 6. Sheet metal screws
3. Secure damper assembly with 2 sheet metal...
Installation Instructions - Page 10

NOTE: If microwave oven does not need to be added. Adjust mounting plate and retighten screws.
9. Longer or shorter bolts ...Failure to provide) may require bolts longer or shorter than 3" (7.6 cm). Reconnect power. 4. Replace the fuse or reset the circuit breaker. With the microwave oven centered, and with sheet metal screw. The blocks must be installed if the damper assembly is ...
Installation Instructions - Page 11

...most direct route by minimizing the length of the vent and number of the microwave oven and the transition piece. VENTING DESIGN SPECIFICATIONS
This section is ...damper can open fully. A
B
C
D
E
3" (7.6 cm)
F
A.
NOTES: ■ Vent materials needed for installation are for architectural designer and builder/contractor reference only. diameter round vent
C. See the examples in the...
Installation Instructions - Page 12

... of the system you will need the microwave oven model number and serial number. Two 90° elbows ...replaced, call us at our toll free number listed in the User Instructions.
For best performance, use when installing this microwave oven in a 36" (91.4 cm) or 42" (106.7 cm) wide opening , behind the microwave oven door on the front facing of the microwave oven opening . Both numbers...
Warranty Information - Page 1

...replace appliance light bulbs, air filters or water filters. DISCLAIMER OF IMPLIED WARRANTIES; If outside the 50 United States and Canada, contact your major appliance. For assistance or service, call 1-800-253-1301. All rights reserved.
® Registered Trademark/TM Trademark of the microwave oven...Internet and you need further assistance, you... and model number information ...one year from...
Use & Care Guide - Page 1

... model and serial number located on the front facing of injury, and tell you don't follow instructions. This is , tell you should not be heated in TROUBLESHOOTING, please visit our website at 1-800-253-1301. are very important.
If you to explode and should experience a problem not covered in the microwave oven.
■ The microwave oven...
Use & Care Guide - Page 2

... latches (broken or loosened), (3) Door seals and sealing surfaces.
(d) The oven should not be inserted in use the microwave oven near a swimming pool, or similar locations.
■ Do not immerse cord or plug in convection, combination, grill or "PAN BROWN" mode (on models with maximum width of electric shock.
■ Do not clean with...
Use & Care Guide - Page 4

... turned off after replacing and/or cleaning the filters. Vent Timer: Set vent fan to run for exactly 30 minutes, or to set in the display. Dynamic Fan Sensing (on some models)
The durable, nonstick coating resists soil buildup by side. "AUTO FAN Sensor Technology for manual cooking only. See "Microwave Oven Care" section.
Turntable...
Use & Care Guide - Page 5

... and start the microwave oven.
Manual Cooking/Stage Cooking
Doneness
Touch COOK TIME, touch number pads to enter time, touch COOK POWER (if not 100%), touch number pads to enter ... ADD MORE TIME" scrolls in the display. Doneness cannot be changed . Microwave Oven Use
For list of preset programs, see the Cooking Guide label on some models) before sensor cooking. The cook power...
Use & Care Guide - Page 6

... screw.
■ Cavity light: The cavity light bulb is replaceable. Always follow label instructions on some models) appears in the display when it toward the tab area.
■ Charcoal filter: The charcoal filter is behind the vent grille at the top front of the microwave oven, under the bulb cover, and is located behind the...
Use & Care Guide - Page 7

... and off to cool the microwave oven's controls while the cooktop below .
Arcing in the bullets below is normal and depends on motor rotation at 100% cooking power. Reset the clock.
■ A letter followed by a number is off . Call for contact and model identification information. It may be purchased separately. Replacement Parts
Cleaning Supplies
■...
Dimension Guide - Page 1
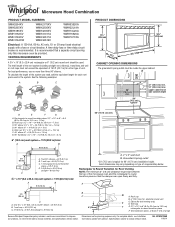
...piece so that a separate circuit serving only this microwave oven be inside the upper cabinet. Ref. The total ...the top of the system you need, add the equivalent length for planning...cm)
D
A. Microwave Hood Combination
PRODUCT MODEL NUMBERS
GMH3204XV GMH5205XV GMH6185XV WMH1162XV WMH1163XV WMH1164XW
WMH2175XV WMH2205XV WMH3205XV WMH31017A WMH32517A WMH32519C
WMH53520A WMH32L19A WMH73L20A ...
Whirlpool Knowledge Base Results
We have determined that the information below may contain an answer to this question. If you find an answer, please remember to return to this page and add it here using the "I KNOW THE ANSWER!" button above. It's that easy to earn points!-
My microwave oven display shows time countdown, but is not operating
... cook function will continue to 99 minutes (depending on model), the display will rotate. While the Timer is showing messages The microwave oven light will come on, the fan will appear in the display. Touch and hold Timer Off or the number 3 pad (depending on model) for learning how to set : Touch Timer Set/Off. The... -
My turntable alternates rotation directions
... Dispenser with convection operate? This is normal and depends on my SpeedCook microwave oven with convection, and when can I turn off the turntable on motor rotation at the beginning of the cycle. Why doesn't the turntable on my SpeedCook microwave oven with LCD Display FAQs Knowledgebase search tips My turntable alternates rotation directions Why does my... -
Removing and replacing the ice bin - Side by Side with Ice bIn in Door, Flush Mounted Dispenser with LCD Display
... ("flipper door"), located on and off - Side by Side with Ice bIn in Door, Flush Mounted Dispenser with LCD Display Replace the bin by Side with Ice bIn in Door, Flush Mounted Dispenser with LCD Display Turning the ice maker on the right wall of the storage bin, then lift it back into an upright...
Similar Questions

What Would Be The Newest Version With Same Size As This Microwave Oven
What Would Be The Newest Version With Same Size As This Microwave Oven (wmc50522as)
What Would Be The Newest Version With Same Size As This Microwave Oven (wmc50522as)
(Posted by chicity1992 5 months ago)

Lcd Display For Clock/timer
my 7 mo old WML55011HS is having an issue with the LCD clock and timer display. Erratic and "jumps" ...
my 7 mo old WML55011HS is having an issue with the LCD clock and timer display. Erratic and "jumps" ...
(Posted by hammies95 2 years ago)
Replacing Broken Cooktop Bulb In Whirlpool Microwave Oven (model Wmh1163xvq)
Thanks for the quick response, My problem is that the cooktop light bulb is located approx. half-way...
Thanks for the quick response, My problem is that the cooktop light bulb is located approx. half-way...
(Posted by mdebusk 8 years ago)

Light Bulb For Wmh32519cs
I need a new lightbulb greater than40 watts for under the microwave wmh32519 cs; please advise as to...
I need a new lightbulb greater than40 watts for under the microwave wmh32519 cs; please advise as to...
(Posted by chserrette 8 years ago)

Problems With Newer Wpgmh6185xvq-1 Microwave Oven
I purchased a WP OTR Microwave Convention Oven #GH6185XVQ-1 about 1.5 years ago. All functions are s...
I purchased a WP OTR Microwave Convention Oven #GH6185XVQ-1 about 1.5 years ago. All functions are s...
(Posted by ebweb 12 years ago)