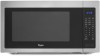
Whirlpool WMC50522AS Support Question
Whirlpool WMC50522AS Support Question
Find answers below for this question about Whirlpool WMC50522AS.Need a Whirlpool WMC50522AS manual? We have 3 online manuals for this item!
Question posted by Dawnkalfon7 on June 30th, 2021
Display Not Showing Correctly.
Current Answers
Answer #1: Posted by Kingmonu on June 30th, 2021 11:37 AM

Member since:
June 12th, 2021 Points: 33,940

2.Use a screwdriver to loosen and remove the microwave from the kitchen unit. After the microwave is placed on a secure surface, remove the panels to access the inner components. You'll need to thoroughly inspect the parts to determine why the display isn't working.
3.Loca the various fuses within the microwave to determine whether they need replacing. The Microwave Wizard website explains that the temperature and monitor fuses can affect the microwave's display. Examine whether the fuse is discolored or if the filament is broken.
4.Purchase new fuses and install them in the microwave as needed. The Microwave Wizard website explains that the individual should also check the circuit board within the microwave to determine whether any lines or digits are missing. The display issue can be related to missing solder in the circuit board.
5.Check the circuit board thoroughly to locate the broken line. Use the soldering iron to solder the line back into place. After replacing or fixing the fuses and lines, test the microwave display to ensure that it is working correctly.
Answer #2: Posted by Odin on June 30th, 2021 10:56 AM

Member since:
April 10th, 2010 Points: 41,236,690
Hope this is useful. Please don't forget to click the Accept This Answer button if you do accept it. My aim is to provide reliable helpful answers, not just a lot of them. See https://www.helpowl.com/profile/Odin.
Answer #3: Posted by Kingmonu on June 30th, 2021 11:25 AM
Member since:
June 12th, 2021 Points: 33,940
2.Flashing or sparking
Do you see sparks or flashes of light emitting from the inside of your microwave? A microwave flashing from the inside could be the sign of a dirty or faulty metal wave guide cover inside your appliance. The wave guide cover protects and shields what is known as the "magnetron," the device that's responsible for directing and radiating heat waves toward the center of the appliance where food is placed. Do not attempt to remove, clean or repair the wave guide cover on your own. While the problem is likely not a severe safety hazard, do not attempt to remove the wave guide cover yourself. Tip: Immediately switch off the microwave and give Appliance Service Station a call to avoid injury or further appliance damage
Related Whirlpool WMC50522AS Manual Pages


Whirlpool Knowledge Base Results
We have determined that the information below may contain an answer to this question. If you find an answer, please remember to return to this page and add it here using the "I KNOW THE ANSWER!" button above. It's that easy to earn points!-
What are some tips for defrosting food using my microwave oven?
...microwave oven. Aluminum foil and metal Always use the Auto Defrost feature on my microwave oven? It should be used properly, arcing (a blue flash of aluminum foil to defrost. The Auto Defrost feature can be used in the display... and sausage. Touch Start. What are there tips for using my microwave oven? Touch the number pads to set to shield parts of -cycle tones will sound, ... -
Why won't my SpeedCook microwave oven with convection operate?
... Touch "OK." Info." Find Manuals & Why won 't my SpeedCook microwave oven with convection operate? Remove spacer; Why won 't my SpeedCook microwave oven with convection operate? Child Lock activation is possible only when the oven is visible in operation. Is the door completely closed? Is the Learning Mode activated? Learning Mode: The Learning... -
What are some tips for cooking in my microwave oven?
... be turned back at one corner to provide an opening to vent steam. Condensation on my microwave oven? What are some metal can occur and cause damage to the microwave oven. Plastic wrap should be used properly, arcing (a blue flash of the food. Piercing: Before heating, use the Auto Defrost feature on the door and...
Similar Questions

What Would Be The Newest Version With Same Size As This Microwave Oven (wmc50522as)


how do I cook already defrosted chicken breasts in this microwave? The use and care guide doesn't sa...
my microwave keep running no heat how can I fix this problem ?

I purchased a WP OTR Microwave Convention Oven #GH6185XVQ-1 about 1.5 years ago. All functions are s...