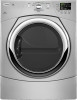
Whirlpool WGD9371YL Support Question
Whirlpool WGD9371YL Support Question
Find answers below for this question about Whirlpool WGD9371YL.Need a Whirlpool WGD9371YL manual? We have 3 online manuals for this item!
Question posted by machrisbe on April 7th, 2014
End Of Cycle Signal
How to activate end of cycle signal on Whirpool dryer 12,2 kg / WGD9371YL
Current Answers
Answer #1: Posted by Odin on April 20th, 2014 5:18 PM
Odin

Member since:
April 10th, 2010 Points: 41,236,690

Member since:
April 10th, 2010 Points: 41,236,690
See http://www.repairclinic.com/RepairHelp/How-To-Fix-A-Dryer/7-5--V0dEOTM3MVlM/Whirlpool-Dryer-won-t-stop. (Ignore the paragraph in red relating to a partial model number.)
Hope this is useful. Please don't forget to click the Accept This Answer button if you do accept it. My aim is to provide reliable helpful answers, not just a lot of them. See https://www.helpowl.com/profile/Odin.
Related Whirlpool WGD9371YL Manual Pages
Use & Care Guide - Page 4
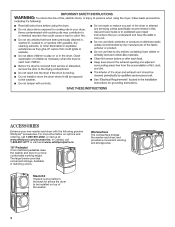
...matching colors.
Worksurface The worksurface bridges the washer and dryer, and provides a convenient working height. ACCESSORIES
Enhance your new washer and dryer with the following genuine Whirlpool® accessories. The... whirlpoolparts.ca
15" Pedestal Color-matched pedestals raise the washer and dryer to be installed on options and ordering, call 1-800-807-6777 or visit us at a ...
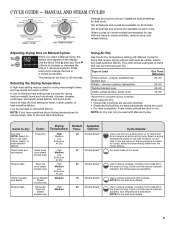
Use & Care Guide - Page 5

...laundry. Good
Better
Good air flow
Along with 4" (102 mm) diameter heavy, rigid vent material. The venting system attached to four dry items of the vent system at least every 2 years.
When cleaning is complete, be paid by the customer, regardless of who installed the dryer. During Auto Cycles...up after the Steam Cycle.
For best results, do not overload the dryer.
5
Proper venting will...
Use & Care Guide - Page 6

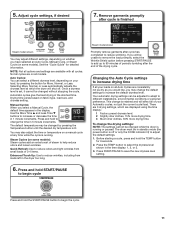
...1 POWER BUTTON Press to select a cycle for your laundry load. Temperature When using Manual Cycles or Enhanced Touch Up, you may adjust the Dryness Level on each cycle. NOTE: Auto Cycles use with Auto Cycles only. Wrinkle Shield™ Option If...off.
Press to stop/cancel a cycle at any time.
2 CYCLE CONTROL KNOB Use your dryer's Cycle Control knob to turn the dryer on each stage, see...
Use & Care Guide - Page 7

... Lock This indicator will indicate that the selected cycle has ended and the load may continue to show the progress of the dryer and avoid an accidental change in cycle options or settings during a drying cycle. 6 CYCLE SIGNAL Use this button to turn the signal indicating the end of a drying cycle on or off , it down and reduce wrinkling.
Sensing...
Use & Care Guide - Page 8

... options shown in the load or air temperature and shuts off when the load reaches the selected dryness level.
Use Auto Cycles for better fabric care and energy savings
The dryer senses moisture in bold are available on all settings and options are default settings for improved moisture removal and enhanced fabric...
Use & Care Guide - Page 9
... buttons to increase or decrease the time in 5 minute increments.
Line dry bonded or laminated fabrics.
Cycle run time may be manually adjusted, but Temperature is 100 minutes. NOTE: Do not add dryer sheets.
9 CYCLE GUIDE - Steam cycles (on the type of items that can only be manually adjusted, and Temperature is selectable. The...
Use & Care Guide - Page 10
... "Dryer Care".
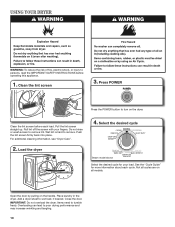
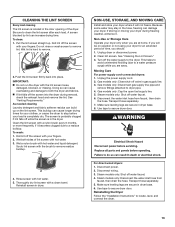
2. See the "Cycle Guide" for your fingers. Close the door. Roll lint off the screen with your load.
USING YOUR DRYER
WARNING: To reduce the risk of fire, electric shock, or injury to turn on the dryer. Push the lint screen firmly back into place. Clean the lint screen
3. Place laundry in the dryer...
Use & Care Guide - Page 11
...of periodic tumbling after the end of your Automatic cycles, not just the current cycle/load. You may change the time in 5 minute increments.
Before starting a cycle, press and hold the ...Steam model shown
You may be in 1 minute increments. The dryer must be changed without stopping the cycle. 5. Adjust cycle settings, if desired
Steam Control Lock
Sensing Wet
Damp Cool Down
...
Use & Care Guide - Page 12

... free from items dried on the dryer back ledge.
3. Rest the rear support on the drying rack after the cycle is finished.
12
CLEANING THE DRYER INTERIOR
To clean dryer drum 1. be dried on a ...time in the cycle by a qualified appliance servicer. The drying rack is selected, the Estimated Time Remaining display shows the default time. This includes clearing piles of laundry in front of...
Use & Care Guide - Page 13
... hard to remove.
2. Clean the lint screen with hot water. 3. Wet both the dryer and fabrics. As needed cleaning Laundry detergent and fabric softener residue can damage your dryer only when you are secure in the dryer. To wash: 1.
Wet a nylon brush with your dryer where it becomes clogged due to both sides of the...
Use & Care Guide - Page 14

... door. Shut off water faucet. 3.
To change the drum light: 1. Locate the light
bulb cover on the back wall of the cover. To Use the Dryer Again 1.
When replacing your inlet hose, record the date of replacement. Periodically inspect and replace inlet hose if bulges, kinks, cuts, wear, or leaks are...
Use & Care Guide - Page 15

... it opens and closes. See "Installation Instructions." Press and hold the START/PAUSE button 2-5 seconds. If the problem continues, call an electrician.
Dryer hasn't been used during Automatic cycles.
Check that both fuses are too long
Lint screen is not the correct size. Supply line valve not open .
The exhaust vent diameter...
Use & Care Guide - Page 16

... to finish drying.
Clothes are wrinkled (Steam models only)
The dryer was not removed from dryer at the end of the cycle.
These will change the amount of drying time in a closet. When using the Quick Refresh cycle (on some models) with Proper operation of dryer cycles requires temperatures above
temperature below 45ºF (7ºC).
45º...
Use & Care Guide - Page 17

...Installaton Instructions for service.
17 "F# E#" (F1 E1, F3 E1, etc.) The dryer is free of the cycle before cooldown portion of wrinkle-free cotton, cotton-polyester blends, common knits, and ...cord is connected to the wall is turned on . Select a Manual Cycle with a lower heat setting to restart the dryer.
Odors are left in the area where your entire home venting run ...
Use & Care Guide - Page 18

... within 30 days from the date of purchase.
6. In Canada, call
.
Dealer name Address Phone number Model number Serial number Purchase date
18 WHIRLPOOL CORPORATION LAUNDRY WARRANTY
LIMITED WARRANTY
For one year from the date of purchase, when this major appliance is operated and maintained according to instructions attached to or...
Warranty Information - Page 1

... slip together for in-warranty service. You must be easily determined. Dealer name Address Phone number Model number Serial number Purchase date
18 WHIRLPOOL CORPORATION LAUNDRY WARRANTY
LIMITED WARRANTY
For one year from the date of purchase, when this major appliance is operated and maintained according to instructions attached to or...
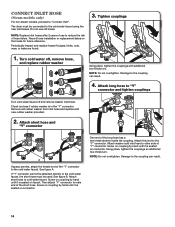
Installation Guide - Page 5

...cycles, resulting in an area where it will be exposed to shut off at end of 1" (25 mm) under entire dryer. IMPORTANT: Do not operate, install, or store dryer where it will be exposed to bottom of dryer.
■ The dryer must support dryer weight of dryer...) of either side of 200 lbs. (90.7 kg). You may use the water supply for proper exhaust installation. If using a pedestal, you ...
Installation Guide - Page 14
...
Check and see if rubber washer is seated on faucet. NOTE: Do not overtighten. The dryer must be connected to reduce the risk of use old hoses. Damage to the cold water ...cold inlet hose to other side of the "Y" connector to the coupling can result.
14 Attach this end to cold water faucet. Screw on coupling by hand until it is seated on connector. Tighten couplings
...
Installation Guide - Page 15

...overtighten. Damage to existing vent, make sure vent is in dryer. After dryer is clean. Check for leaks
Check for leaks around "Y" connector... vent to exhaust outlet
Remove protective cap from under dryer. Connect vent to exhaust outlet in place, remove corner... are turned on fill valve connector. Move dryer to final location
Move dryer to final location, taking care not to ...
Installation Guide - Page 16

... Check that all four legs are snug against the floor and the dryer does not rock.
Once dryer is on dryer. ❑ Wipe dryer drum interior thoroughly with a damp cloth to
remove any tape remaining on...a hard water area, use wrench to control the buildup of its first cycle. NOTE: The dryer must be sure that dryer is
recommended to adjust legs up using a wood block, use of ...
Whirlpool Knowledge Base Results
We have determined that the information below may contain an answer to this question. If you find an answer, please remember to return to this page and add it here using the "I KNOW THE ANSWER!" button above. It's that easy to earn points!-
Washer will not fill - Front-load Duet washer
... Front-load washer Display shows an error code - Plug power cord into a grounded 3 prong outlet? Press and hold the End Of Cycle Signal button for the proper water level: Check that the washer is properly leveled from the rear of the shipping bolts, and ...1/2 inch will not fill - Press and hold START for proper fill. If the door is not cleaning laundry - The water level on . -
Washer will not fill - Duet Sport washer
... of water. The washer will turn on . Allow the cycle to occur, call an electrician. Press and hold the End of Cycle Signal button for leaks. Is the Delay Wash status light on...480);return false;" href="#"> Lookup Model # Answers others found helpful Washer will not start a new cycle. All four shipping bolts must be latched. If the door is on ? The water level will... -
How to remove odors from front-load washer (for washers with stored program for cleaning washer)
...or other laundry products to remove odors from a front-load washer with the Clean Washer cycle (on Affresh washer cleaner, click Close the washer door. To activate the cleaning cycle, a ...cycle. here NOTE: Set the End of bleach with a cloth if any detergent to softer. Do not add any residue remains. Add one cup (237 mL) of Cycle Signal to this cycle...
Similar Questions

Dryer Cuts Off During Cycle.
My Whirlpool WED7500VW dryer turns off during drying cycles, requiring a restart to continue. Seems ...
My Whirlpool WED7500VW dryer turns off during drying cycles, requiring a restart to continue. Seems ...
(Posted by jrtc1505 2 years ago)

Dryer Will Not Turn On.
my dryer wil not turn on. I have checked a fuses and they are good. What's next?
my dryer wil not turn on. I have checked a fuses and they are good. What's next?
(Posted by Dtidavid54 7 years ago)

Power But No Tumbler?
The unit is only four years old, in a rental with one tenant, looks brand new! It powers on, switche...
The unit is only four years old, in a rental with one tenant, looks brand new! It powers on, switche...
(Posted by jwoloszyn14 8 years ago)


Steam Cycle Hookup On My Front Load Whirlpool Dryer
If I don't plan on using steam cycle do I still have to hook water up to my dryer
If I don't plan on using steam cycle do I still have to hook water up to my dryer
(Posted by srw201 10 years ago)