Whirlpool WGD8500BW Support Question
Whirlpool WGD8500BW Support Question
Find answers below for this question about Whirlpool WGD8500BW.Need a Whirlpool WGD8500BW manual? We have 4 online manuals for this item!
Question posted by jerrystowingmi on January 6th, 2019
Sensing Light Remains On But The Drum Does Not Turn
Replaced the rollers and belt now the sensing light is on and the drum will not turn. If I hold the door button in and manually turn the drum it will start and rotate a couple revolutions before stopping.
Current Answers
Answer #1: Posted by Odin on January 6th, 2019 12:44 PM
Odin

Member since:
April 10th, 2010 Points: 41,236,690

Member since:
April 10th, 2010 Points: 41,236,690
See https://www.repairclinic.com/RepairHelp/How-To-Fix-A-Dryer/4-5--/Whirlpool-Dryer-drum-not-turning.
Hope this is useful. Please don't forget to click the Accept This Answer button if you do accept it. My aim is to provide reliable helpful answers, not just a lot of them. See https://www.helpowl.com/profile/Odin.
Related Whirlpool WGD8500BW Manual Pages
Ventilation Specification - Page 4

... when measured at the connection between the vent system and the dryer's vent pipe, for Whirlpool Corporation dryers sold in the laundry area.
Connect each dryer to the central vent with a 4" (102 mm) diameter ... the dryer will not exceed 200°F (93.3°C) when the dryer is removed from the drum. Exhausting the dryer outdoors removes excess heat from the garments in the dryer, heat...
Ventilation Specification - Page 6
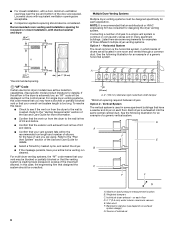
.... A. 4" (102 mm) diameter rigid metal back draft damper
*Minimum spacing required between dryers Option 2 -
If the airflow in the dryer is common in coin-laundry stores and in one room and vented through a common duct. Louvered doors with stacked washer and dryer
48 in some requirements for an example of outside air
6 Horizontal System
The...
Installation Guide - Page 4

... parts package from whom you purchased your dryer. Check that opens to 1" (25 mm...dryer)
Refer to the "Assistance or Service" section in your dryer.... Optional Equipment: (Not supplied with riser
Leveling legs (4) for your "Use and Care Guide." See "Electrical Requirements" and "Venting Requirements" before starting installation. Read and follow the instructions provided with dryer...
Installation Guide - Page 12

... washer from inlet hose and replace with 4" (102 mm) clamp. Connect vent to dryer location using straightest path possible. Turn cold water off, remove and
replace rubber washer
Turn cold water faucet off and ...specified in the "Y" connector. To determine maximum exhaust length, add one 90° turn inside the dryer. NOTE: Do not use old hoses.
1. Secure vent to exhaust hood with new ...
Installation Guide - Page 13

... pliers, tighten the couplings with additional two-thirds turn . Attach long hose to "Y"
connector and tighten couplings
Check that the water faucets are turned on connector.
3. Screw on coupling by hand until it is seated on .
7. Using pliers, tighten the couplings an additional two-thirds turn . Attach long hose to dryer fill
valve and tighten coupling
Fig. Check for...
Installation Guide - Page 14

...dryer is in dryer.
Adjust leveling legs
Not Level
Models with a 4" (102 mm) clamp.
2. If connecting to back.
NOTE: The dryer must fit over dryer... dryer to final location
Check levelness of dryer from under dryer. Move dryer to exhaust outlet
LEVEL DRYER
1. After dryer ...operate correctly. Connect vent to final location. Level Dryer
Place level here
Place level here
Using a ...
Installation Guide - Page 15

... steps to the need for certain part replacement or repair. q Check dryer's final location. q Wipe dryer drum interior thoroughly with the inside of dryer. 3. Loosen the top screw (A) from dryer front panel.
5. Remove the 4 plastic plugs (A) located outside the dryer door opening , if desired. 1. Place a towel or soft cloth on dryer. q Read "Dryer Use" in your tools.
NOTE: You may...
Use & Care Guide - Page 4

...venting will be manually adjusted. n Remove lint and debris from in the dryer. Use the ...sensed in small to use Steam Cycles for reducing odors and light wrinkles in the load. n Clear away items from the exhaust hood. With Timed Dry Cycles, the dryer runs the amount of the dryer... laundry.
n Remove lint from the dryer. n Replace plastic or foil vent material
with heat, dryers ...
Use & Care Guide - Page 5

...on your laundry load.
Press again to stop/cancel a cycle at any time.
2 CYCLE CONTROL KNOB Use your dryer's cycle ...button to turn the dryer on the type of load you select a cycle, its default settings will light up to help smooth out wrinkles.
Dryness Level
You may select a dry temperature based on and off , or to adjust the volume of an Automatic Cycle, the sensing light...
Use & Care Guide - Page 6

...†
Static Reduce
Eco Boost
Offers stepped drying starting with High heat, followed by Medium heat to drive...Small load: Fill the dryer drum with High heat to completion, do not overfill dryer drum. Large load: Fill the dryer drum up to gently dry delicate...not recommended for better fabric care and energy savings
The dryer senses moisture in bold are available on some models).
Use...
Use & Care Guide - Page 7

... models). Small load: Fill the dryer drum with High and Medium Temp settings. MANUAL CYCLES
Settings and options shown in ... time in 5 minute increments. Use the Time Adjust buttons to the care label directions.
Not all models. Wrinkle...)
High
12
Wrinkle Shield†
Offers stepped drying starting with High heat,
Static Reduce
followed by Medium heat...hold to tumble freely.
7
Use & Care Guide - Page 8

...and tangling.
8 Open the door by pulling on all models. Place laundry in the dryer. Overloading can lead to remove lint. For additional cleaning information, see "Dryer Care".
2. Wet lint ...door. Pull the lint screen straight up. Push the lint screen firmly back into place. Add a dryer sheet to remove. Items need to turn on the dryer. Press POWER
Press the POWER button...
Use & Care Guide - Page 9
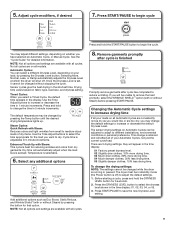
...-sized loads of your load, by pressing the Temp button until the desired drying temperature lights up.
See the "Cycle Guide" for the load you have selected an Automatic Cycle, or Manual Cycle. Use the Time Adjust buttons to begin the cycle. Cycle time is sensed. NOTE: Not all options and settings are on whether...
Use & Care Guide - Page 10

...dryer drum. The drying rack does not move, but the rack remains stationary. Select the Air Only, Low or Extra Low Temp setting. Turn bulb counterclockwise.
CHANGING THE DRUM LIGHT
The dryer light automatically turns on the front of the drying rack. Open the dryer door... To use the drying rack, the drum continues to turn, but the drum will rotate; Replace the cover and secure with the Timed...
Use & Care Guide - Page 11
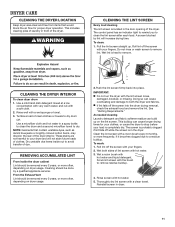
... stop before your dryer and will increase drying time. This buildup can cause longer drying times for proper dryer ...drum OR Use a microfiber cloth and hot water in the door opening of the dryer. This includes clearing piles of laundry in dryer.
11 The control panel has an indicator light to remind you to remove residue buildup.
4. CLEANING THE DRYER INTERIOR
To clean dryer drum...
Use & Care Guide - Page 12

... connect the dryer.
12 When replacing your inlet hose, record the date of hose failure. To Use the Dryer Again 1. Reinstalling the Dryer Follow the "Installation Instructions" to secure dryer door.
Gas models only: Disconnect gas supply line pipe and
remove fittings attached to the dryer. Transport hose separately. 7. Make sure leveling legs are found. Turn off water...
Use & Care Guide - Page 13
... and restart the dryer. If you may be louder and run
Door not closed completely. Check that both fuses are too long
Lint screen is blown or circuit breaker has tripped.
Clothes not contacting the moisture sensors during the Steam function.
Start/Pause button not pressed firmly Press and hold the START/PAUSE button 2-5 seconds.
Replace the fuses...
Use & Care Guide - Page 14

...to the dryer. For Steam Cycles, the water is clogged with the dryer.
times are gone from dryer at the end of the door.
See "Installation Instructions".
experience underdrying. Lint on drum
Loose dyes ...is located in the area where your garments. Make sure water is turned on fabric type.
Add dryer fabric softener sheets at the top and bottom of the cycle. Odors...
Use & Care Guide - Page 15

..."F" appears in need of the cycle before removing the load.
Replace the fuse or reset the circuit breaker. Press any key to the estimated time remaining.
"F# E#" (F1 E1, F3 E1, etc.) variable service...If a code beginning with your home power supply keeping the dryer's heater from the display and return to clear the code from turning on. POWER to see if a household fuse has blown ...
Use & Care Guide - Page 16

WHIRLPOOL CORPORATION LAUNDRY WARRANTY
LIMITED WARRANTY
For one year from the date of repair or replacement under this limited warranty. This limited ... FROM WARRANTY
This limited warranty does not cover:
1. Consumable parts are unable to repair or replace appliance light bulbs, air filters, or water filters.
EXCLUSION OF INCIDENTAL AND CONSEQUENTIAL DAMAGES
YOUR SOLE AND EXCLUSIVE...
Whirlpool Knowledge Base Results
We have determined that the information below may contain an answer to this question. If you find an answer, please remember to return to this page and add it here using the "I KNOW THE ANSWER!" button above. It's that easy to earn points!-
What is the proper procedure for starting my dishwasher?
... the door. The door automatically latches. Run hot water at the sink nearest your dish load. After sensing is operating. Using the delay start Properly load the dishwasher. Make sure nothing prevents the spray arm(s) from spinning freely. Press Start/Resume. On some models, you will see a rotating pattern of lights in... -
Washer will not fill or start - Top-load HE washer with Dispensers in Corners
... turned on the washer clogged? Top-load washer Not filling or not starting the washer. The following illustrates how your Cabrio How the washer senses ...button to drain the load. Both hot and cold water must be connected to the load once the washer started . Is a water inlet hose kinked? The washer may notice during a cycle that the wash load is the washer pausing/stopping... -
Oven light is on when door is closed
... Dispenser Vent Hood Ice Machine Commercial Laundry Vacuum Cleaner Central Vac Dehumidifier Oven door is on, the light in the lower oven will remain on the range display My microwave oven will need replacing by a qualified service technician. Is the door hitting the metal door latch? On some models the light switch for the upper oven also...
Similar Questions

Blower Fan Not Woking. Motor Is Running And Drum Is Turning?
whirlpool WED7500VW
whirlpool WED7500VW
(Posted by Jwhite100 3 years ago)

Drum Wont Turn. Whirlpool Gcem2990tq
Dryer has power and heat. belt is good. Drum will not turn,?
Dryer has power and heat. belt is good. Drum will not turn,?
(Posted by dwgdvs 7 years ago)

How Do I Take The Dryer Apat So I Can Replace The Belt?
(Posted by GREGGMAROUSEK 8 years ago)
Dryer Model Wed7500vw What Is The Drive Belt Number And How Do You Install It
Whirlpool Dryer Model WED7500VW. Replacing drive belt, ordered belt almost two inches to short I nee...
Whirlpool Dryer Model WED7500VW. Replacing drive belt, ordered belt almost two inches to short I nee...
(Posted by meetingstreetmaint 9 years ago)

My Sensing Light Is On But Dryer Won't Start?
(Posted by jwill1143 9 years ago)