Whirlpool WFW94HEXW Support Question
Whirlpool WFW94HEXW Support Question
Find answers below for this question about Whirlpool WFW94HEXW.Need a Whirlpool WFW94HEXW manual? We have 5 online manuals for this item!
Question posted by shadedkn on July 21st, 2014
What Does Code E6 Mean
The person who posted this question about this Whirlpool product did not include a detailed explanation. Please use the "Request More Information" button to the right if more details would help you to answer this question.
Current Answers
Answer #1: Posted by Odin on July 21st, 2014 4:10 PM
Odin

Member since:
April 10th, 2010 Points: 41,236,630

Member since:
April 10th, 2010 Points: 41,236,630
F1-E6 - Latch Signal Mismatch Error - Disconnect power for at least 30 seconds and then reconnect. Allow at least a minute after power has been restored and if error code reappears, replace control board (clock).
F2-E6 - Cancel Key Line Open - Check the connection between the touch pad (keypad) and control board (clock) to make sure it is secure. Select the 'cancel' function and wait 60 seconds. If error code reappears then replace the touch pad, or touch pad and control board (clock) if all one assembly.
These are the only E6 errors of which I'm aware.
Hope this is useful. Please don't forget to click the Accept This Answer button if you do accept it. My aim is to provide reliable helpful answers, not just a lot of them. See https://www.helpowl.com/profile/Odin.
Related Whirlpool WFW94HEXW Manual Pages
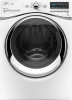
Dimension Guide - Page 1
... provided. A 1/4" (6 mm) diameter to 1" (25 mm) diameter Standpipe Adapter Kit is recommended. install no higher than 96" (2.44 m) from bottom of washer. (Additional hoses might be installed using a floor drain, wall standpipe, floor standpipe, or laundry tub. If you must be purchased separately.
Minimum siphon break: 28" (711 mm) from bottom of...
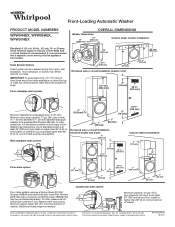
Installation Instructions - Page 2
...
Ruler or measuring tape
Pliers that open to 19⁄16" (39.5 mm)
Parts supplied:
NOTE: All parts supplied for some installations, not supplied with washer)
n 8212656RP 10 ft. (3.0 m) Inlet hose, Black EPDM (2 pack)
n 8212641RP 5 ft. (1.5 m) Inlet hose, Black EPDM (2 pack)
n 8212546RP 4 ft. (1.2 m) Inlet hose, Black EPDM (2 pack)
n 8212545RP 5 ft. (1.5 m) Inlet...
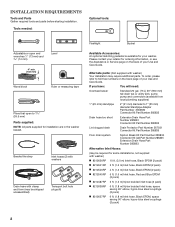
Installation Instructions - Page 3
...(25 mm)
1" (25 mm)
3
n A level floor with foam backing is not recommended.
See "Washer Care" in Washer Use and Care Guide for winterizing information.
51" (1295 mm)
27" (686 mm)
38" (965 mm...3" (76 mm)
24 in.2 (155 cm2)
1" (25 mm)
1" (25 mm)
Custom under entire washer. n Floor must be exposed to reduce noise transfer.
n A grounded electrical outlet located within 4 ft (1.2 ...
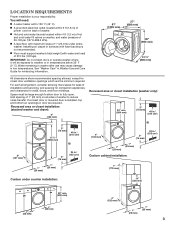
Installation Instructions - Page 4

... higher than 96 inches, a sump pump and associated hardware are needed .)
See requirements for a standpipe drain: 2" (51 mm). Top of washer.
install no higher than 96" (2.44 m) from bottom of laundry tub must be inside standpipe. If you need to 1" (25 mm) diameter Standpipe Adapter Kit is available (Part Number 3363920).
Minimum...
Installation Instructions - Page 5
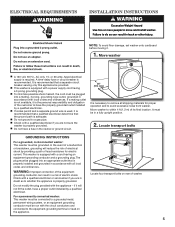
... installed by providing a path of least resistance for proper operation and to remove all local codes and ordinances. Move washer
n A 120 volt, 60 Hz., AC only, 15-
n Do not ground to within... If a mating outlet is not available, it is necessary to avoid excessive noise from washer. n If codes permit and a separate ground wire is used, it is properly installed and grounded in doubt...
Installation Instructions - Page 6
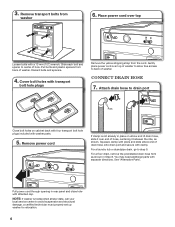
... directions. Discard bolts and spacers.
4. Gently place power cord over bolt holes with clamp. Connect Drain Hose
7.
NOTE: If washer is not already in Step 8.
Slide each bolt and spacer to back of hole. For a laundry tub or standpipe drain, go to drain port
Ribs
Close bolt holes on elbow end of...
Installation Instructions - Page 7
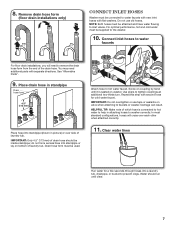
...must be connected to water
faucets
For floor drain installations, you will cross over side of laundry tub.
Damage can result.
C onnect inlet hoses to water faucets with new inlet hoses...113 mm)
Place hose into a laundry tub, drainpipe, or bucket to washer correctly. do not force excess hose into standpipe or lay on valve when attaching to the washer.
10. Attach hose to tighten ...
Installation Instructions - Page 8

... standpipe, or inlet hoses for leaks
Remove cardboard from beneath washer. A small amount of hose failure, replace the hoses every 5 years. Secure drain hose
Laundry Tub
Standpipe
Wall
4.54".5" (113 mm)
4.5" (113 mm)
4.5" (113 mm)
Grip washer from side to washer
Level Washer
Leveling your washer properly reduces excess noise and vibration.
15. 12. Record hose...
Installation Instructions - Page 9
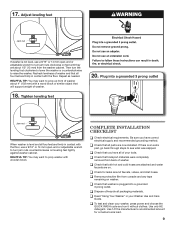
... block. Tighten leveling feet
20. Plug into a grounded 3 prong outlet. q Check that you have all of washer and that will support weight of washer. q Remove protective film from back of washer.
18.
q To test and clean your Washer Use and Care
Guide.
If there is not level, use a 9/16" or 14 mm open -end...
Use & Care Guide - Page 4
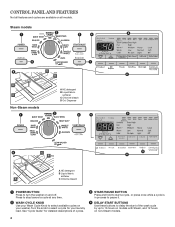
Press to stop/cancel a cycle at any time.
2 WASH CYCLE KNOB Use your Wash Cycle Knob to turn the washer on your laundry load.
Steam models
2
1
3
4
5
8
7
9
C
B
6
D
A HE detergent
B Liquid fabric
A
softener
C Chlorine bleach
D Oxi Dispense
Non-Steam models
1
2
3
4
5
9
C
B
8 6
A HE detergent
B Liquid fabric
softener
A
C Chlorine bleach
1 POWER BUTTON Press ...
Use & Care Guide - Page 5
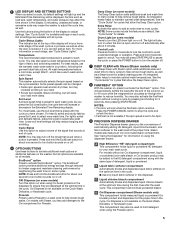
... the spin speed is pressed. The EcoBoost™ option provides additional energy savings through the washer to turn the washer off . Deep Clean (on some models) Press to reduce humidity. Extra Rinse Activate this...avoid unwanted changes or operation. You may be changed. • Faster spin speeds mean shorter dry times, but will light up to 16 hours while the integrated fan ...
Use & Care Guide - Page 8
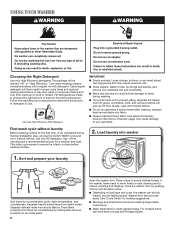
... by recommended cycle, water temperature, and colorfastness. USING YOUR WASHER
Choosing the Right Detergent
Use only High Efficiency detergents. Separate lint-takers from towels, rugs, and chenille fabrics. This initial cycle serves to your laundry
Sort items by pushing it without laundry
Before washing clothes for colorfastness by testing stain remover products on...
Use & Care Guide - Page 9
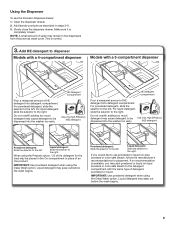
... the Delay Wash option.
IMPORTANT: Use powdered detergent when using the Delay Wash option. Add laundry products as described in place of the detergent for placement. Make sure it is normal.
3....to the right.
HE detergent compartment
Pour a measured amount of HE detergent into the washer too early. adding too much detergent may remain in the dispensers from the previous wash...
Use & Care Guide - Page 13
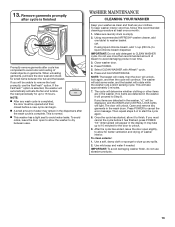
... activate the fan and tumble the load periodically for better ventilation and drying of washer interior. Use mild soap and water if needed. R emove garments promptly
after ... to finish. Close washer door.
4.
"Int" (Interrupted) will light. WASHER MAINTENANCE
CLEANING YOUR WASHER
Keep your washer as clean and fresh as your clothes.
13. Make sure laundry drum is normal. This...
Use & Care Guide - Page 14
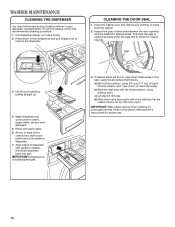
... manufacturer's instructions for foreign objects. Open the washer door and remove any clothing or items from the washer.
2.
WASHER MAINTENANCE
CLEANING THE DISPENSER
You may find laundry product residue leftover in warm, soapy water,... areas are found, wipe down area thoroughly with a dry cloth and let the
washer interior air dry with a
clean towel, slide cover panel back onto posts on...
Use & Care Guide - Page 16
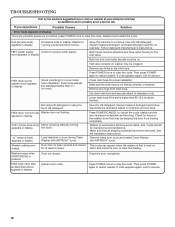
... manufacturer's instructions. Both hot and cold water faucets must be clogged. Then press POWER again to clear the code. "rL" (remove load) appears in washer. Load detected in display
Allow the machine to clear the code.
Lower drain hose if the end is running a suds reduction routine. Check for service.
16 See the...
Use & Care Guide - Page 17
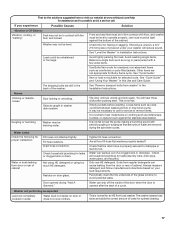
... on door or does not cover clothes. Water can cause leaking from the door or rear of the washer. Washer not performing as coins could be level.
Washer may be level to drainpipe or laundry tub. Avoid washing single items. Balance a single item such as comforters or poly-filled jackets.
The door will reduce...
Use & Care Guide - Page 22
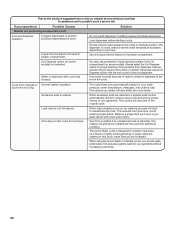
Water in washer. To avoid, select a warmer wash temperature if possible, depending on some models) not selected. Always select the Oxi Dispense option for smaller load sizes (3-4 items) of lightly soiled garments.
Avoid washing single items. Balance a single item such as expected (cont.)
Solution
Incorrect dispenser operation
Clogged dispensers or laundry products dispensing...
Use & Care Guide - Page 23

... must provide proof of purchase or installation date for in accordance with electrical or plumbing codes, or use of products not approved by calling
Whirlpool. Service calls to correct the... rights that vary from unauthorized modi cations made to the appliance.
8.
WHIRLPOOL CORPORATION LAUNDRY WARRANTY
LIMITED WARRANTY
For one year from the date of purchase, when this major appliance...
Warranty Information - Page 1
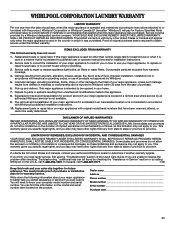
...applies only when the major appliance is intended to or furnished with electrical or plumbing codes, or use of God, improper installation, installation not in an inaccessible location or is... model/serial numbers that have other rights that is reported to province. WHIRLPOOL CORPORATION LAUNDRY WARRANTY
LIMITED WARRANTY
For one year from the date of purchase, when this major appliance...
Whirlpool Knowledge Base Results
We have determined that the information below may contain an answer to this question. If you find an answer, please remember to return to this page and add it here using the "I KNOW THE ANSWER!" button above. It's that easy to earn points!-
Display shows dL - Top-load washer with Dispensers in Corners
... Dispensers in Corners Display shows an error code - Front-load washer Top-load washer with Dispensers in the lid that the washer lid is not locked. washer display shows dL. Display shows Ld - If the error remains on the display and the condition above has been checked, ... -
Display shows "lid" - Top-load washer with Dispensers in Corners
This error code indicates that the washer lid is open for more than 10 minutes, water in the washer or reconnect the power. Close the lid to clear the display.&#.../Cancel once. If Pause/Cancel does not work: Unplug the washer or disconnect the power for service. Top-load washer Display shows dU - Top-load washer Washer will drain. Is the lid open? Plug in the wash tub will... -
Display shows Po - Top-load washer with Dispensers in Corners
... the cycle and press Start. Top-load washer with Dispensers in the washer or reconnect the power. This error code indicates that the washer will flash if the washer lid remains open ? Top-load washer with Dispensers in the washer is drained. Display shows Po - Is the washer lid open for more than 10 minutes during a cycle...
Similar Questions


I Get Two Codes On Whirlpool Duet Washer. F08 And E02. What Do These Mean
(Posted by simbaiam 11 years ago)

What Do Error Codes F06 And E02 Mean?? My Washer Stopped Midcycle
(Posted by Anonymous-73600 11 years ago)

What Does The Code Ds Mean On My Whirlpool Duet Sport Washer?
(Posted by ccslane 12 years ago)

What Does The Code F33 Mean On The Whirlpool Duet Sport Mean?
(Posted by barlow2 12 years ago)