Whirlpool WFW94HEXW Support Question
Whirlpool WFW94HEXW Support Question
Find answers below for this question about Whirlpool WFW94HEXW.Need a Whirlpool WFW94HEXW manual? We have 5 online manuals for this item!
Question posted by Quincyhebert on June 19th, 2013
How To Clean Drain Screen?
How to clean drain screen on WFW94HEXW2? Is there a repair manual for the WFW94HEXW2
Current Answers
Answer #1: Posted by waelsaidani1 on June 20th, 2013 7:58 AM
waelsaidani1

Member since:
May 12th, 2013 Points: 19,501,807

Member since:
May 12th, 2013 Points: 19,501,807
Hello Quincyhebert to clean drain screen
Turn off and open the Whirlpool dishwasher, removing the bottom rack.
Locate the screen at the bottom of the dishwasher to the right of the spinning spray blades.
Remove any food and debris with the washcloth.
Grab hold of the round ring in the middle of the large flat screen on the bottom of the Whirlpool dishwasher or lower filter. This is the upper filter. Turn it 90 degrees to the left and lift out. Lift out both the upper and lower screens or filters.
Rinse both screens or filters under hot running water.
Replace both the upper and lower filters in the bottom of your Whirlpool dishwasher.
Related Whirlpool WFW94HEXW Manual Pages
Dimension Guide - Page 1
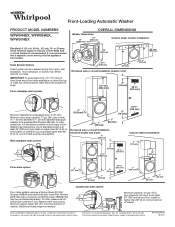
... higher than 96" (2.44 m) from bottom of drain hose should be installed using a floor drain, wall standpipe, floor standpipe, or laundry tub. To order, please see Installation Instructions packed with product. Floor standpipe drain system
38" (965 mm)
311/2" (800 mm)
1" (25 mm)
Recessed area or closet installation (washer only):
39" min. (990 mm) 1" (25...
Installation Instructions - Page 4

... need to 1" (25 mm) diameter Standpipe Adapter Kit is available (Part Number 3363920). Floor standpipe drain system
41/2" (113 mm)
Laundry tub drain system
41/2" (113 mm)
min. 30" (762 mm)
Minimum capacity: 20 gal. (76 L). Top of washer. (Additional hoses may be needed . Minimum carry-away capacity: 17 gal. (64 L) per minute.
Minimum...
Installation Instructions - Page 6
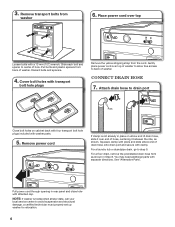
... place power cord over top
Loosen bolts with washer parts.
5. For a floor drain, remove the preinstalled drain hose form as shown.
Discard bolts and spacers.
4. See "Alternative Parts". Pull bolts and plastic spacers from
washer
6. Slide each bolt and spacer to step 9. For a laundry tub or standpipe drain, go to center of hose, centering it between...
Installation Instructions - Page 7
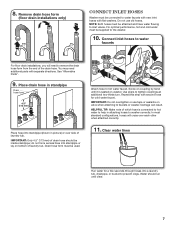
... water must be connected to help in picture) or over each other when attached correctly.
11. Place drain hose in standpipe
Drain hose form
4.5" (113 mm)
Place hose into a laundry tub, drainpipe, or bucket to faucets or washer.
IMPORTANT: Do not overtighten or use old hoses. Clear water lines
Run water for cold water...
Installation Instructions - Page 8

... two-thirds turn on water faucets to laundry tub leg, drain standpipe, or inlet hoses for leaks
Remove cardboard from beneath washer. Place a level on floor. Secure drain hose
Laundry Tub
Standpipe
Wall
4.54".5" (113 mm)
4.5" (113 mm)
4.5" (113 mm)
Grip washer from side to washer
Level Washer
Leveling your washer properly reduces excess noise and vibration.
15...
Installation Instructions - Page 9
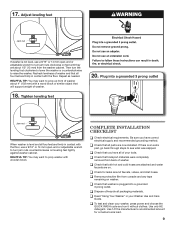
.... If there is not level, use a 9/16" or 14 mm open -end or adjustable wrench to prop washer with a wood block or similar object that you have all packaging materials.
q To test and clean your Washer Use and Care
Guide. Use only HE detergent. Tighten leveling feet
20. Plug into a grounded 3 prong outlet...
Use & Care Guide - Page 5
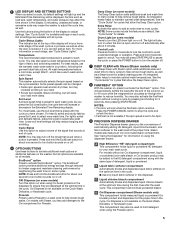
... on the cycle selected.
NOTE: Press and hold the EcoBoost button for cycles that allow the Deep Clean option.
8 FANFRESH™ OPTION With the washer on or off .
7 DEEP CLEAN with Steam (Steam models only) The Deep Clean with the same type of automatically adding HE detergent, liquid chlorine bleach, and fabric softener to...
Use & Care Guide - Page 7

...
Normal
No Spin
Light
Extra Rinse Presoak FanFresh
Delay Start
No clothes in washer Clean Washer with each cycle. For best performance, not all models. Medium load: Fill the washer drum up to remove excess water from the load by choosing Rinse/Drain & Spin and turning off Extra Rinse. For some options cannot be set...
Use & Care Guide - Page 8
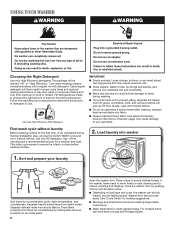
...tears to avoid further damage to ensure the interior is clean before washing clothes.
2. n Always read and follow fabric care labels and laundry product instructions. Use only HE detergent. Separate heavily soiled ... will be fully loaded, but not tightly packed. Improper usage may also result in the washer. Treat stains promptly and check for a medium-size load. Place a load of suds ...
Use & Care Guide - Page 11
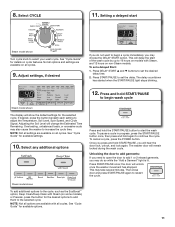
... additional options to increase the cycle time.
This may also cause the washer to the cycle, such as the EcoBoost™ option, Deep Clean/Deep Clean with all options and settings are available on cycle features. 8. The washer door will unlock once the washer movement has stopped.
Press DELAY START s and t buttons to restart the...
Use & Care Guide - Page 12
... best results.
12 If used, liquid chlorine bleach is added in the last rinse.
Spin The washer spins the load at the proper temperature for optimal cleaning.
Done Once the cycle is complete, this time, the washer will first perform a self-test on the door lock mechanism. Remove the load promptly for proper...
Use & Care Guide - Page 13
... hours. If you will rotate while the washer runs a short sensing cycle. To clean exterior:
1.
WASHER MAINTENANCE
CLEANING YOUR WASHER
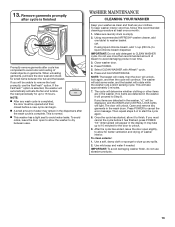
Keep your washer as clean and fresh as your clothes. IMPORTANT: Do... leaks. n This washer has a tight seal to avoid odor and rusting of washer interior. Close washer door.
4.
Press and hold START/PAUSE. 13. Make sure laundry drum is finished
Promptly...
Use & Care Guide - Page 14
... with the dilute solution, using the procedure that follows. d) W ipe down these areas of warm tap water. WASHER MAINTENANCE
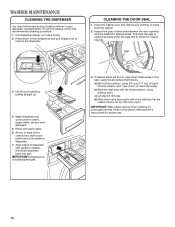
CLEANING THE DISPENSER
You may find laundry product residue leftover in washer, then slide dispenser back into slot. CLEANING THE DOOR SEAL
1. Inspect the gray colored seal between the door opening and the basket for prolonged...
Use & Care Guide - Page 15

... replacement date on label with a rubber band or cable tie to your washer for about 30 seconds to clean
washer and remove antifreeze, if used. Disconnect and drain water inlet hoses.
2. Unplug power cord. 5. Do not reuse transport bolts. Before using your washer, it from back of hose failure, replace inlet hoses every five years...
Use & Care Guide - Page 16
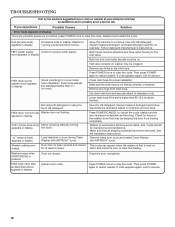
...measure detergent, and base detergent quantity on washer may be on load size and soil level. Inlet valve screens on load size.
Drain hose extends into standpipe farther than as described...experience
Possible Causes
Solution
Error Code Appears in Display Once any kinks in drum during Clean Washer with AFFRESH™ cycle.
Both hoses must be clogged. Remove any possible issues...
Use & Care Guide - Page 17
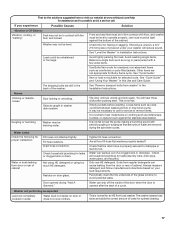
... much HE detergent.
Residue on door or does not cover clothes. Are all household plumbing for leaks (laundry tubs, drain pipe, water pipes, and faucets.) Only use HE detergent.
Check all four fill hose flat washers properly seated? Periodically clean the the underside of the door when the door is opened during the spin...
Use & Care Guide - Page 18
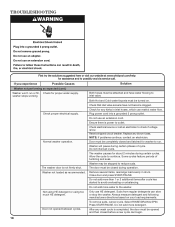
... grounded 3 prong outlet.
Washer may be turned on your load requirements. Only use an extension cord.
Check that inlet valve screens have water flowing to check ...you experience
Possible Causes
Solution
Washer not performing as recommended.
Select RINSE/DRAIN & SPIN.
Reset a tripped circuit breaker.
Washer not loaded as expected (cont.)
Washer won't run . Remove ...
Use & Care Guide - Page 19
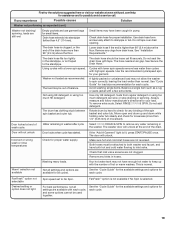
... from drain hose. Do not add detergent. Move open end drum up with each cycle.
19 Door will unlock.
If the "Add A Garment" light is selected.
Check that inlet valve screens are ...wrong wash or rinse temperatures
Warm* selection not available
Water remaining in the washer.
Do not tape over drain opening.
The drum has clothing stuck between spin basket and outer tub....
Use & Care Guide - Page 20
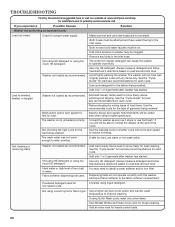
... rinse well if tightly packed. Add only 1 or 2 garments after washer has started . If safe for proper water supply.
Both hoses must be wetter than when using too much HE detergent. Inlet valve screens on . Fabric softener dispensing ball used for best cleaning. Powdered detergent used .
Items need to the inlet valve. Reduce...
Use & Care Guide - Page 21
... hard water.
Not enough detergent used , or hard water. Odors Fabric Damage
Monthly maintenance not done as expected (cont.)
Not cleaning or removing stains
Not using too much HE detergent.
This washer has a tight seal to avoid chlorine bleach and fabric softener staining. Strings and straps could have been damaged before washing...
Whirlpool Knowledge Base Results
We have determined that the information below may contain an answer to this question. If you find an answer, please remember to return to this page and add it here using the "I KNOW THE ANSWER!" button above. It's that easy to earn points!-
Leaking water - Cabrio® washer with agitator
... came in Corners Product repair manuals Product Recall Information Leaking water - Find Manuals & Top-load HE washer with agitator My Cabrio ® washer with the washer. Make sure all four feet are installed, the washer is level front to back and side to the faucet. Be sure that the household drain is leaking where the... -
Leaking water - Front-load washer
... and cause water to avoid leaks. Top-load washer Product repair manuals My dishwasher is not backing up. Check for details;...washer leaking at the hose connections? Are the gaskets missing from the drain. The drain system can block the flow of both inlet hoses contain the hose washers that could clog the flow of the Machine - Manually remove the dispenser, and clean... -
My front load washer has an odor
... is damp, use ? How to remove odors from front-load washer (for washers with the Clean Washer cycle (on control panel) Causes of the washer interior. If your laundry room is required. Removing odors from a front-load washer without a Clean Washer cycle How do the following answers for details. This washer has a tight seal to remove odors from a front-load...
Similar Questions

Washer Wfw94hexw
My whirlpool washer model WFW94HEXW totally stop working and cannot open the door and there is a cod...
My whirlpool washer model WFW94HEXW totally stop working and cannot open the door and there is a cod...
(Posted by dhynes 9 years ago)


How To Clean Pump Filter On Front Loading Whirlpool Washer Wfw94hexw
(Posted by HQajowas 10 years ago)
How To Repair Review Front Cover On Front Loading Whirlpool Washer Wfw94hexw
(Posted by cuongcla 10 years ago)

I Need Repair Manual For Wtw6700two Whirlpool Washer
(Posted by jhinds7 11 years ago)