Whirlpool WFW94HEXR Support Question
Whirlpool WFW94HEXR Support Question
Find answers below for this question about Whirlpool WFW94HEXR.Need a Whirlpool WFW94HEXR manual? We have 5 online manuals for this item!
Question posted by tburgeson on February 26th, 2021
How Do I Drain The Water Behind The Rubber Door Gasket?
Water puddles under the gasket after a wash.
Current Answers
Answer #1: Posted by techyagent on February 27th, 2021 12:26 AM
techyagent

Member since:
June 17th, 2014 Points: 4,799,800

Member since:
June 17th, 2014 Points: 4,799,800
- STEP 1: Turn off the power. Switch the power button on the machine off, if your model has one. ...
- STEP 2: Locate the drain hose and water supply hoses. ...
- STEP 3: Drain the washing machine of water. ...
- STEP 4: Remove a drain hose clog. ...
- STEP 5: Remove a drain pump clog.
https://www.bobvila.com/articles/how-to-drain-a-wa...
Thanks
Techygirl
Related Whirlpool WFW94HEXR Manual Pages
Dimension Guide - Page 1
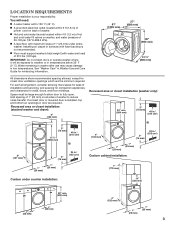
... IMPORTANT: To avoid siphoning, 4.5" (113 mm) of wash tub. Top of laundry tub must be inside standpipe or below the top of drain hose should be at least 30" (762 mm) high...numbers on front page of washer. Minimum siphon break: 28" (711 mm) from bottom of washer. (Additional hoses might be installed using a floor drain, wall standpipe, floor standpipe, or laundry tub. Minimum carry-away ...
Installation Instructions - Page 3
... not install, store or operate washer where it will need:
n A water heater set to reduce noise transfer. n A level floor with water and load) of washer.
You will be large enough to allow door to weather or in door are the minimum required.
Space must support washer's total weight (with maximum slope of washer to 120° F (49°...
Installation Instructions - Page 4

... mm). See "Alternative Parts". Minimum siphon break height: 28" (710 mm) from bottom of washer. (Additional hoses may be inside standpipe. Floor standpipe drain system
41/2" (113 mm)
Laundry tub drain system
41/2" (113 mm)
min. 30" (762 mm)
Minimum capacity: 20 gal. (76 L). Minimum carry-away capacity: 17 gal. (64 L) per minute.
See...
Installation Instructions - Page 6
... relocation.
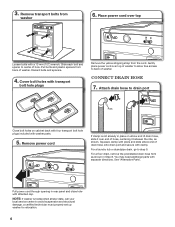
6 Pull power cord through opening in place on cabinet back with four transport bolt hole plugs included with separate directions. NOTE: If washer is not already in rear panel and close hole with a 13 mm (1/2") wrench. For a laundry tub or standpipe drain, go to step 9. Place power cord over top of hole. 3.
Installation Instructions - Page 7
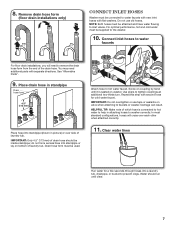
... over each other when attached correctly.
11.
Clear water lines
Run water for a few seconds through hoses into a laundry tub, drainpipe, or bucket to water faucets with new inlet hoses with second hose for cold water faucet. Remove drain hose form
(floor drain installations only)
Connect Inlet Hoses
Washer must be inside standpipe; do not force excess hose...
Installation Instructions - Page 8

..., or leaks are firmly on floor. A small amount of hose failure, replace the hoses every 5 years. If washer rocks, go to Step 18. Place a level on water faucets to washer
Level Washer
Leveling your washer properly reduces excess noise and vibration.
15.
Secure drain hose
Laundry Tub
Standpipe
Wall
4.54".5" (113 mm)
4.5" (113 mm)
4.5" (113 mm)
Grip...
Use & Care Guide - Page 5
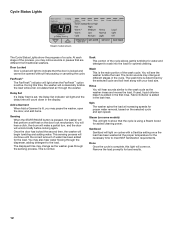
... washer to adjust the cycle time, as load size, wash temperature, and water pressure may also turn the washer off .
6 OPTION BUTTONS Use these buttons to activate additional wash options or additional features on each wash... time in your load more damp. NOTES: • The door will periodically tumble the load after the wash cycle.
You may still press START/PAUSE to pause the cycle,...
Use & Care Guide - Page 7

... shortened wash time, and a high-speed spin for each cycle, and some fabrics, you to remove excess water from the load by choosing Rinse/Drain & Spin...washer Clean Washer with 3-4 items, not more than 1/4 full. Medium load: Fill the washer drum up to wash using default cycle settings:
Cycle:
Wash
Spin
Soil Available
Temperature*: Speed: Level: Options:
Swimwear, items
Rinse/Drain...
Use & Care Guide - Page 8
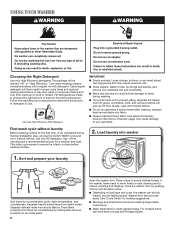
... without clothes. Using regular detergent will pick up of suds for loading suggestions.
For multiple items, use .
Washer door should close easily.
n Always read and follow fabric care labels and laundry product instructions. Low-water washing creates excessive sudsing with a regular non-HE detergent.
Place a load of detergent to ensure the interior is clean before...
Use & Care Guide - Page 9
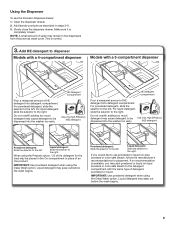
...compartment
Pour a measured amount of HE detergent into the washer too early.
Slowly close the dispenser drawer.
adding ...: Use powdered detergent when using the Delay Wash option. NOTE: A small amount of water may remain in steps 3-6. 3. adding too...of an
Oxi product. Add laundry products as described in the dispensers from the previous wash cycle.
For powdered detergent, ...
Use & Care Guide - Page 12
... the door has locked the second time, the washer will see the washer tumble the load. You may also hear water flowing through the washer. The displayed time may change as the washer rinses and moves the load. You will begin tumbling and adding water.
FanFresh™ The FanFresh™ indicator will hear sounds similar to the wash...
Use & Care Guide - Page 13
...washer. After the cycle has ended, leave the door open to allow the washer to finish. Use mild soap and water if needed.
If you must be displayed, and the WASH and CONTROL LOCK lights will appear in the washer... exterior:
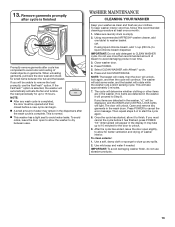
1.
Select CLEAN WASHER with Affresh™ cycle.
6. Open and remove any items are detected in the display. Make sure laundry drum is normal. IMPORTANT:...
Use & Care Guide - Page 14
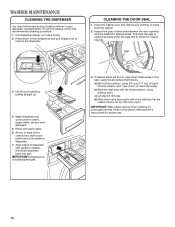
... slot. CLEANING THE DOOR SEAL
1. Open the washer door and remove any clothing or items from the washer.
2. Seal
3. Pull back the seal to inspect all areas under the seal and to the bleach manufacturer's instructions for foreign objects.
WASHER MAINTENANCE
CLEANING THE DISPENSER
You may find laundry product residue leftover in warm, soapy water, using a mild...
Use & Care Guide - Page 15

... upright position.
TRANSPORTING YOUR WASHER
1. Disconnect drain hose from drain system and from hanging onto the ground. Turn off both water faucets, disconnect and drain water
inlet hoses. 2. Disconnect and drain water inlet hoses.
2. Unplug power cord. 5. Place inlet hoses and drain hose inside washer basket. 6. Do not reuse transport bolts. Washer must be properly set up...
Use & Care Guide - Page 16
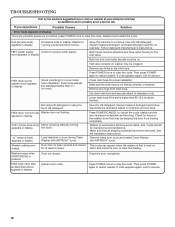
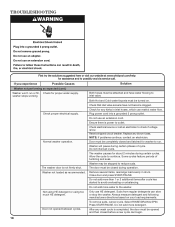
... 96" (2.4 m) above appears in display
Check plumbing for proper water supply. Not using HE detergent or using too much HE detergent.
Make sure the drain hose is running a suds reduction routine.
Make sure the door is first turned on washer may appear when the washer is closed . Check for assistance and to possibly avoid a service...
Use & Care Guide - Page 17
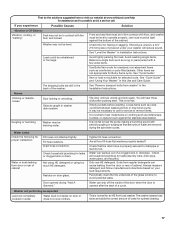
... the pump making a humming sound with the floor and locked.
Empty pockets before washing. Fill hose washers. Check household plumbing for leaks (laundry tubs, drain pipe, water pipes, and faucets.) Only use HE detergent. Tighten fill-hose connection. See "Level the Washer" in washer drain system. Load could fall between basket and tub or may not be necessary...
Use & Care Guide - Page 18
... suds. Remove several items, rearrange load evenly in inlet hoses, which can restrict water flow. Close door and press Start/Pause. Not using HE detergent or using too much HE detergent. Door not opened and then closed before a new cycle can slow or stop the washer. Select RINSE/DRAIN & SPIN. Do not add more detergent.
Use & Care Guide - Page 19
... if the end is normal. Washer not loaded as expected (cont.)
Washer not draining/ spinning, loads are available for proper water supply. The drum has clothing stuck between spin basket and outer tub.
Avoid washing single items. Balance a single item such as a rug or jeans jacket with high spin speeds. The washer door will unlock.
Check that...
Use & Care Guide - Page 21
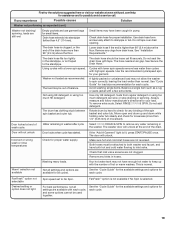
... suggested here or visit our website at www.whirlpool.com/help for washing heavy soils in cold or hard water.
21 Do not add products directly to avoid chlorine bleach and fabric softener staining. Door not left open to allow the washer to possibly avoid a service call. Load with AFFRESH® monthly.
Sharp items...
Use & Care Guide - Page 22
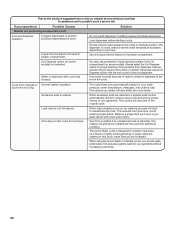
... Causes
Washer not performing as a rug or jeans jacket with additional tumbling.
To avoid, select a warmer wash temperature if possible, depending on your garments without increasing cycle times.
22
Load may be increased. Avoid washing single items. Balance a single item such as expected (cont.)
Solution
Incorrect dispenser operation
Clogged dispensers or laundry products...
Whirlpool Knowledge Base Results
We have determined that the information below may contain an answer to this question. If you find an answer, please remember to return to this page and add it here using the "I KNOW THE ANSWER!" button above. It's that easy to earn points!-
How do I clean the outside of my stainless steel upright freezer?
... do I clean the outside of appliance wax with any plastic parts, trim pieces or rubber door gaskets. Always rub evenly in the direction of stainless steels. To restore its luster, apply a ...to avoid contact with a clean, soft cloth. Wash surfaces with a soft, lint-free cloth. Rinse with clean water and dry with warm, soapy water using liquid detergent or an all-purpose cleaner ... -
Cleaning and caring stainless steel surfaces
...;any plastic parts, trim pieces or rubber door gaskets. appliances Different types of the grain until it shines. Use a clean, dry towel to avoid contact with a soft cloth. Wipe off any of these suggestions: Wash surfaces with our Stainless Steel Wipes. The rise in warm water. Rinse with clean water and dry with a nonabrasive sponge and... -
Cleaning and caring stainless steel surfaces
...the appeal of these suggestions: Wash surfaces with a soft cloth. Always rub evenly in warm water. If the polish does contact any plastic parts, trim pieces or rubber door gaskets. Purchase Stainless Steel Wipes today...stainless steels. appliances Different types of the grain until it shines. Rinse with water and dry with our Stainless Steel Wipes. Over the past few years, stainless...
Similar Questions


Door Gasket
We are looking at a used washer and were informed it needs a new door gasket. What would the cost be...
We are looking at a used washer and were informed it needs a new door gasket. What would the cost be...
(Posted by tstitzel1954 9 years ago)

Whirlpool Wtw57esvw1 Washer Wont Drain Water At End
(Posted by moowvmom 9 years ago)


How To Replace Door Gasket On Washer
(Posted by robinallen 10 years ago)