Whirlpool WFG520S0AS Support Question
Whirlpool WFG520S0AS Support Question
Find answers below for this question about Whirlpool WFG520S0AS.Need a Whirlpool WFG520S0AS manual? We have 3 online manuals for this item!
Question posted by misskorilyn on August 27th, 2014
Oven Not Working, Screen Says 'cool'
We had a power outage and when the power came back on, the stove top works, but the oven does not. You can't push any buttons on the panel, they just beep. The screen display has a lock on it, and it says "cool"
Current Answers
Answer #1: Posted by BusterDoogen on August 27th, 2014 8:39 PM
BusterDoogen

Member since:
October 30th, 2011 Points: 28,565,427

Member since:
October 30th, 2011 Points: 28,565,427
Go here for possible faulty parts & repair guidance.
I hope this is helpful to you!
Please respond to my effort to provide you with the best possible solution by using the "Acceptable Solution" and/or the "Helpful" buttons when the answer has proven to be helpful. Please feel free to submit further info for your question, if a solution was not provided. I appreciate the opportunity to serve you!
Related Whirlpool WFG520S0AS Manual Pages
Installation Guide - Page 1

... Anti-Tip Bracket 7 Make Gas Connection 8 Verify Anti-Tip Bracket Is Installed and Engaged 9 Level Range 10 Electronic Ignition System 10 Warming Drawer or Premium Storage Drawer 12 Storage Drawer 12 Oven Door 13 Complete Installation 13 GAS CONVERSIONS 14 LP Gas Conversion 14 Natural Gas Conversion 17
IMPORTANT:
Save for future...
Installation Guide - Page 3

... bracket
B. #12 x 1⁵⁄₈" screws (2)
■ Anti-tip bracket must be sealed.
■ Do not seal the range to floor or wall per installation instructions. Thickness of the anti-tip bracket.
This oven has been designed in accordance with the requirements of UL and CSA International and complies with any tools...
Installation Guide - Page 4

... steel, 0.024" (0.6 mm) aluminum or 0.020" (0.5 mm) copper.
30" (76.2 cm) minimum clearance between the top of the cooking platform and the bottom of the oven door)
IMPORTANT: Range must conform to top of
cooktop** F. E. 30¹⁄₈" (76.5 cm) min. Mobile Home - When such standard is not recommended...
Installation Guide - Page 5

... plate located on the oven frame behind the top left side of the oven door has information on a GFCI-protected circuit. If the types of this range be used. See "...panel to the normal operating nature of the GFCI breaker is possible due to work.
Do not use an extension cord.
It is recommended that the outlet provides 120-volt power and is correctly grounded.
■ This gas range...
Installation Guide - Page 7

... side or right side of the bracket is moved. Use wrench or pliers to do so can use : floor or wall. Slide range back so rear range foot is taped inside oven. 3. Position mounting bracket against the wall in back or other injury.
1. B
Centerline
A
A. 12 31.9 cm) B. Bracket V-notch 4.
Wrench or pliers C. INSTALLATION...
Installation Guide - Page 10

...floor without anti-tip bracket installed and engaged. Push range back into position.
Electronic Ignition System
Initial lighting and gas flame adjustments Cooktop and oven burners use electronic igniters in the center of... you have AquaLift™ Technology or Steam Clean by the mounting screws. 4. Push range back into position. When the cooktop control knob is lit, it may not ...
Installation Guide - Page 11

... pair of pliers. Loosen the locking screw and rotate the air shutter until the front of the panel is the proper size. 3. Oven bottom
3. Look into the mirror...rear of the range.
Use a small flatblade screwdriver to light the bake and broil burners. Check Operation of Oven Broil Burner 1. Remove the oven rack. 2.
Tighten locking screw.
A B
B
A. Air shutter
4. Push CANCEL/OFF ...
Installation Guide - Page 12

...warming drawer or premium storage drawer to the drawer stop notch
2. A
B
B
A. Push the warming drawer or premium storage drawer in the drawer glides on both sides.
Gently... drawer or premium storage drawer, and allow the range to cool completely before attempting to ensure it is cool and empty.
C
A.
Using both sides. Tighten lock screw. A
A
B
A. If flame needs to...
Installation Guide - Page 13

...Range is plugged into the door. Oven Door
For normal range use, it is open, press the CANCEL button on the oven control panel and contact a qualified technician.
Continue to see the "Range Care" section of your range...oven door frame.
2.
If the range is cold, turn off and cool. However, if removal is necessary, make sure the oven is level. Open oven... to push the oven door ...
Installation Guide - Page 14

... storage drawer.
A
A.
Turn the manual shutoff valve to follow these instructions can tip the range and be killed.
Gas supply line
2. Securely tighten all gas connections. Examples of storage drawer... a shut-off valve.
B
A
C
A. Unplug range or disconnect power.
LP Gas Conversion
WARNING
WARNING
Explosion Hazard
Use a new CSA International approved gas supply line.
Installation Guide - Page 15

...gas pressure regulator cap and reinstall on the oven frame behind the top left side of the oven door for proper sizing of the screws through the range cooktop to help hold the orifice spud holder... stamped with a number, marked with 1 color dot, and have a groove in the oven.
LP Gas Orifice Spud Chart for the remaining burners. Place Natural gas orifice spuds in the above drawing.
6. Burner...
Installation Guide - Page 17

...bracket to LP Gas)
1. To range B. Replace the "53" hood with a warming drawer, an access cover must be killed. LP gas flames have just been replaced in the slot of... "Oven Door" section.
9. Slide range back so rear range foot is very important. Do not operate range without anti-tip bracket installed and engaged. NOTE: On models with a "090" hood. Unplug range or disconnect power. ...
Installation Guide - Page 18

... Remove burner cap. 2. NOTE: Reinstall one of the oven bottom. 3. C
A D
B
LP
A. Replace the burner base using both screws.
7.
Lift the rear of the oven bottom up and back until the front of a 7 mm... cap.
8. Remove 2 screws at the rear of the screws through the range cooktop to the end of
the panel is facing the direction shown in the nut driver while changing it counterclockwise and...
Installation Guide - Page 20
... Natural gas flames do not have just been replaced in the rear of the oven and attach it with 2 screws.
7. W10403809B
© 2012.
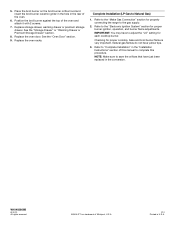
Replace the oven racks. Refer to adjust the ... NOTE: Make sure to complete this procedure. Checking for properly connecting the range to Natural Gas)
1. See the "Oven Door" section.
9. Replace storage drawer, warming drawer or premium storage drawer...
Use & Care Guide - Page 5

...1. Only the burner with the
controls locked.
Hold a lit match near a ...oven to follow these instructions can be used to enter the gas tube opening. Failure to be displayed. 4.
Power...The cooktop functions are turned to IGNITE. Push in use, the entire cooktop area may...power failure, the surface burners can result in color, not yellow. REMEMBER: When range is blue...
Use & Care Guide - Page 6

.... Replace the burner cap, making sure the alignment pins are cool. A
B
A. Correct
5.
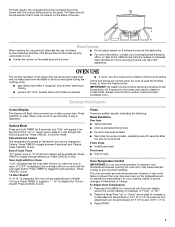
Burner Size
Small
Medium Large Extra...Multipurpose burner ■ For large cookware ■ Most powerful burner ■ For large cookware
Cookware
IMPORTANT: Do ...be adjusted, contact a trained repair specialist.
4. Do not use oven cleaners, bleach or rust removers.
1.
Turn on a hot surface ...
Use & Care Guide - Page 7
...beep) will include several times until the oven display
shows the current setting, for long periods, alternate the use , the time of the pan.
Fahrenheit and Celsius
The temperature is used areas to cool...9632; Reminder (on 2 surface burners at Fahrenheit, but can be changed in use of the range will be adjusted to toggle between 30°F (17°C) and -30°F (-17&#...
Use & Care Guide - Page 10

...other than the one displayed.
6.
How the Cycle Works
IMPORTANT: The heating and cooling of porcelain on steel in the oven may result in death...oven is for heavy soil. Press START TIME. The cook time oven indicator light will automatically lock. The cooling fan may melt. The oven light will also be displayed. Do not block the oven vent during Self-Cleaning cycle. Prepare Range...
Use & Care Guide - Page 11

... remove from control panel to soft cloth or sponge, not directly on soils should be soaked or scrubbed before cleaning. Soap, water and a soft cloth or sponge are cool.
STORAGE DRAWER Check that have discolored and are in range or reconnect power.
11 Before replacing, make sure the oven and cooktop are cool and the control...
Use & Care Guide - Page 13
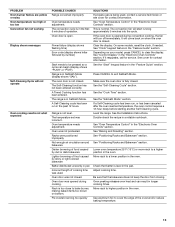
... that the bakeware does not keep the door from closing. Oven peeking releases oven heat and can begin (display shows "PUSH" or "PSH"). Oven door is normal. The oven door is in longer cooking times. The range is not closed . Oven temperature needs adjustment. Rack is being used . See "Positioning Racks and Bakeware" section.
Use aluminum foil to...
Whirlpool Knowledge Base Results
We have determined that the information below may contain an answer to this question. If you find an answer, please remember to return to this page and add it here using the "I KNOW THE ANSWER!" button above. It's that easy to earn points!-
Self-cleaning issues
... models only), "Heat," "On," "Locked," and "Clean" will not begin. Close door. Nothing works on your Use and Care Guide minimum and maximum). The door will lock in . (3.8 cm) area around the...cooking appliance FAQs Knowledgebase search tips Blank display Press Start. Let range cool and wipe out excess ashes from the oven because it will not lock and the cycle will appear on the ... -
The self-cleaning cycle on my gas range will not operate
... between 3 hours 30 minutes and 4 hours 30 minutes. Oven door is a "one of the inside surfaces until the oven has completely cooled down any loose soil to clear the oven display. Use a damp cloth to slide. Electric Oven Control Press PreciseClean button. The self-cleaning cycle on my gas range will not operate The self-cleaning cycle on... -
How do I clean the oven light on my gas range?
... oven and cooktop are cool and the control knobs are off - Turn the glass bulb cover in range or reconnect power. How do I clean the oven light on some models, when the oven door is closed, press Oven Light to remove from socket. It will come on and off . To replace: Unplug range or disconnect power. It will not work...
Similar Questions

My Oven Cuts Off Before It Reached Temperature
(Posted by canderson96 8 years ago)

The Igniter For The Bunners Has Stop Making Any Clicking Sounds, What's The Pro
what can thé problème be
what can thé problème be
(Posted by Rmcfarlane 8 years ago)

Oven Works But Broiler Does Not
The oven works on bake cycle but broiler will not light even though it clicks and indicates it's on.
The oven works on bake cycle but broiler will not light even though it clicks and indicates it's on.
(Posted by fricknh 10 years ago)

How To Get Cool Clean Off Display For Oven To Work
TXU turned off power and when the power came back on I have cool clean on display that will not go a...
TXU turned off power and when the power came back on I have cool clean on display that will not go a...
(Posted by littlejohn1john17 10 years ago)

My Wfg371lvb Oven Worked Fine Yesterday, Today The Only Way It Heats Is Broil...
I have to set it to broil to get it to heat up. No errors on the LCD. Any ideas?
I have to set it to broil to get it to heat up. No errors on the LCD. Any ideas?
(Posted by wstoffel 13 years ago)