Whirlpool WED95HEXL Support Question
Whirlpool WED95HEXL Support Question
Find answers below for this question about Whirlpool WED95HEXL.Need a Whirlpool WED95HEXL manual? We have 4 online manuals for this item!
Question posted by Larryesther on April 9th, 2021
Where Can I Buy A Replacement Unit In Gray
The person who posted this question about this Whirlpool product did not include a detailed explanation. Please use the "Request More Information" button to the right if more details would help you to answer this question.
Current Answers
Answer #1: Posted by Troubleshooter101 on April 9th, 2021 1:48 PM
Troubleshooter101

Member since:
September 30th, 2015 Points: 2,927,050

Member since:
September 30th, 2015 Points: 2,927,050
Please check this link below:-
https://www.fixya.com/support/p10148184-whirlpool_duet_steam_wed95hex_27_electr
Thanks
Please respond to my effort to provide you with the best possible solution by using the "Acceptable Solution" and/or the "Helpful" buttons when the answer has proven to be helpful. Please feel free to submit further info for your question, if a solution was not provided. I appreciate the opportunity to serve you!
Troublshooter101
Related Whirlpool WED95HEXL Manual Pages
Dimension Guide - Page 1
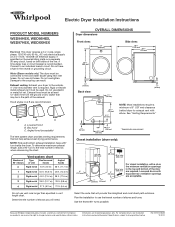
...See "Venting Requirements."
3/4"* (18 mm)
143/8" (365 mm)
61/8"* (156 mm)
* Approximate measurement
Closet installation (dryer only):
5" (127 mm)
18" min. (457 mm)
3"
(76 mm) 48 in.2 min. (310 cm2)
...) 3" (76 mm)
For closet installation, with elbow.
Water (Steam models only): The dryer must be used. Rigid or flexible metal exhaust vent must be in the neutral or grounding ...
Installation Instructions - Page 1
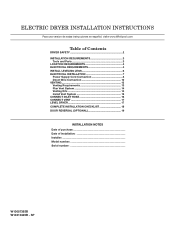
...version de estas instrucciones en español, visite www.Whirlpool.com
Table of Contents
DRYER SAFETY 2 Installation Requirements 3
Tools and Parts 3 Location Requirements 4 Electrical Requirements 4 INSTALL... 14 Install Vent System 15 Connect Inlet Hose 16 Connect Vent 17 Level Dryer 17 Complete Installation Checklist 18 Door reversal (OPTIONAL 19
INSTALLATION NOTES Date of purchase...
Installation Instructions - Page 2
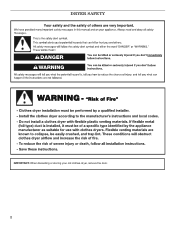
DRYER SAFETY
IMPORTANT: When discarding or storing your old clothes dryer, remove the door. 2
Installation Instructions - Page 3
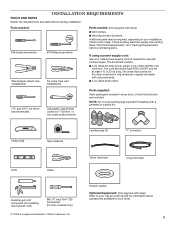
...marked for door reversal only)
® TORX is located in ring terminals or spade terminals with dryer) Refer to 1" (25mm) or hex-head socket wrench
Parts supplied:
Parts package is a ...)
Min. 8" long Torx® T25 screwdriver (for use leveling legs supplied if installing with dryer)
■■Vent clamps ■■Vent elbows and ductwork Additional parts may be at least...
Installation Instructions - Page 4

...)
Power supply cord/cable
Vent
Water inlet
297/8"* (759 mm)
31/2"* (89 mm)
3/4"* (18 mm)
61/8"* (156 mm)
4
* Approx. Add spacing on all sides of dryer. LOCATION REQUIREMENTS
Check code requirements.
Contact your local building inspector.
3/4"* (18 mm) * Approx. Some codes limit, or do not permit, installation of installation and servicing...
Installation Instructions - Page 5
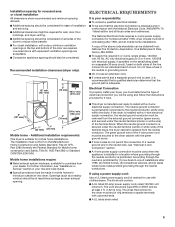
..., minimum ventilation openings in the neutral or grounding circuit.
■■Do not use with clothes dryers. Do not have a fuse in the top and bottom of the door are acceptable.
■... servicing.
■■Additional clearances might be required for wall, door, floor moldings, and dryer venting.
■■Additional spacing should be considered on both sides of the line. The ...
Installation Instructions - Page 6
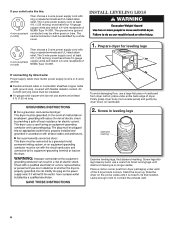
...wrench to finish turning legs until it is no longer visible. Place a carton corner post from dryer carton; The ground wire (ground conductor) may be :
■■Flexible armored cable or..., must match power supply (4-wire or 3-wire) and be either green or bare. Slide the dryer on cardboard.
2. Screw in leveling legs
diamond marking
Examine leveling legs, find diamond marking. place ...
Installation Instructions - Page 8
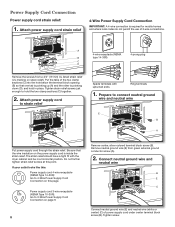
... power supply cord is inside the strain relief. Power supply cord 3-wire receptacle (NEMA Type 10-30R): Go to strain relief
Spade terminals with the dryer cabinet and be in place. Tighten strain relief screws just enough to 4-Wire Power Supply Cord Connection on strain relief). Be sure that one tab...
Installation Instructions - Page 13

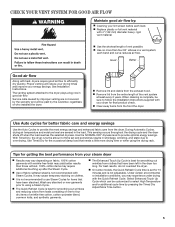
...of flexible metal vent used must be included in the overall vent system design as shown in final dryer location.
■■ Remove excess to avoid sagging and kinking that may obstruct exhaust (such as... and make sure exhaust hood is not plugged with rigid metal or flexible metal vents.
Replace plastic or metal foil vents with lint. IMPORTANT: Observe all joints.
■■ Exhaust...
Installation Instructions - Page 15
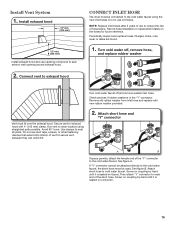
... short hose must fit over the exhaust hood. Remove old rubber washer from inlet hose and replace with 4" (102 mm) clamp. Screw on connector.
15 Connect vent to exhaust hood
Connect Inlet Hose
The dryer must be attached directly to the cold water faucet using straightest path possible.
Attach short hose to...
Installation Instructions - Page 18
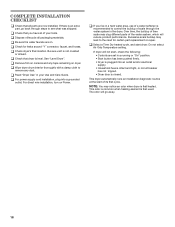
... away.
18 This odor is common when heating element is level. q Check that dryer is first used. q Check for certain part replacement or repair. Over time, the buildup of lime scale may lead to
remove any tape remaining on Power. If dryer will not start, check the following: • Controls are on. This...
Owners Manual - Page 5
... laundry. See Installation Instructions.
Use Auto cycles for smoothing out wrinkles and reducing odors from your dryer for the occasional damp load that have been left in the dryer ... you may experience under drying with your steam dryer
n Results may vary depending on clothes. n Replace plastic or foil vent material
with heat, dryers require good air flow to select High Temperature...
Owners Manual - Page 6
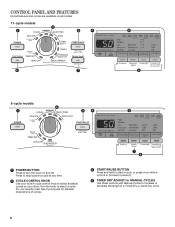
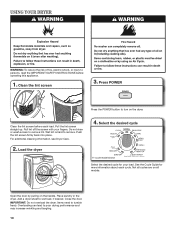
Press to stop/cancel a cycle at any time.
2 CYCLE CONTROL KNOB Use your dryer's cycle control knob to select available cycles on and off. Turn the knob to ...pause it.
4 TIMED DRY ADJUST for MANUAL CYCLES Use these buttons with Manual Cycles to select a cycle for your laundry load. See Cycle Guide for detailed descriptions of a Timed Dry or Quick Dry cycle.
6 CONTROL PANEL AND FEATURES
...
Owners Manual - Page 10
....
Open the door by pulling on all cycles are on the handle. Do not rinse or wash screen to wet load, if desired. Place laundry in the dryer. Items need to remove. Roll lint off the screen with your load. Push the lint screen firmly back into place.
Wet lint is hard...
Owners Manual - Page 13
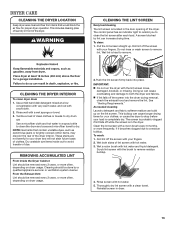
... hand dish detergent mixed at a low
concentration with very warm water, and rub with a clean towel. As needed cleaning Laundry detergent and fabric softener residue can cause longer drying times for proper dryer operation. Roll lint off while the screen is hard to remove.
NOTE: Garments that would block the air flow...
Owners Manual - Page 14
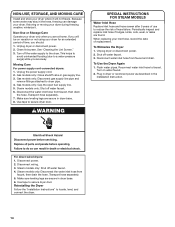
... reduce the risk of use to dryer pipe. 4. Make sure leveling legs are secure in dryer base. 6.
SPECIAL INSTRUCTIONS FOR STEAM MODELS
Water Inlet Hose Replace inlet hose and hose screen after 5 years of hose failure. When replacing your dryer for an extended period of replacement. To Winterize the Dryer 1. Unplug dryer or disconnect power. 2. Shut off the...
Owners Manual - Page 15
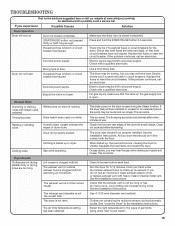
... a qualified electrician. Household fuse is running. Unusual Noise
Humming or whining noise with Steam cycle selected
Thumping noise
Water pump on dryer is blown or circuit breaker has tripped.
Replace the fuses or reset the circuit breaker.
The thumping sound should be louder and run
Door not closed completely.
This is not...
Owners Manual - Page 17
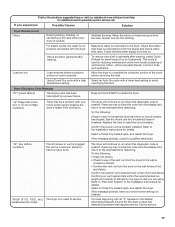
... entire home venting run length and number of elbows for service.
17 Select a Timed Dry heated cycle, and restart the dryer. This cycle is clogged; Refer to possibly avoid a service call. Replace the fuse or reset the circuit breaker.
Using Timed Dry cycle with an "F" appears in the display. Press and hold...
Owners Manual - Page 18
...a manner that vary from state to state or province to province. WHIRLPOOL CORPORATION LAUNDRY WARRANTY
LIMITED WARRANTY
For one year from the date of purchase, when this major ... major appliance was purchased. If outside the 50 United States and Canada, contact your sales slip together for product service if your major appliance, to replace or repair house fuses, or to correct house ...
Warranty - Page 1

... to you ever need it. If outside the 50 United States and Canada, contact your major appliance to better ... WARRANTY
This limited warranty does not cover:
1.
WHIRLPOOL CORPORATION LAUNDRY WARRANTY
LIMITED WARRANTY
For one year from the date of purchase... correct defects in your major appliance if it was purchased. Replacement parts or repair labor on how to the appliance.
8. ...
Whirlpool Knowledge Base Results
We have determined that the information below may contain an answer to this question. If you find an answer, please remember to return to this page and add it here using the "I KNOW THE ANSWER!" button above. It's that easy to earn points!-
Stains on tub or dishes in my dishwasher
... tomato-based products like spaghetti sauce. The discoloration is more often than every other month, the installation of an iron removal unit is recommended. Are there black or gray marks? Are there lipstick stains? Is there yellow discoloration near the heating element can be loaded so that they may break down... -
Washer will not fill - Front-load Duet washer
... last cycle? Open the door and close firmly. Failure to see if a fuse has blown and replace it, if necessary. Does the water level seem too low? Select the Normal cycle and press Start. Allow the unit to occur, call an electrician. With the baffle in noise, vibration, error codes and possible... -
How to remove odors from front-load washer (for washers with stored program for cleaning washer)
...washer displays the letters "rL" (Remove Load) in the unit will dispense for a moment, then the door will unlock,... the correct amount of bleach with this is added. Replace the detergent compartment divider. See your control panel), see &... better ventilation and drying of Cycle Signal to complete. No laundry products will access this cleaning process. Set the End of...
Similar Questions

I Need To Know The Deminsions Of This Model Dryer So I Can Replace It With A Sim
What is the dimensions of this whirlpool dryer and it's matching washer. Washer is model number WTW7...
What is the dimensions of this whirlpool dryer and it's matching washer. Washer is model number WTW7...
(Posted by Kdyori 5 years ago)
Dryer Will Not Turn On.
my dryer wil not turn on. I have checked a fuses and they are good. What's next?
my dryer wil not turn on. I have checked a fuses and they are good. What's next?
(Posted by Dtidavid54 7 years ago)

Power But No Tumbler?
The unit is only four years old, in a rental with one tenant, looks brand new! It powers on, switche...
The unit is only four years old, in a rental with one tenant, looks brand new! It powers on, switche...
(Posted by jwoloszyn14 8 years ago)


Where Can I Find Instructions For Door Reversal On My Whirlpool Duet Dryer Model
(Posted by Morgan02 10 years ago)