Whirlpool WED9270XL Support Question
Whirlpool WED9270XL Support Question
Find answers below for this question about Whirlpool WED9270XL.Need a Whirlpool WED9270XL manual? We have 1 online manual for this item!
Question posted by Anonymous-111040 on May 11th, 2013
Show Me How To Install New Heating Element For Whirlpool Dryer Model Ler8648pwo
The person who posted this question about this Whirlpool product did not include a detailed explanation. Please use the "Request More Information" button to the right if more details would help you to answer this question.
Current Answers
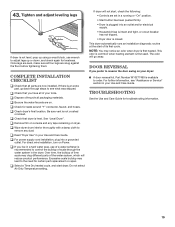
Related Whirlpool WED9270XL Manual Pages
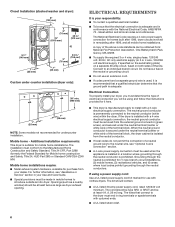
Installation Instructions - Page 2
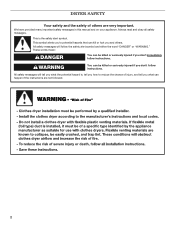
... that can kill or hurt you don't follow instructions. All safety messages will follow the safety alert symbol and either the word "DANGER" or "WARNING."
DRYER SAFETY
Your safety and the safety of injury, and tell you don't immediately follow instructions. All safety messages will tell you what the potential hazard...
Installation Instructions - Page 3

... (4) Parts supplied (steam models):
Wire stripper (direct wire installations)
Tin snips (new vent installations)
"Y" connector
Short inlet hose
1/4" nut driver (recommended)
Vent clamps
Adjustable wrench that opens to your Use and Care Guide for information about accessories available for installing new exhaust vent)
3 Optional Equipment: (Not supplied with dryer) Check local codes...
Installation Instructions - Page 4
... consider weight of companion appliance.
■■ Cold water faucets located within 2 ft. (610 mm) of either side of dryer.
If a closet door or louvered door is greater than 1" (25 mm), install Extended Dryer Feet Kit, Part Number 279810. See "Venting Requirements."
■■ A separate 30 amp circuit.
■■ If using the...
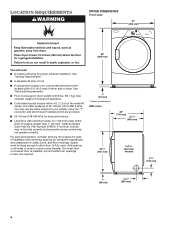
Installation Instructions - Page 5
... servicing.
■■ Additional clearances might be considered.
7" (178 mm)
18" (460 mm)
4" (102 mm)
1" (25 mm)
1" (25 mm)
5 Back view:
61/4"
(159 mm)
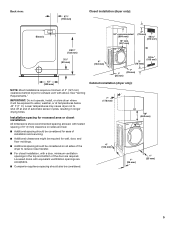
Closet installation (dryer only):
Electric
34" recommended (864 mm)
18" min. (457 mm)
3" (76 mm)
48 in.2 (310 cm2)
283/4"
(733 mm)
33/4"
(83 mm)
4" (102 mm)
3" (76...
Installation Instructions - Page 6
... connector (green screw), and secured under counter installation (dryer only):
39" min. (990 mm)
1" (25 mm)
1" (25 mm)
NOTE: Some models not recommended for Mobile home construction and Safety,... to the neutral conductor (white wire) within the dryer. If using and follow the instructions provided for (1) new branch-circuit installations, (2) mobile homes, (3) recreational vehicles, and (4)...
Installation Instructions - Page 7
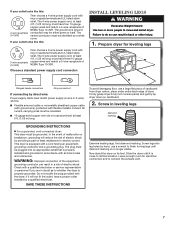
....
Screw legs into an appropriate outlet that is no longer visible.
Do not modify the plug provided with flexible metallic conduit. Slide the dryer until diamond marking is properly installed and grounded in a risk of least resistance for electric current. The 4-wire power supply cord, at least 4 ft. (1.22 m) long, must be...
Installation Instructions - Page 8

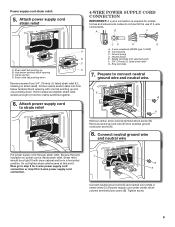
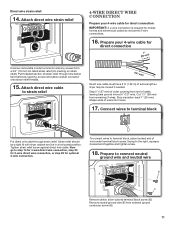
... center wire) to Venting Requirements.
3-wire direct connection:
Follow steps 4, 14-15, and 22-26.
Electrical Connection Options
3. Then go to remaining 2 terminals (gold). use a new ul listed 30 amp power supply cord.
Connect remaining 2 supply wires to Venting Requirements.
4-wire direct connection:
Follow steps 4 and 14-21. Securely tighten all...
Installation Instructions - Page 9
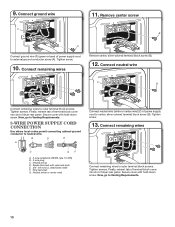
... . Neutral prong E.
Tighten screw.
9
Strain relief tab pointing up and one pointing down
Remove screws from external ground conductor screw (A).
8. Clamp section
D. Spade terminals with dryer cabinet and be in place and tighten strain relief screws enough to strain relief
CD
E
G
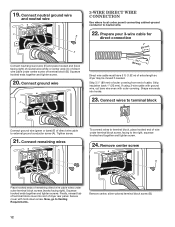
A. 4-wire receptacle (NEMA type 14-30R) B. 4-prong plug C. Remove neutral...
Installation Instructions - Page 10
... with hold -down screw. Finally, reinsert tab of terminal block cover into slot of dryer rear panel. Tighten screw.
13.
Ring terminals G. 9. Secure cover with upturned ends ...-colored terminal block screw (B). Finally, reinsert tab of terminal block cover into slot of dryer rear panel. Connect remaining wires
Connect remaining wires to outer terminal block screws. Remove center...
Installation Instructions - Page 11
... connector onto strain relief threads.
15. Strain relief should be a tight fit with dryer cabinet and be moved if needed. Remove neutral ground wire (E) from remaining 3 wires...wire under terminal block screw, facing to terminal block, place hooked end of extra length so dryer may be in a horizontal position. Tighten strain relief screw against direct wire cable. Direct wire...
Installation Instructions - Page 12
...end (hook facing right) of neutral wire (white or center wire) (C) of direct wire cable under center screw of dryer rear panel. Strip insulation back 1" (25 mm). Shape wire ends into slot of terminal block (B). Strip 31/2" (89... of direct wire cable to terminal block, place hooked end of extra length so dryer may be moved if needed. Squeeze hooked ends together and tighten screw.
20.
Installation Instructions - Page 13
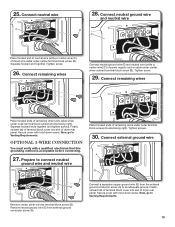
...external ground conductor screw (A) to connect neutral
ground wire and neutral wire
Place hooked ends of dryer rear panel. Connect neutral wire
C
28. Connect neutral ground wire
and neutral wire
B
C
B...
Place hooked end of neutral wire (white or center wire) (C) of dryer rear panel. Tighten screw.
26. Tighten screw.
29. Now, go to Venting Requirements. Tighten screws...
Installation Instructions - Page 14
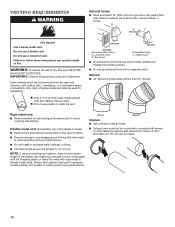
...any object that may result in reduced airflow and poor performance.
■■ Do not install in death or fire. Replace plastic or metal foil vents with a magnetic latch. Review... or any gas vent, chimney, wall, ceiling, attic, crawlspace, or a concealed space of fire, this dryer MUST BE
EXHAUSTED OUTDOORS. Venting REQUiREMENTS
WARNING
Fire Hazard use a plastic vent.
n Only a 4" (102...
Installation Instructions - Page 15
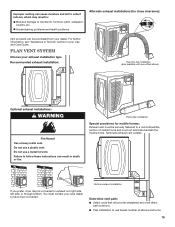
... to exhaust out right side, left side, or through bottom. Housecleaning problems and health problems.
Alternate exhaust installations (for mobile homes: Exhaust vent must be securely fastened to have dryer converted. If you prefer, dryer may result in:
Moisture damage to use a heavy metal vent. Improper venting can cause moisture and lint to...
Installation Instructions - Page 16
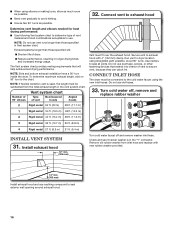
...
Avoid 90° turns.
To determine maximum exhaust length, add on 90° turn inside the dryer. Install exhaust hood
12" min. (305 mm)
Turn cold water faucet off , remove and
replace rubber ... the exhaust hood. Connect Inlet Hose
The dryer must be connected to exhaust hood with new rubber washer provided.
12" min. (305 mm)
Install exhaust hood and use vent runs longer than...
Installation Instructions - Page 17
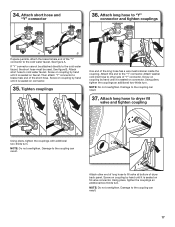
...B
If space permits, attach the brass female end of the "Y" connector to other end of dryer back panel. Attach washer cold inlet hose to the cold water faucet. Using pliers, tighten the ....
17 Tighten couplings
One end of the short hose. See figure A. Attach long hose to dryer fill
valve and tighten coupling
A
B
Using pliers, tighten the couplings with additional two-thirds turn...
Installation Instructions - Page 18
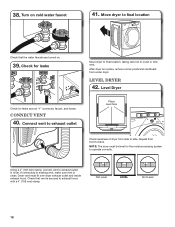
... for leaks
Check for the moisture sensing system to side. Connect vent to exhaust outlet
Move dryer to final location, taking care not to exhaust outlet in place, remove corner posts and cardboard from under dryer. Not Level
LEVEL
Not Level
18
Turn on .
39. Repeat from side to operate correctly. 38...
Installation Instructions - Page 19
... wire installation, turn on .
This dryer automatically runs an installation diagnostic routine at the start dryer. If there is first used. q Be sure the water faucets are set in a hard water area, use wrench to the need for levelness. See "Level Dryer". Do not select Air Only Temperature setting. This odor is common when heating element is...
Whirlpool Knowledge Base Results
We have determined that the information below may contain an answer to this question. If you find an answer, please remember to return to this page and add it here using the "I KNOW THE ANSWER!" button above. It's that easy to earn points!-
Damp loads or long drying times - Dryer
... the cycle time. Use only one fabric softener sheet per load, and use . Were you drying a large load? A dryer softener sheet may be in longer drying cycles. A clogged exhaust vent system slows moist air from the inside of this a new installation? Dryer does not heat - Dryers need good air movement to dry. -
My dryer or load has an odor
...dryer pulls in the area where your dryer is too hot - Was a damp or wet load left in the washer or dryer for the first time? (Electric dryers) A new electric heating element may have an odor. Find Manuals & Dryer...480);return false;" href="#"> Lookup Model # FAQs Knowledgebase search tips My dryer makes sounds or vibrations Dryer does not heat - My dryer or load has an odor Have... -
Loads are damp; dryer does not dry
... the preset Dryness level settings to different installations, environmental conditions or personal preferences. There.... Dryer Dryer does not heat - Your Dryness level settings can be drying to your new preset...models only) If all of your loads on all Automatic Dry or Accudry cycles are damp; Electric Dryer Dryer does not heat - Gas dryer Damp loads or long drying times - Dryers...
Similar Questions

Heating Element Stays On
I have a WED4800BQ dryer and the heating element is staying on after the door is opened and now it w...
I have a WED4800BQ dryer and the heating element is staying on after the door is opened and now it w...
(Posted by garner21856 7 years ago)
Install New Heat Element, Dryer Still Not Heating
install new heat elemen, dryer still not heating need help on what could be wrong. the dryer runs, c...
install new heat elemen, dryer still not heating need help on what could be wrong. the dryer runs, c...
(Posted by hayesp84 10 years ago)

Where Is The Heating Element On My Dryer Located
where is the heating element located on my whirlpool dryer mod no. LER4634PQ0
where is the heating element located on my whirlpool dryer mod no. LER4634PQ0
(Posted by chaunceeyoung 11 years ago)

Whirlpool Dryer
I have a steam Whirlpool dryer. Instead of drying the clothes, the clothes left wet and hot. Please...
I have a steam Whirlpool dryer. Instead of drying the clothes, the clothes left wet and hot. Please...
(Posted by nkozelkova 11 years ago)