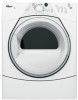
Whirlpool WED8300S Support Question
Whirlpool WED8300S Support Question
Find answers below for this question about Whirlpool WED8300S.Need a Whirlpool WED8300S manual? We have 1 online manual for this item!
Question posted by tlab47 on March 11th, 2014
Support Roller Replacement
How do I replace the 2 support rollers for my drier? Do I have to take the top and front end of the drier off in order to do this?
Current Answers
Answer #1: Posted by BusterDoogen on March 11th, 2014 12:27 PM
BusterDoogen

Member since:
October 30th, 2011 Points: 28,565,447

Member since:
October 30th, 2011 Points: 28,565,447
Watch this video for roller change instructions.
I hope this is helpful to you!
Please respond to my effort to provide you with the best possible solution by using the "Acceptable Solution" and/or the "Helpful" buttons when the answer has proven to be helpful. Please feel free to submit further info for your question, if a solution was not provided. I appreciate the opportunity to serve you.
Related Whirlpool WED8300S Manual Pages
Use and Care Guide - Page 1
®
®
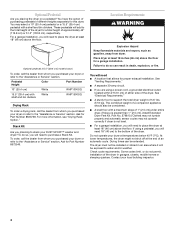
ELECTRONIC ELECTRIC DRYER
Use & Care Guide
For questions about features, operation/performance, parts, accessories or service, call: 1-800-253-1301 or visit our website at... www.whirlpool.com
Table of Contents 2
W10151580A
Use and Care Guide - Page 2
... Status Lights 19 Cycles 20 Additional Features 21 Changing Cycles, Options and Modifiers 21 Drying Rack Option 21
DRYER CARE 22 Cleaning the Dryer Location 22 Cleaning the Lint Screen 22 Cleaning the Dryer Interior 23 Removing Accumulated Lint 23 Vacation and Moving Care 23
TROUBLESHOOTING 24
ASSISTANCE OR SERVICE 26
ACCESSORIES 26...
Use and Care Guide - Page 3
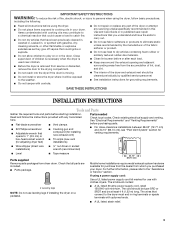
... to cooking oils in published user-repair instructions that connect to the dryer must end in the dryer. Check existing electrical supply and venting. If using a power supply cord...NOTE: Do not use leveling legs if installing the dryer on or in ring terminals or spade terminals with controls.
■ Do not repair or replace any part of the dryer or attempt any tools listed here.
■ ...
Use and Care Guide - Page 4
...dryer is not level. ■ For a garage installation, you purchased your dryer or refer to place the dryer at the end...order, call the dealer from whom you will need 18" (46 cm) to purchase a Stack Kit.
To order, call the dealer from dryer... Stack Kit
Are you placing the dryer on a pedestal? Failure to support the total dryer weight of the dryer. You will be extended. See ...
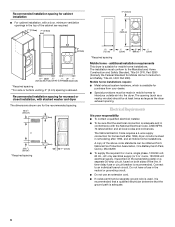
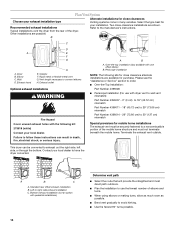
Use and Care Guide - Page 5
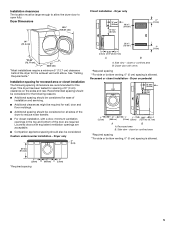
... spacing dimensions are acceptable.
■ Companion appliance spacing should be required for spacing of the dryer to open fully. Dryer only
2"* (5 cm)
36" min (91.4 cm)
24 in .2* (310 cm2)...cm)
*Most installations require a minimum 5" (12.7 cm) clearance behind the dryer for this dryer. Louvered doors with equivalent ventilation openings are recommended for the exhaust vent with ...
Use and Care Guide - Page 6
...adequate.
6
Recommended installation spacing for recessed or closet installation, with stacked washer and dryer
The dimensions shown are required.
7"* (17.8 cm) 7"* (17.8 cm)
6"*... **For side or bottom venting, 0" (0 cm) spacing is available for homes built after 1996, dryer circuits involved in conformance with a door, minimum ventilation openings in .2 * (155 cm2)
*Required spacing...
Use and Care Guide - Page 7

... must be plugged into an appropriate outlet that connect to a grounded metal, permanent wiring system, or an equipment-grounding conductor must end in ring terminals or spade terminals with clothes dryers. WARNING: Improper connection of least resistance for use aluminum). ■ At least 5 ft (1.52 m) long.
Grounding through the neutral conductor is...
Use and Care Guide - Page 8
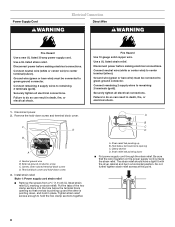
... block opening so that the wire insulation on strain relief). Hole below the terminal block opening C. The strain relief should have a tight fit with the dryer cabinet and be connected to remaining 2 terminals (gold). Use a UL listed strain relief. Connect neutral wire (white or center wire) to center terminal (silver). Failure...
Use and Care Guide - Page 9
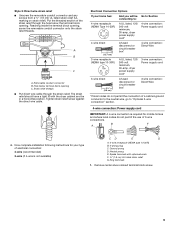
... receptacle (NEMA type 10-30R)
A UL listed, 120/ 240-volt minimum, 30-amp, dryer power supply cord*
3-wire connection: Power supply cord
3-wire direct
3¹⁄₂" (8.9 cm...B. 4-prong plug C. Removable conduit connector B. The strain relief should have a tight fit with upturned ends F. ¾" (1.9 cm) UL listed strain relief G. Remove center silver-colored terminal block screw.
9...
Use and Care Guide - Page 10
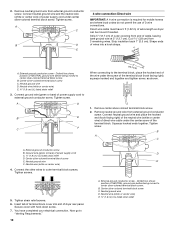
... line shows position of NEUTRAL ground wire before being moved to the terminal block, place the hooked end of the wire under the screw of extra length so dryer can be moved if needed. Shape ends of wires into slot of NEUTRAL ground wire before being moved to outer terminal block screws. Dotted...
Use and Care Guide - Page 11
... with hold -down screw.
7. Strip 3¹⁄₂" (8.9 cm) of outer covering from end of dryer rear panel. Tighten screw. C
A
B
D
E
A. Now go to "Venting Requirements."
3-...3-wire cable with ground wire, cut bare wire even with hold -down screw.
6. Place the hooked ends of dryer rear panel. You have 5 ft (1.52 m) of power supply cable C. ¾" (1.9 cm) UL...
Use and Care Guide - Page 12

... your electrical connection. Insert tab of terminal block cover into slot of dryer rear panel. Remove center silver-colored terminal block screw. 2. External ground conductor screw B. Insert ...Tighten strain relief screws.
5.
Grounding path determined by a qualified electrician
3. Place the hooked end of the neutral wire (white or center wire)
of direct wire cable under the outer...
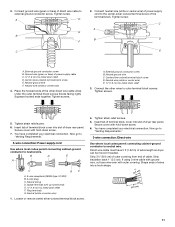
Use and Care Guide - Page 13
... cm) heavy metal exhaust vent
DURASAFE™ vent products can be fully extended and supported when the dryer is recommended to seal all governing codes and ordinances. Modify existing vent system if necessary ... ceiling or a concealed space of fire, this is not plugged with lint.
■ Replace any object that may result in reduced airflow and poor performance.
■ Do not install ...
Use and Care Guide - Page 14
...
Special provisions for your exhaust installation type
Recommended exhaust installations Typical installations vent the dryer from the rear of elbows and turns.
■ When using elbows or making...Plan the installation to order. ■ Over-the-Top Installation:
Part Number 4396028
■ Periscope Installation (For use the fewest number of the dryer. A
B
C
A. Dryer B. Contact your ...
Use and Care Guide - Page 18
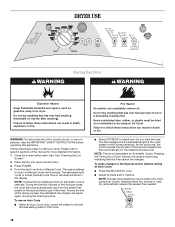
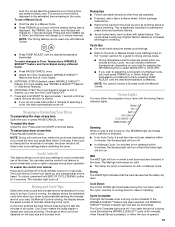
...(manual) cycle time (in minutes) will cause a triple beep, indicating that cycle. Toward the end of the drying process, the estimated time display will illuminate.
Point the dial to specific sections of...Fire Hazard
No washer can be dried on a clothesline or by using Auto Cycles. Place laundry into dryer and shut door. 3. The preset settings
for the selected dryness level. Do not dry...
Use and Care Guide - Page 19
... Up or Down.
Stopping or Restarting Your Dryer
To pause/stop the dryer at any time Open the door or press PAUSE/CANCEL once.
Laundry is especially important for 3 seconds. This is...; Press PAUSE/CANCEL once. ■ Adjust the Time, Temperature, WRINKLE SHIELD™
feature and End of a Manual Cycle, you wish to reduce wrinkling.
Lock Controls
This feature allows you close the...
Use and Care Guide - Page 23
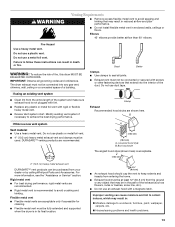
... operating. See "Cleaning the Lint Screen." Replace all excess dye and stains are at home. To wash 1. Tumble a load of dye. Removing Accumulated Lint
From Inside the Dryer Cabinet Lint should : 1. If you are removed. 3. Unplug the power supply cord. 2. Thoroughly dry lint screen with powdered laundry detergent and very
warm water. 2. Apply...
Use and Care Guide - Page 24
... the correct power supply available?
No heat
■ Has a household fuse blown, or has a circuit breaker tripped? Unusual sounds
■ Has the dryer had a period of lint or replace exhaust vent with a qualified electrician.
■ Was a regular fuse used for a while, there may not have not tripped. Hold your hand under the...
Use and Care Guide - Page 26
...dryer connector installation kit
PT220L
4" (10.2 cm) dryer cord, 3-wire, 30 amp
PT400L
4" (10.2 cm) dryer cord, 4-wire, 30 amp
PT600L
6" (15.2 cm) dryer cord, 4-wire, 30 amp
4210463
Dryer vent lint brush
31682
All-purpose appliance cleaner
1903WH
Laundry...because they are trained to order replacement parts, we recommend that you the cost of your dryer with any questions or concerns...
Use and Care Guide - Page 28
...which it was purchased. Write down the following information about your major appliance to repair or replace appliance light bulbs, air filters or water filters. All rights reserved.
® Registered Trademark... or systems resulting from unauthorized modifications made to know your major appliance, to replace or repair house fuses or to refrigerator or freezer product failures.
6.
You ...
Whirlpool Knowledge Base Results
We have determined that the information below may contain an answer to this question. If you find an answer, please remember to return to this page and add it here using the "I KNOW THE ANSWER!" button above. It's that easy to earn points!-
My turntable isn't working
.... Is the turntable properly in my microwave oven? Remove and clean turntable support and rollers. My turntable isn't working properly. Place one cup (250 mL) of the hub. My microwave oven will not run My turntable alternates rotation directions Ordering replacement parts or accessories Why doesn't the turntable on the... -
Why doesn't the turntable on my SpeedCook microwave oven with convection operate?
... microwave oven with convection operate? Replace turntable support. Make sure turntable is correct...support properly working My turntable alternates rotation directions Has tape been removed from turntable hub? Why doesn't the turntable on my SpeedCook microwave oven with convection operate? Is the turntable support operating properly? Remove and clean turntable support and rollers... -
My dryer makes sounds or vibrations
...dryer is not level. Check if any of a dryer running with rivets and buckles. Play the sound of the four dryer legs are missing. Replace any objects caught in the dryer. A dryer... where the rollers and drum touch. The flat spot causes the thumping sound. Once the dryer runs for details. If the dryer hasn't been used , the drum support rollers can download ...
Similar Questions

I Need To Know The Deminsions Of This Model Dryer So I Can Replace It With A Sim
What is the dimensions of this whirlpool dryer and it's matching washer. Washer is model number WTW7...
What is the dimensions of this whirlpool dryer and it's matching washer. Washer is model number WTW7...
(Posted by Kdyori 5 years ago)
Dryer Will Not Turn On.
my dryer wil not turn on. I have checked a fuses and they are good. What's next?
my dryer wil not turn on. I have checked a fuses and they are good. What's next?
(Posted by Dtidavid54 7 years ago)

Replace Starter Button On Whirlpool Duet Dryer Model Wed9200sq0
Can someone tell me how to remove the top 2 consoles on my dryer so I can test and replace the start...
Can someone tell me how to remove the top 2 consoles on my dryer so I can test and replace the start...
(Posted by srweitzel 8 years ago)

Power But No Tumbler?
The unit is only four years old, in a rental with one tenant, looks brand new! It powers on, switche...
The unit is only four years old, in a rental with one tenant, looks brand new! It powers on, switche...
(Posted by jwoloszyn14 8 years ago)
