
Whirlpool WED5800BW Support Question
Whirlpool WED5800BW Support Question
Find answers below for this question about Whirlpool WED5800BW.Need a Whirlpool WED5800BW manual? We have 4 online manuals for this item!
Question posted by billyveno on March 2nd, 2014
How To Install Side Vent In Wed5800bw Dryer
Spece restrictions make it necessary to use side vent option. I need to know how to do it and spacing required for side vent to fit.
Current Answers
Related Whirlpool WED5800BW Manual Pages
Use & Care Guide - Page 4
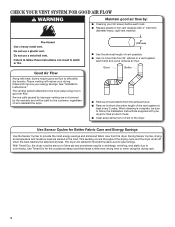
... follow the Installation Instructions supplied with heat, dryers require good air flow to over-drying. This sensing occurs throughout the drying cycle and the dryer shuts off when the load reaches the selected dryness. Service calls caused by improper venting are sensed in the load. Use Timed Dry for the occasional damp load that needs a little more...
Use & Care Guide - Page 7
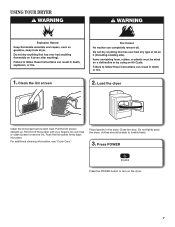
... load. Pull the lint screen straight up. For additional cleaning information, see "Dryer Care." USING YOUR DRYER
1. Roll lint off the screen with your fingers.
Close the door.
Place laundry in the dryer. Do not rinse or wash screen to turn on the dryer.
7 clothes should be able to tumble freely.
3. Push the lint screen firmly...
Use & Care Guide - Page 9
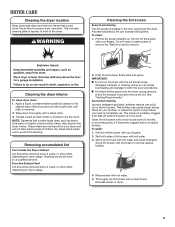
..., or cause the dryer to the
stained area of the dryer. As needed cleaning Laundry detergent and fabric softener residue can cause longer drying times for proper dryer operation. Roll lint...See "Venting Requirements." Scrub lint screen with a soft cloth until stain is in front of the drum and rub with the brush to remove. To clean:
1. Tumble a load of laundry in the dryer. ...
Use & Care Guide - Page 10
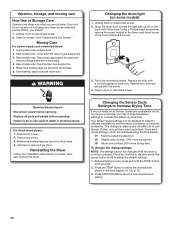
... power. 2. Make sure leveling legs are displayed using your dryer for 6 seconds.
2. WARNING
Changing the drum light (on all Sensor Cycles are at home. Failure to do so can be on the
back wall of time, you will affect all parts and panels before servicing. For direct-wired dryers: 1. Reinstalling the Dryer
Follow the "Installation Instructions...
Use & Care Guide - Page 11
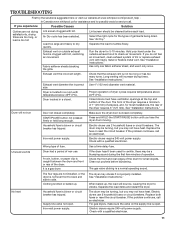
.... Check that the exhaust vent is a gas dryer. See "Installation Instructions." Dryer will bounce, causing the dryer to side.
START/PAUSE button not pressed firmly or held long enough. Incorrect power supply. The front of the dryer requires a minimum of 1" (25 mm) of airspace, and, for most installations, the rear of garments being dried.
Electric dryers use 2 household fuses or...
Use & Care Guide - Page 12
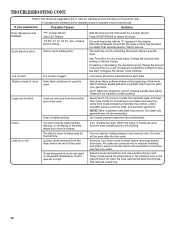
... the selected dryness.
Select Touch Up Cycle to handle. This cycle is being used . Dry loosely packed loads that requires service. The electric dryer is best for service. Laundry items removed from dryer. If so, ventilate the area. Select a lower temperature, and use a sensor drying cycle. Was the drying cycle interrupted by dyes in the area...
Dimension Guide - Page 1
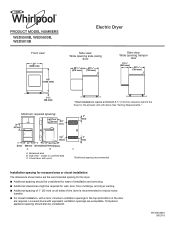
... might be considered. Closet door with vents
3"* (76 mm)
C
*Additional spacing recommended
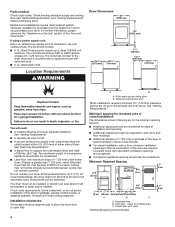
Installation spacing for recessed area or closet installation
The dimensions shown below are the recommended spacing for this dryer.
■■ Additional spacing should also be required for wall, door, floor moldings, and dryer venting.
■■ Additional spacing of 1" (25 mm) on all sides...
Dimension Guide - Page 2

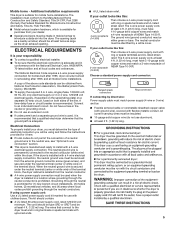
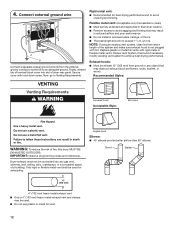
... not use . Exhaust hoods: Recommended Styles:
The Vent System Chart provides venting requirements that will provide straightest and most direct
path outdoors.
■■ Plan installation to use vent runs longer than those specified in the path of elbows and turns.
■■ When using elbows or making turns, allow as much room as possible.
■■ Bend vent gradually...
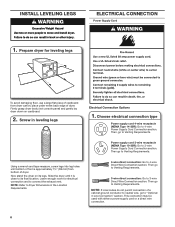
Installation Guide - Page 3
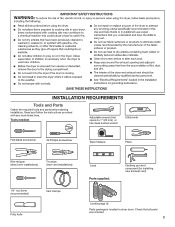
...
Tape measure
Pliers
Wire stripper (direct wire installations)
Tin snips (new vent installations)
1/4" nut driver (recommended)
Vent clamps
Putty knife
Level Parts supplied:
Caulking gun and compound (for installing new exhaust vent)
Leveling legs (4)
Parts package is located in dryer drum. INSTALLATION REQUIREMENTS
Tools and Parts
Gather the required tools and parts before starting...
Installation Guide - Page 4
... an automatic cycle. See "Venting Requirements."
■■ A separate 30 amp circuit.
■■ If you purchased your dryer. At lower temperatures, the dryer might be considered for wall, door, and floor moldings.
■■ Additional spacing of 1" (25 mm) on all sides of the dryer is greater than 1" [25 mm], install Extended Dryer Feet Kit, Part Number...
Installation Guide - Page 5
...National Electrical Code requires a 4-wire power supply connection for use an extension cord.
■■ If codes permit and a separate ground wire is used when the dryer is installed in a location ...install your dealer.
■■ Special provisions must determine the type of a neutral ground wire to the neutral wire, see "Optional 3-wire connection" section.
■■ This dryer...
Installation Guide - Page 6
... of cardboard from bottom of a cabinet-ground conductor to neutral wire, go to "Optional 3-wire Connection" section.
This connection may be used with either a power supply cord or a direct wire connection.
6 Slide the dryer until bottom of dryer. Then go to Venting Requirements.
3-wire direct connection: Go to 4-wire Direct Wire Connection section. Then go to...
Installation Guide - Page 8
... ends
Ring terminals Now, go to Venting Requirements.
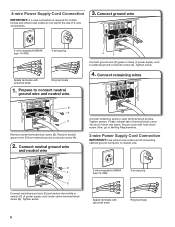
3-wire Power Supply Cord Connection
IMPORTANT: Use where local codes permit connecting cabinet-ground...connections.
3.
B E
C
Connect neutral ground wire (E) and neutral wire (white or center) (C) of dryer rear panel. Connect remaining wires
Connect remaining wires to external ground conductor screw (A).
Tighten screw.
8
3-wire...
Installation Guide - Page 9

...: Go to 4-Wire Direct Connection on page 10.
3-wire direct connection: Go to Venting Requirements. Remove center screw
B
Direct Wire Connection
Direct wire strain relief
1. Finally, reinsert tab... on strain relief). Secure cover with the dryer cabinet and be in a horizontal position.
Tighten screw.
3. The strain relief should have a tight fit with hold-down screw. Connect neutral wire
...
Installation Guide - Page 10
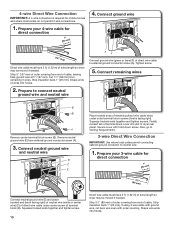
...dryer rear panel. Strip 31/2" (89 mm) of outer covering from end of cable. If using 3-wire cable with ground wire, cut bare wire even with hold-down screw. Tighten screw.
5. Connect remaining wires
E B
A Remove center terminal block screw (B). Secure cover with outer covering. Now, go to Venting Requirements.
3-wire Direct Wire Connection
IMPORTANT: Use...so dryer may be moved if needed ...
Installation Guide - Page 12
... not install in final dryer location. ■■ Remove excess to clean) ■■ Must be used .
■■ Do not use plastic or metal foil vent.
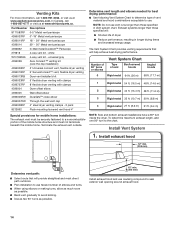
12 4. Connect external ground wire
A G
Connect a separate copper ground wire (G) from ground or any gas vent, chimney, wall, ceiling, attic, crawlspace, or a concealed space of the system and make sure exhaust...
Installation Guide - Page 13
... dryer from the rear of duct and catch lint. Clamps: ■■ Use clamps to seal all joints.
■■ Exhaust vent must not be converted out the right side, left side, or through the bottom (4-way vent kit). Other installations are shown. Each kit includes step-by-step instructions.
Do not use duct tape. Vent length necessary...
Installation Guide - Page 14
...-the-wall vent cap
4396008RP 4" steel dryer venting clamps - 2 pack
8212662
Flush mounting louvered vent hood 4"
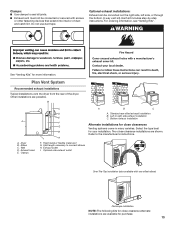
Determine vent length and elbows needed for mobile home installations:
The exhaust vent must not terminate beneath the mobile home. Install Vent System
1.
NOTE: Side and bottom exhaust installations have a 90º turn to use. white
W10186596 4-way vent kit -
To...
Installation Guide - Page 15
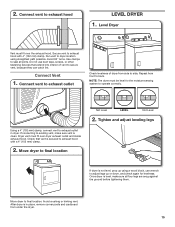
...from side to back. Dryer vent must fit over the exhaust hood. Move dryer to secure vent, because they can catch lint. Tighten and adjust leveling legs
If dryer is in dryer. Do not use wrench to adjust legs up using straightest path possible. Move dryer to exhaust hood
LEVEL DRYER
1.
2. Connect vent to final location. Level Dryer
Vent must be level for levelness...
Installation Guide - Page 16
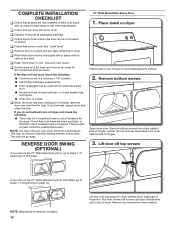
...Be sure vent is still no heat, contact a qualified technician. q Remove film on this page.
27" Wide Model Side-Swing Door
1. q Read "Dryer Use" in your door is first heated. If the dryer will ... may notice an odor when the dryer is the 27" Wide Side-Swing Door, go away. REVERSE DOOR SWING (OPTIONAL)
If your "Use and Care Guide." COMPLETE INSTALLATION CHECKLIST
q Check that both fuses ...
Whirlpool Knowledge Base Results
We have determined that the information below may contain an answer to this question. If you find an answer, please remember to return to this page and add it here using the "I KNOW THE ANSWER!" button above. It's that easy to earn points!-
No or low ice production - Bottom freezer/French door refrigerator
... right corner. How do I install or replace the water filter Find a local service provider: Product Category Washer or Dryer Refrigerator or Freezer Dishwasher Electric Range, Oven or Cooktop Gas Range, Oven or Cooktop Microwave Trash Compactor Window Air Conditioner Hot Water Dispenser Vent Hood Ice Machine Commercial Laundry Vacuum Cleaner Central Vac Dehumidifier... -
Cycle is too short - Dryer
...dryer does not dry My dryer will not start Cycle time is level from front to back and side to large loads. Cycle is not heating, see: For best results in Automatic Dry or Accudry cycles, dry medium to side. See the Installation...not contact these strips if the dryer is not level. Make sure that the dryer is increasing - Are you using a dry rack with a ... -
Water leak
... is firmly inserted into all fittings and that all connections that are...Make sure the tubing is not damaged or cracked. Find a local service provider: Product Category Washer or Dryer Refrigerator or Freezer Dishwasher Electric Range, Oven or Cooktop Gas Range, Oven or Cooktop Microwave Trash Compactor Window Air Conditioner Hot Water Dispenser Vent Hood Ice Machine Commercial Laundry...
Similar Questions


Dryer Display Isn't Working
Dryer is getting power but the display won't turn on. It doesn't appear that any connections are loo...
Dryer is getting power but the display won't turn on. It doesn't appear that any connections are loo...
(Posted by Lts9989 5 years ago)

Dryer Will Not Turn On.
my dryer wil not turn on. I have checked a fuses and they are good. What's next?
my dryer wil not turn on. I have checked a fuses and they are good. What's next?
(Posted by Dtidavid54 7 years ago)
How To Install Whirlpool Cabrio Dryer With Steam Without A Water Outlet
(Posted by dcBUTC 9 years ago)

Cannot Vent This Dryer To Outside.
1. Is It O.k. To Use Ventless Duct?
(Posted by alazarnjbcs 11 years ago)