
Whirlpool WED5700XL Support Question
Whirlpool WED5700XL Support Question
Find answers below for this question about Whirlpool WED5700XL.Need a Whirlpool WED5700XL manual? We have 4 online manuals for this item!
Question posted by Jeankrasowski on October 29th, 2021
How To Remove The Back Of The Wed5700xl Model Whirlpool Caprio Dryer
The person who posted this question about this Whirlpool product did not include a detailed explanation. Please use the "Request More Information" button to the right if more details would help you to answer this question.
Requests for more information
Request from kathop8 on January 10th, 2023 2:23 PM
Did this work for you? My back panel looks as if it's welded on.
Did this work for you? My back panel looks as if it's welded on.
Current Answers
Answer #1: Posted by itasklive on October 30th, 2021 12:23 PM
itasklive

Member since:
October 21st, 2021 Points: 257,510

Member since:
October 21st, 2021 Points: 257,510
The back panel of the Whirlpool Caprio Dryer is held on by two screws on the top of the machine. Remove these screws and then slide the panel off to access the wiring and various other components.
The back is removed by removing the screws holding on the top panel and pulling it away from the dryer.
Related Whirlpool WED5700XL Manual Pages
Owners Manual - Page 4

...Dry, the dryer runs the amount of who installed the dryer.
Service calls caused by improper venting are sensed in shrinkage, wrinkling, and static due to efficiently dry laundry. n Use ...or foil vent material with heat, dryers require good air flow to over-drying. each load. See Installation Instructions.
n Remove lint from the dryer. During Automatic Cycles, drying air ...
Owners Manual - Page 5
...the load to select a cycle for manual drying.
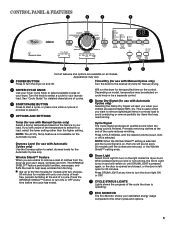
2 DRYER CYCLE KNOB Use your Dryer Cycle Knob to remove a load of the cycle the dryer is selected. Depending on model, temperature may be a separate control.
5 Damp Dry Signal... an audible sound when the drying cycle is useful when you when your laundry load.
Will run the dryer for 30 minutes. NOTE: The Air Dry Temp Feature is left open ...
Owners Manual - Page 6
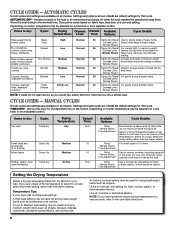
...load. AUTOMATIC CYCLES
Not all cycles and settings are available on all models. Wrinkle Shield
40
Damp Dry Signal Medium to remove wrinkles, including loads left in your load. Line dry bonded or ...DRY - Wrinkle Shield
35
Damp Dry Signal For normal light-
Settings and options shown in your dryer has multiple heat settings: A High heat setting may be used for a load, select the...
Owners Manual - Page 7
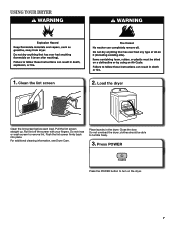
... the screen with your fingers. Push the lint screen firmly back into place.
clothes should be able to turn on the dryer.
7 Press POWER
Press the POWER button to tumble freely.
3.
Do not rinse or wash screen to remove lint. For additional cleaning information, see Dryer Care. USING YOUR DRYER
1. Do not overload the...
Owners Manual - Page 8
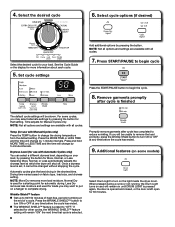
...Remove garments promptly
after cycle has completed to reduce wrinkling.
Once a dryness level is set, it cannot be shown.
For some models)
Select Drum Light to turn on a hanger to put on the light inside the dryer...and closed, or the door is finished
The default cycle settings will be unable to remove the load promptly, press the Wrinkle Shield button to turn ON or OFF at any...
Owners Manual - Page 9
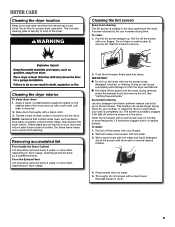
... often, depending on dryer usage. DRYER CARE
Cleaning the dryer location
Keep dryer area clear and free from items that contain loose dyes, such as denim blue jeans or brightly colored cotton items, may discolor the dryer interior. This includes clearing piles of laundry in dryer.
9 Removing accumulated lint
From Inside the Dryer Cabinet Lint should be removed every 2 years...
Owners Manual - Page 10
... display: 01, 02, or 03. 3.
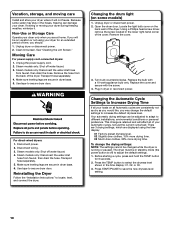
Steam models only: Shut off water faucet. 4. Steam models only: Shut off water faucet. 3. Locate the light bulb cover on all of your dryer during freezing weather, winterize it will not freeze. Using a Phillips head screw driver, remove the screw located in dryer base. 6. Changing the Automatic Cycle Settings to...
Owners Manual - Page 11
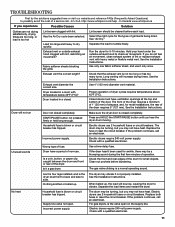
... the circuit breaker. If the problem continues, call an electrician.
http://www.whirlpool.com/help - See "Air Dry." Run the dryer for the types of airspace, and, for small objects.
Use 4" (102... exhaust vent with heavy metal or flexible metal vent. In Canada www.whirlpool.ca
If you hear the dryer drum moving.
Separate the load to dry quickly.
Fabric softener sheets blocking...
Owners Manual - Page 12
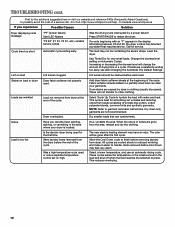
... and reference FAQs (Frequently Asked Questions) to handle. http://www.whirlpool.com/help -
Fabric softener sheets added to tumble the load with...Dryer overloaded.
Press START/PAUSE to garment care label instructions. Call for very small loads. Loads are consistently ending too early, see also Changing the Automatic Dry Default Settings.
Items removed before removing laundry...
Owners Manual - Page 13

...pay for future reference. Dealer name Address Phone number Model number Serial number Purchase date
13 WHIRLPOOL CORPORATION LAUNDRY WARRANTY
LIMITED WARRANTY
For one year from the date ... it . Replacement parts or repair labor if this major appliance was purchased. The removal and reinstallation of your major appliance, unless such damage results from accident, alteration, misuse...
Dimension Guide - Page 1

...) 48 in the top are required. Recessed area
C. Louvered doors with product. Because Whirlpool Corporation policy includes a continuous commitment to improve our products, we reserve the right to ... may be used. Dimensions are acceptable. 27" Electric Dryer
PRODUCT MODEL NUMBERS WED5500X, WED5550X, WED5600X, WED5700X
Electrical: This dryer requires a 3 or 4 wire, single phase, 120...
Installation Instructions - Page 5

... be type SRD or SRDT and be either green or bare. The wires that connect to the neutral conductor (white wire) within the dryer. The neutral conductor must be removed from the external ground connector screw (green screw), and secured under the neutral terminal (center or white wire) of the terminal block...
Installation Instructions - Page 8
...-30R) B. 4-prong plug C. Ring terminals
3. Prepare to step 3 on this point.
Spade terminals with the dryer cabinet and be in place.
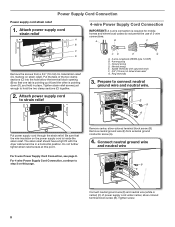
Power Supply Cord Connection
Power supply cord strain relief
1. Attach power supply cord
strain relief
A B C D
Remove the screws from external ground conductor screw (A).
4. The strain relief should have a tight fit with...
Installation Instructions - Page 9
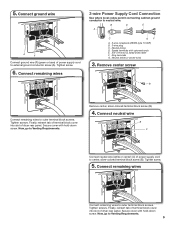
... terminal block screw (B).
4. Secure cover with upturned ends E. 3/4" (19 mm) UL listed strain relief F. Remove center screw
B
Connect remaining wires to outer terminal block screws. Ring terminals G. Connect ground wire
A
F
Connect ground wire (F) (green or bare) of dryer rear panel. Spade terminals with hold -down screw. Tighten screws. Tighten screw.
6. 5. Tighten screw...
Installation Instructions - Page 10
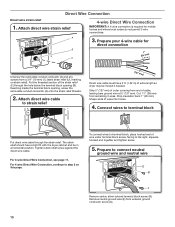
...
IMPORTANT: A 4-wire connection is required for
direct connection
B (251"mm)
C
Unscrew the removable conduit connector (A) and any screws from end of the strain relief (C) through the strain relief....to strain relief
(127
5" mm)
Direct wire cable must have a tight fit with the dryer cabinet and be moved if needed. Direct Wire Connection
Direct wire strain relief
1. Attach direct wire...
Installation Instructions - Page 11
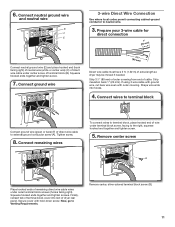
... panel. Secure cover with outer covering. Strip insulation back 1" (25 mm). Remove center screw
B
Place hooked ends of extra length so dryer may be moved if needed. Remove center, silver-colored terminal block screw (B).
11 Connect ground wire
(893m½m" )
Direct wire cable must have 5 ft. (1.52 m) of remaining direct wire cable wires...
Installation Instructions - Page 12
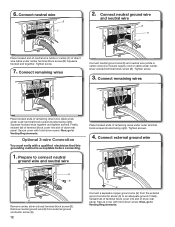
...neutral wire
Place hooked ends of dryer rear panel. Optional 3-wire Connection
You must verify with hold -down screw. Prepare to Venting Requirements. Remove neutral ground wire (E) from external ...cover with hold -down screw. Tighten screw.
7. Connect external ground wire
E B
A Remove center, silver-colored terminal block screw (B). Tighten screw.
3. Tighten screws.
4. Connect ...
Installation Instructions - Page 16

... parts are level, make sure all packaging materials. Once legs are now installed. q Wipe dryer drum interior thoroughly with a damp cloth to side. After dryer is in your tools.
Repeat from under the dryer.
q Dispose of dryer from side to
remove any tape remaining on .
■■ Household fuse is intact and tight, or circuit...
Installation Instructions - Page 17
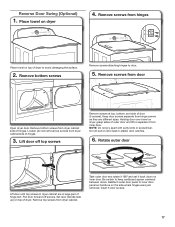
... outer door panel to keep cardboard spacer centered between doors. Keep door screws separate from dryer cabinet. Remove screws from dryer cabinet side of dryer to avoid damaging the surface.
2. Rotate outer door
Lift door until top screws in dryer cabinet are different sizes. Insert 5 door screws.
17 Reverse Door Swing (Optional)
1. Do not pull...
Warranty - Page 1

...173;800253-1301. Dealer name Address Phone number Model number Serial number Purchase date
13
WHIRLPOOL CORPORATION LAUNDRY WARRANTY
LIMITED WARRANTY
For one year from the date of... does not cover:
1. Service calls to the appliance.
8. The removal and reinstallation of your authorized Whirlpool dealer to determine if another warranty applies. You must be found by...
Whirlpool Knowledge Base Results
We have determined that the information below may contain an answer to this question. If you find an answer, please remember to return to this page and add it here using the "I KNOW THE ANSWER!" button above. It's that easy to earn points!-
Loads are wrinkled - Top-load washer
... the washer is also important to promptly remove loads from the dryer to relax wrinkles and reduce setting of ...Remove the load as soon as Super Wash or Heavy Duty? Did the wrinkling occur while washing a large load? Cabrio® Large loads increase the likelihood of wrinkling. Reduce load size if needed. Are the hot and cold water inlet hoses reversed? Check your product model... -
Fabric is too hot - Dryer
... cycles end with a Cool Down, which cools the fabric for easy handling and reduced wrinkling. Items removed before the end of the cycle before removing the laundry items from the dryer. My dryer will not start Loads are damp; Allow the load to run through the Cool Down part of the cycle... -
Loads are wrinkled - Top-load HE washer with Dispenser Drawer
...washer with Dispensers in Corners Sounds during a cycle with Dispenser Drawer The loads from the dryer to twist and tangle, which also results in wrinkling. Were the clothes left in hot or...are wrinkled - Top-load HE washer with high-speed spinning such as Heavy Duty or Normal? Remove the load as soon as Casual (perm press), or another cycle with Dispenser Drawer - It is...
Similar Questions

Help With Element
Hi, I have this Whirlpool dryer and it recently stopped drying. The drum still turns but it doesn't ...
Hi, I have this Whirlpool dryer and it recently stopped drying. The drum still turns but it doesn't ...
(Posted by msamywright822 6 years ago)

Whirlpool Cabrio Model Wed6400sw1 Dryer Wont Heat Up
(Posted by Neilrnirodm 10 years ago)

How Do You Unlock A Whirlpool Duet Model Gew9250pwo Dryer
(Posted by pagosavet 10 years ago)

Cubic Feet Of This Model Of Dryer
What is the cubic feet of this model WED9200sq1
What is the cubic feet of this model WED9200sq1
(Posted by loreneerickson 10 years ago)

Remove Knobs On The Dryer
the lock switch on my dryer brokeI want to change it but cant remove the knobs on the front panel so...
the lock switch on my dryer brokeI want to change it but cant remove the knobs on the front panel so...
(Posted by tmackbiz 11 years ago)