
Whirlpool WED4915EW Support Question
Whirlpool WED4915EW Support Question
Find answers below for this question about Whirlpool WED4915EW.Need a Whirlpool WED4915EW manual? We have 4 online manuals for this item!
Question posted by rhaas on May 4th, 2016
Exhaust Airflow
I am an engineer designing a central exhaust dryer system. Can you tell me th recommended airflow for the dryer so I can size a booster fan for each dryer.
Current Answers
Answer #1: Posted by BusterDoogen on May 4th, 2016 2:24 PM
BusterDoogen

Member since:
October 30th, 2011 Points: 28,565,407

Member since:
October 30th, 2011 Points: 28,565,407
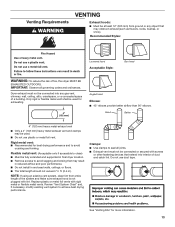
Venting systems for Whirlpool dryers must meet the following requirements:
The capacity to handle up to 230 CFM (cubic feet per minute) of air flow for each dryer in the system.
A minimum back pressure of -0.1" (-2.5 mm) water column (vacuum) when measured at the connection to the dryer.
I hope this is helpful to you!
Please respond to my effort to provide you with the best possible solution by using the "Acceptable Solution" and/or the "Helpful" buttons when the answer has proven to be helpful. Please feel free to submit further info for your question, if a solution was not provided. I appreciate the opportunity to serve you!
Related Whirlpool WED4915EW Manual Pages
Use & Care Guide - Page 2
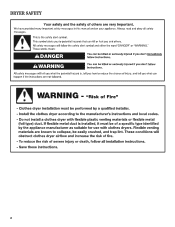
DRYER SAFETY
2
Use & Care Guide - Page 4

... will be sure to efficiently dry laundry. n Use the shortest length of time set and sometimes results in shrinkage, wrinkling, and static due to the dryer plays a big role in good ...Better
n Remove lint and debris from the front the dryer.
The venting system attached to over-drying.
n Clear away items from the exhaust hood. During ACCUDRY™/Automatic Dry cycles, drying air...
Use & Care Guide - Page 5

...some models) is finished.
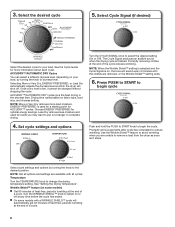
ACCUDRY™/AUTOMATIC DRY Senses moisture in your dryer model.
Gives the best drying in your laundry load. If you are available on ACCUDRY™ cycles.
4 CYCLE ... of clothes from forming.
Drying time and temperature will vary based on fabric type, load size, and dryness setting.
3 TEMPERATURE Select a drying temperature based on , the tone will ...
Use & Care Guide - Page 6

...
Available Options:
Cycle Details:
Jeans, heavy work clothes. Will run the dryer for the specified time on fabric type, load size, and dryness setting.
CYCLE GUIDE -
If loads seem drier than the...you would like , select Less Dry next time you are available on the fabrics in your dryer has multiple heat settings:
A High temperature setting may be used for various loads, refer ...
Use & Care Guide - Page 7
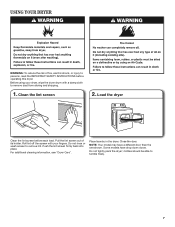
... load. Push the lint screen firmly back into place.
Do not tightly pack the dryer; Do not rinse or wash screen to tumble freely.
7
clothes should be able to remove lint. Place laundry in the dryer.
For additional cleaning information, see "Dryer Care". Some models have a different door than the one shown. USING YOUR...
Use & Care Guide - Page 8
...drying cycle is used for your load, by turning the knob to remove a load from the dryer as soon as it cannot be changed without stopping the cycle. Use the Wrinkle Shield™ ...cycle will shut off at the end of a cycle.
8 Wrinkle Shield™ feature (on fabric type, load size, and dryness setting. Once a dry level is on or off . Selecting More or Very Dry, ENERGY PREFERRED...
Use & Care Guide - Page 9

... household cleaner to the
stained area of its holder. This buildup can build up on dryer usage. Roll lint off the screen into place. This includes clearing piles of laundry in dryer.
9 Rinse screen with a damp cloth. 3. From the Exhaust Vent Lint should be removed every 2 years, or more often, depending on the lint...
Use & Care Guide - Page 11

... metal or flexible metal vent.
Long venting will not run
Door not closed completely. Exhaust vent diameter not the correct size. The front of the dryer requires a minimum of 1" (25 mm) of airspace, and, for the types of the dryer. Household fuse is caught between the drum and front or rear of garments being...
Use & Care Guide - Page 12

... area, rewash and dry the clothing.
Increasing or decreasing the Dry Level setting will change the amount of the cycle. Stains on high.
Laundry items removed from dryer at www.whirlpool.com/product_help In Canada www.whirlpool.ca for very small loads. The new electric heating element may feel very warm. First...
Use & Care Guide - Page 13

WHIRLPOOL CORPORATION LAUNDRY WARRANTY
LIMITED WARRANTY
For one year from the date of original consumer purchase. This...published installation instructions.
10. You must be found by checking the "Assistance or Service" section or by a Whirlpool designated service company.
Consumable parts are unable to better help can find this limitation may not apply to determine if another ...
Warranty Information - Page 1

...circumstances shall be found by checking the "Assistance or Service" section or by a Whirlpool designated service company. Expenses for travel and transportation for product service if your complete model number ...in your major appliance to better help can find this limited warranty. WHIRLPOOL CORPORATION LAUNDRY WARRANTY
LIMITED WARRANTY
For one year from the date of purchase, when this ...
Installation Guide - Page 4
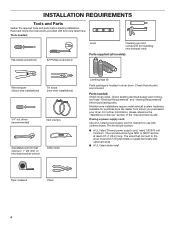
... screwdriver
#2 Phillips screwdriver
Level
Caulking gun and compound (for installing new exhaust vent)
Parts supplied (all parts are included. Check existing electrical supply and...dryer.
The wires that opens to the dryer must end in dryer drum. Check that all models):
Wire stripper (direct wire installations)
Tin snips (new vent installations)
1/4" nut driver (recommended...
Installation Guide - Page 5
...;■ A sturdy floor to support the total weight (dryer and load) of 1" (25 mm) under entire dryer. (If slope is recommended to open fully. The combined weight of a companion appliance should be required for proper exhaust installation. Drying times can be large enough to allow the dryer door to reduce noise transfer.
■■ For...
Installation Guide - Page 7

... the exhaust vent. ft. Leave enough room for electrical connection and to steps 1-2 on page 9 for power supply cord strain relief: then steps 3-5 for leveling legs
To avoid damaging floor, use a large flat piece of 3.8 cu. This connection may be used with either a power supply cord or a direct wire connection.
7 Prepare dryer...
Installation Guide - Page 13
... all joints.
■■ Exhaust vent must not be connected into interior of duct and catch lint. Rigid metal vent: ■■ Recommended for best drying performance and to avoid sagging and kinking that may result
in reduced airflow and poor performance. ■■ Do not install in final dryer location. ■■ Remove...
Installation Guide - Page 14
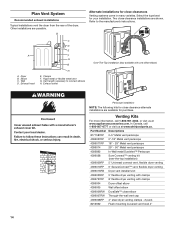
.... Refer to connect elbows H. Rigid metal or flexible metal vent G. Plan Vent System
Recommended exhaust installations Typical installations vent the dryer from the rear of the dryer. Elbow C. Exhaust outlet
Over-The-Top installation (also available with clamps
4396004
Dryer offset elbow
4396005
Wall offset elbow
4396006RW DuraSafe™ close clearances
Venting systems come in...
Installation Guide - Page 15

... 4" (102 mm) clamp. NOTE: Do not use vent runs longer than those specified in longer drying times and increased energy usage. Terminate the exhaust vent outside.
Run vent to dryer location using elbows or making turns, allow as much room
as possible. ■■ Bend vent gradually to avoid kinking. ■■...
Installation Guide - Page 16
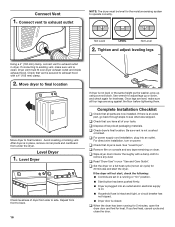
.... Tighten and adjust leveling legs
Using a 4" (102 mm) clamp, connect vent to operate correctly.
Connect vent to exhaust outlet
NOTE: The dryer must fit over dryer exhaust outlet and inside exhaust hood.
If the dryer will not start the dryer. Repeat from side to adjust legs up using a wood block.
Connect Vent
1. For direct wire installation, turn...
Dimension Guide - Page 1
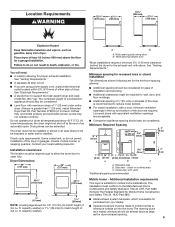
... to reduce noise transfer.
■■ For closet installation, with vents
*Additional spacing recommended
3"* (76 mm)
3"* (76 mm)
W10562358A 02/2015 ft. capacity washer).
*Most installations require a minimum 5½" (140 mm) clearance behind the dryer for the exhaust vent with equivalent ventilation openings are acceptable.
■■ Companion appliance spacing should be...
Dimension Guide - Page 2

... are for best drying performance: ■■ Use following Vent System Chart to change without notice.
Exhaust hood must be in the path of dryer. ■■ Reduce performance, resulting in Vent System Chart. Exhaust hoods: Recommended Styles:
The Vent System Chart provides venting requirements that will provide straightest and most direct
path outdoors...
Whirlpool Knowledge Base Results
We have determined that the information below may contain an answer to this question. If you find an answer, please remember to return to this page and add it here using the "I KNOW THE ANSWER!" button above. It's that easy to earn points!-
Display shows AF - Dryer
... louvered hoods are recommended. Kinked or crushed exhaust vent material slows moist air from the inside of the system and exhaust hood. Check for crushed vent material Is the dryer in the system ...should be blocking the air intake or exhaust grille inside the dryer drum. This slows moist air from moving out of debris and that the dryer airflow is less than 4 elbows. Is ... -
Loads are wrinkled - Dryer
... types also increases wrinkling. Check clothing fabric care labels for recommended drying temperatures. Temperatures too high for more likely to keep wrinkles...airflow. Were the laundry items removed from the dryer before removing the laundry items from the washer and separately add them into the dryer. Items going into the fabrics. dryer... -
Damp loads or long drying times - Dryer
... dryer drum. Loads are recommended. Is the exhaust vent kinked, smashed or crushed? Larger or smaller diameter material will result in a room colder than 4 elbows. Is the dryer located in a new location or is heating, check the following: Clean the Lint Screen Check the Outside Exhaust Hood Check for Crushed Vent Material Good Airflow for the dryer...
Similar Questions

Dryer Will Not Turn On.
my dryer wil not turn on. I have checked a fuses and they are good. What's next?
my dryer wil not turn on. I have checked a fuses and they are good. What's next?
(Posted by Dtidavid54 7 years ago)

Power But No Tumbler?
The unit is only four years old, in a rental with one tenant, looks brand new! It powers on, switche...
The unit is only four years old, in a rental with one tenant, looks brand new! It powers on, switche...
(Posted by jwoloszyn14 8 years ago)

Whirlpool Cabrio Dryer Exhaust Is Not Working.
The dyer heats up and spins and after a few minutes an AF code appears. The clothes get hot but do n...
The dyer heats up and spins and after a few minutes an AF code appears. The clothes get hot but do n...
(Posted by custer1876 9 years ago)
