Whirlpool WED4850XQ Support Question
Whirlpool WED4850XQ Support Question
Find answers below for this question about Whirlpool WED4850XQ.Need a Whirlpool WED4850XQ manual? We have 4 online manuals for this item!
Question posted by gloriacampbell on August 2nd, 2014
Damp Clothes
is it common that this dryer doesn't dry clothes very well?
Current Answers
Answer #1: Posted by Odin on August 2nd, 2014 5:44 AM
Odin

Member since:
April 10th, 2010 Points: 41,236,680

Member since:
April 10th, 2010 Points: 41,236,680
No. For a fix, see http://www.repairclinic.com/RepairHelp/How-To-Fix-A-Dryer/5-5--V0VENDg1MFhR/Whirlpool-Dryer-takes-too-long. (Ignore the paragraph in red relating to a partial model number.)
Hope this is useful. Please don't forget to click the Accept This Answer button if you do accept it. My aim is to provide reliable helpful answers, not just a lot of them. See https://www.helpowl.com/profile/Odin.
Answer #2: Posted by majorapplirepair on August 3rd, 2014 5:31 AM
majorapplirepair

Member since:
October 7th, 2011 Points: 139,880
Member since:
October 7th, 2011 Points: 139,880
The most common problem for any dryer not drying well is poor ventilation due to the vent tubing being clogged or kinked. Take your vent tubbing off the back of the maching and check the air flow that comes out of the machine. Then replace it and go outside and check for the same amount of air flow. It should be near the same. If not, replace the vent tubbing.
Related Whirlpool WED4850XQ Manual Pages
Owners Manual - Page 2
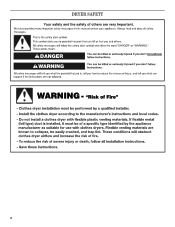
DRYER SAFETY
2
Owners Manual - Page 4

...dryer. During ACCUDRY™/Automatic Dry cycles, drying air temperature or moisture level are not covered by the warranty and will be sure to follow the "Installation Instructions" supplied with your dryer for the occasional damp...of who installed the dryer. The venting system attached to efficiently dry laundry. This sensing occurs throughout the drying cycle and the dryer shuts off when the ...
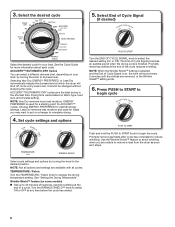
Owners Manual - Page 5

... , the tone will depend on your load. Drying time and temperature will sound every 5 minutes until the clothes are unsure of the temperature to select available cycles on your laundry load.
If you may vary.
1 DRYER CYCLE KNOB
Use your Dryer Cycle Knob to select for your dryer model.
Press the PUSH to START knob to...
Owners Manual - Page 6
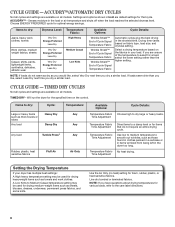
... to a damp level or for drying heavyweight items such as sheets, blouses, dresses, underwear, permanent press fabrics, and some knits.
Select a drying temperature based on all models.
Items to dry:
Dryness Level: Temperature Fabric:
Available Options:
Cycle Details:
Jeans, heavy work clothes. NOTE: If loads do not require an entire drying cycle.
Will run the dryer for...
Owners Manual - Page 7
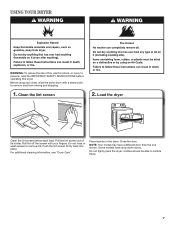
... laundry in the dryer. NOTE: Your model may have drop down doors. For additional cleaning information, see "Dryer Care".
Do not rinse or wash screen to tumble freely.
7 USING YOUR DRYER
WARNING: To reduce the risk of its holder. Load the dryer
Clean the lint screen before operating this dryer. Roll lint off the screen with a damp cloth...
Owners Manual - Page 8
... completed to change the drying temperature setting. ENERGY PREFERRED is finished.
Promptly removing clothes at which the dryer will sound every 5 minutes until the clothes are available with all options...
TIMED DRY 50
40
Damp Dry
Tumble Press
20
60
70
Heavy Dry
Cool Down
OFF ACCUDRY sensor dryer Jeans Very Dry
ENERGY PREFERRED
OFF
Delicate
WP_WEGD4900XW
Less Dry Cool ...
Owners Manual - Page 9
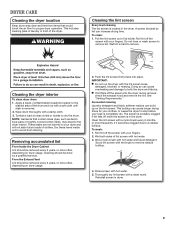
... wash: 1. These stains are not harmful to dry the drum. Thoroughly dry lint screen with a damp cloth. 3. Cleaning the dryer interior
To clean dryer drum 1. Apply a liquid, nonflammable household cleaner to the
stained area of the drum and rub with the brush to both sides of laundry in the dryer. Dry these items inside out to remove lint. As...
Owners Manual - Page 10

.... Locate the light bulb cover on some models)
1. Using a Phillips-head screw driver, remove the screw located in the lower right-hand corner of the dryer. Turn off valve to gas supply
line. 3. Replace the bulb with the screw.
4. Plug into a grounded outlet or reconnect power. Disconnect wiring. 3. Use tape to...
Owners Manual - Page 11

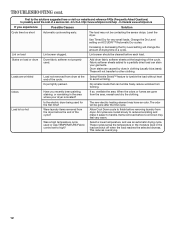
... a coin, button, or paper clip caught between the drum and front or rear of the dryer? If the dryer hasn't been used for awhile, there may be turning, but you experience
Possible Causes
Solution
Clothes are not drying satisfactorily, drying times are too long
Lint screen clogged with lint. Household fuse is not crushed or...
Owners Manual - Page 12
... time too short
Automatic cycle ending early.
Were laundry items removed from dryer at the beginning of the cycle. Allow Cool Down cycle to a partially dried load can tumble freely reduce wrinkles from dryer. The odor will not transfer to other clothing. Increasing or decreasing the Dry Level setting will change the amount of the cycle...
Installation Instructions - Page 2
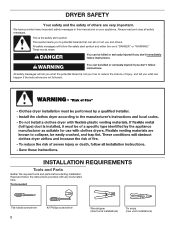
...'t immediately follow instructions. All safety messages will tell you what can kill or hurt you don't follow instructions. Always read and obey all safety messages.
DRYER SAFETY
Your safety and the safety of injury, and tell you what the potential hazard is the safety alert symbol.
This symbol alerts you to...
Installation Instructions - Page 3

...;■ A UL listed 30-amp power supply cord, rated 120/240 volt minimum. Drying times can be considered.
■■ Level floor with clothes dryers. See "Venting Requirements."
■■ A separate 30 amp circuit.
■■ If you purchased your dryer. Parts needed: Check local codes.
Do not operate your local building inspector. Some...
Installation Instructions - Page 4

...connection of a neutral ground wire to the neutral conductor (white wire) within the dryer. If the dryer is installed with a door, minimum ventilation openings in mobile homes to reduce noise ...Large opening hamper door
*Most installations require a minimum 5½" (140 mm) clearance behind the dryer for wall, door, and floor moldings.
■■ Additional spacing of 1" (25 mm...
Installation Instructions - Page 5
...A UL listed 30-amp power supply cord, rated 120/240 volt minimum. Now stand the dryer on cardboard.
2. The
(14-30R)
neutral conductor must have 4 10-gauge solid
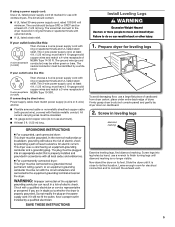
copper wires...;■ Flexible armored cable or nonmetallic sheathed copper cable (with ground wire), covered with clothes dryers. Install Leveling Legs
WARNING
Excessive Weight Hazard Use two or more people to connect the...
Installation Instructions - Page 7
...
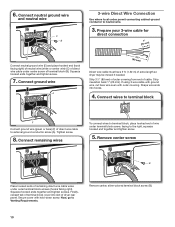
ground wire and neutral wire.
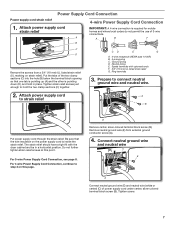
2. Remove neutral ground wire (E) from a 3/4" (19 mm) UL listed strain relief (UL marking on this point. Spade terminals with the dryer cabinet and be in place. Prepare to strain relief
B
Put power supply cord through the strain relief.
Attach power supply cord
strain relief
A B
4-wire Power...
Installation Instructions - Page 8
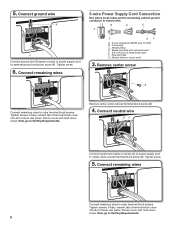
... with hold -down screw. Neutral prong D. Ring terminals G. Remove center, silver-colored terminal block screw (B).
4. Finally, reinsert tab of terminal block cover into slot of dryer rear panel. Tighten screw.
5.
Remove center screw
B
Connect remaining wires to neutral wire. Secure cover with upturned ends E. 3/4" (19 mm) UL listed strain relief F. B
D
E
A
C
GF...
Installation Instructions - Page 9
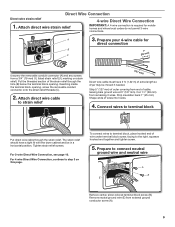
... back 1" (25 mm). The strain relief should have 5 ft. (1.52 m) of extra length so dryer may be in a horizontal position.
For 4 wire Direct Wire Connection, continue to the right, squeeze hooked...Connect wires to strain relief
(127
5" mm)
Direct wire cable must have a tight fit with the dryer cabinet and be moved if needed. Prepare to connect neutral
ground wire and neutral wire
A B
E
...
Installation Instructions - Page 10
... block screw, facing to external ground conductor screw (A). Remove center screw
B
Place hooked ends of dryer rear panel. Finally, reinsert tab of terminal block cover into hooks.
4. Now, go to neutral...Venting Requirements. Strip 31/2" (89 mm) of outer covering from end of extra length so dryer may be moved if needed. Connect wires to terminal block
F
Connect ground wire (green or...
Installation Instructions - Page 15
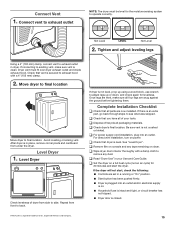
... system to existing vent, make sure all of /recycle all parts are level, make sure vent is secured to exhaust hood with a damp cloth to exhaust outlet
NOTE: The dryer must fit over dryer exhaust outlet and inside exhaust hood. q Dispose of your Use and Care Guide. q Check that vent is clean. See "Level...
Installation Instructions - Page 16
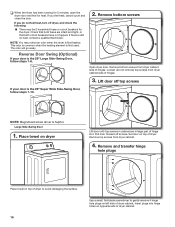
...breakers for heat. Set door on left side of hinges. Insert plugs into hinge holes on dryer
Lift door until top screws in cabinet are intact and tight, or that both fuses are in...hinges.
3. Lift door off screws.
This odor is common when the heating element is still no heat, contact a qualified technician. Remove bottom screws
Open dryer door.
If you feel heat, cancel cycle and ...
Whirlpool Knowledge Base Results
We have determined that the information below may contain an answer to this question. If you find an answer, please remember to return to this page and add it here using the "I KNOW THE ANSWER!" button above. It's that easy to earn points!-
What do I do about stains on my clothing when using my jetted sink?
...least once every 90 days. Sort dark clothes from whites and lights. If the acrylic surface is a renewable surface. These can be buffed or polished out of non-sudsing laundry detergent. Rinse and wipe dry with cold water and run for 10...hot water and add 2 tsp. (9.8 mL) of the finish with a mild, liquid detergent and a damp cloth or sponge. Did you promptly unload the jetted sink? -
There are stains on the dryer drum
.... Is there a blue or gray stain on the inside out. To avoid dye transfer, dry fabrics with powdered laundry detergent and very warm water. Rub with a damp cloth. There are stains on the dryer drum There are removed. Garments which contain unstable dyes, such as denim blue jeans or brightly colored cotton items, may... -
How do I clean my jetted sink?
...wipe dry with hot water and add two teaspoons (9.8 mL) of the finish with cold water and run for 10 minutes, then drain the jetted sink. Fill the jetted sink with a soft cloth....90 days. To flush your jetted sink: Clean the acrylic surface with a mild, liquid detergent and a damp cloth or sponge. Run the system for 10 minutes to rinse the system, then drain the jetted sink. ...
Similar Questions

Dryer Sensor - Does This Dryer Have A Dry Sensor That Requires Regular Cleaning?
does this dryer have a "dry" sensor that requires periodic cleaning?
does this dryer have a "dry" sensor that requires periodic cleaning?
(Posted by pratt7872 5 years ago)

Whirlpool Cabrio Dryer Won't Dry
(Posted by rlvai 10 years ago)

1 Yr Old Wgd8200yw Dryer Does Not Dry Clothes
Dryer will start the fire and heat, but no air flows out the exhaust.I have removed the external ven...
Dryer will start the fire and heat, but no air flows out the exhaust.I have removed the external ven...
(Posted by kenwenzel 10 years ago)

Dryer Won't Dry Clothes But Is Spinning And Getting Super Hot??
(Posted by Ckadavy 11 years ago)

My Gas Dryer Is Not Drying My Clothes.
I have checked my breaker and cleared my vent. Its still not drying what else could it be?
I have checked my breaker and cleared my vent. Its still not drying what else could it be?
(Posted by dsolis4187 13 years ago)