Whirlpool LEW0050PQ Support Question
Whirlpool LEW0050PQ Support Question
Find answers below for this question about Whirlpool LEW0050PQ - Electric Dryer.Need a Whirlpool LEW0050PQ manual? We have 1 online manual for this item!
Question posted by rfcokoko on June 25th, 2014
How Hard Is It To Replace A Door Switch For A Whirlpool Lew0050pq
The person who posted this question about this Whirlpool product did not include a detailed explanation. Please use the "Request More Information" button to the right if more details would help you to answer this question.
Current Answers
Related Whirlpool LEW0050PQ Manual Pages
Use and Care Guide - Page 1
or visit our website at...www.whirlpool.com
Table of Contents 2
8578567 ®
240-VOLT ELECTRIC DRYER
Use & Care Guide
For questions about features, operation/performance, parts, accessories or service, call: 1-800-253-1301.
Use and Care Guide - Page 2
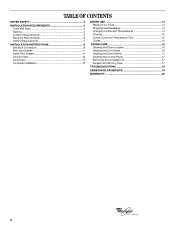
... 3
INSTALLATION REQUIREMENTS 4 Tools and Parts 4 Options 4 Location Requirements 4 Electrical Requirements 6 Venting Requirements 7
INSTALLATION INSTRUCTIONS 8 Electrical Connection 8 Plan Vent System 11 Install Vent System 12 Connect Vent 12 Level Dryer 13 Complete Installation 13
DRYER USE 14 Starting Your Dryer 14 Stopping and Restarting 14 Changing Cycles and Temperatures 14...
Use and Care Guide - Page 3
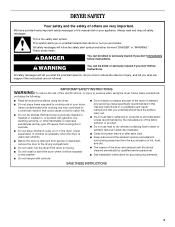
...the chance of fire, electric shock, or injury to persons when using the dryer.
s Do not ...remove the door to the weather. s Do not reach into the dryer if the drum is used near children. DRYER SAFETY
Your...dryer, follow instructions. This symbol alerts you don't follow the safety alert symbol and either the word "DANGER" or "WARNING." s Do not tamper with controls. s Do not repair or replace...
Use and Care Guide - Page 4
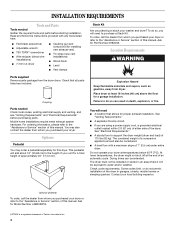
... the height of your unit for this manual. Do not operate your dryer or refer to stack your dryer.
You may order a pedestal separately for a total height of this manual.
s If you purchased your washer and dryer? See "Electrical Requirements." The dryer must not be installed or stored in an area where it will need...
Use and Care Guide - Page 5
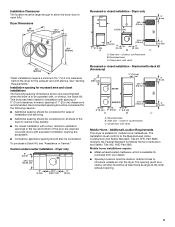
....6 cm)
18"(45.7 cm)
48 in .2 (155 cm2) 0"
1" (2 . 5 cm)
A
(0 cm)
(0 cm)
B
C
A. however, spacing of the dryer to introduce outside air into the dryer. closet or confined area B. Recommended spacing should also be large enough to allow the dryer door to be considered for the exhaust vent with , or without, the Stack Kit. Side view...
Use and Care Guide - Page 6
... be used , it here.
In the event of malfunction or breakdown, grounding will be insulated. WARNING: Improper connection of electric shock.
A copy of electrical connection you are in doubt as to the dryer must have a fuse in conformance with the circuit conductors and connected to install with ring or spade terminals and UL...
Use and Care Guide - Page 7
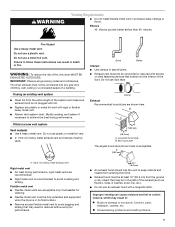
The dryer exhaust must not be connected or secured with lint. s Replace any object that may result in death or fire. s Review Vent system chart. s... to collect indoors, which may be in its final location.
Louvered hood style B.
Do not use a plastic vent. If this dryer MUST BE
EXHAUSTED OUTDOORS. s Exhaust hood must be
used.
4" 10.2 cm
4" (10.2 cm) heavy metal exhaust vent
Rigid...
Use and Care Guide - Page 8
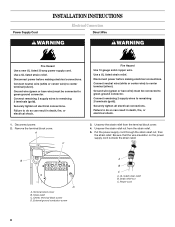
...wire (white or center wire) to do so can result in death, fire, or electrical shock.
1. Failure to center terminal (silver). Fire Hazard
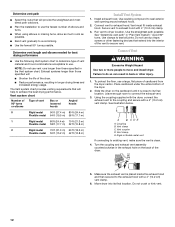
Use 10 gauge solid copper ... cover B.
Connect neutral wire (white or center wire) to do so can result in death, fire, or electrical shock.
Remove the terminal block cover. Put the power supply cord through the strain relief nut, then the strain...
Use and Care Guide - Page 9
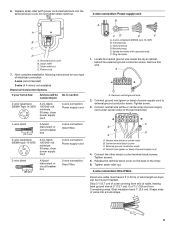
... Ring terminals
1. Connect ground wire (green or bare) of the dryer. 6. External ground conductor screw D. Replace the terminal block cover on the back of power supply cord to external... have 5 ft (1.52 m) of electrical connection: 4-wire (recommended)
3-wire (if 4-wire is not available)
Electrical Connection Options
If your type of extra length so dryer can be Go to section connecting to...
Use and Care Guide - Page 10
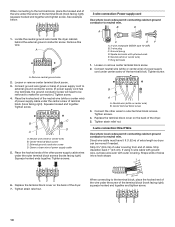
... supply cord under the screw of wires into a hook shape.
1
6. External ground conductor screw D. Neutral wire (white or center wire) B. Replace the terminal block cover on the back of the dryer. 5. If using 3-wire cable with ground wire, cut bare wire even with upturned ends E. Shape ends of the terminal block (hook...
Use and Care Guide - Page 11
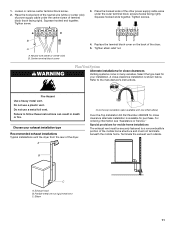
... to follow these instructions can result in many varieties. Special provisions for purchase. Loosen or remove center terminal block screw.
2. Replace the terminal block cover on the back of the dryer. Tighten strain relief nut. Choose your installation.
A
Over-the-top installation (also available with one offset elbow)
Over-the-Top Installation...
Use and Care Guide - Page 12
... so can result in "Plan Vent System." Leave enough room to move and install dryer. See illustration below. Turn the coupling and exhaust vent assembly
counterclockwise in the Vent system... chart. Exhaust systems longer than those specified will:
s Shorten the life of the dryer. Use the straightest path possible. Avoid 90º turns. Failure to exhaust hood with a 4"...
Use and Care Guide - Page 13

...dryer door and feel heat, cancel cycle and close the door. Remove the clear protective film on the front edge and any dust.
10. Wipe the dryer drum interior thoroughly with a damp cloth to back. Set the dryer on the dryer.
8. s Dryer...for heat.
Complete Installation
1. When the dryer has been running or "On" position. ... dryer is not level, prop up or down and check again for the dryer....
Use and Care Guide - Page 14
...shipping.
Doing so can result in this dryer. See "Cleaning the Lint Screen."
2. See "Drying, Cycle and Temperature Tips."
6. To restart the dryer 1.
After the beep sounds, press the ...the recommended setting for the type of fire, electric shock, or injury to persons, read the IMPORTANT SAFETY INSTRUCTIONS before each load. Close the door. 2. After the beep sounds, press the ...
Use and Care Guide - Page 15
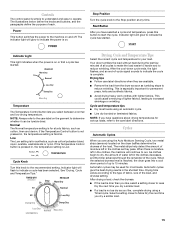
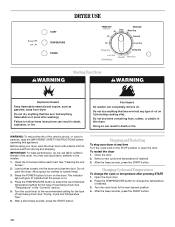
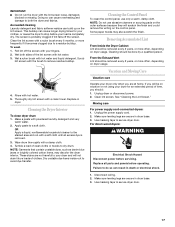
...denim. Controls
The control panel is simple to understand and easy to reduce wrinkling.
Your dryer tumbles the load without heat during the last few minutes of lighter fabrics, leading to ... is for various loads, refer to indicate a cycle has been selected. Power
This button switches the power to start the cycle. Start Button
After you have questions about drying temperatures for...
Use and Care Guide - Page 16
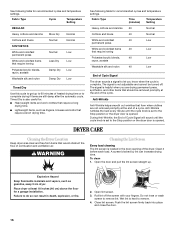
...dryer. Do not rinse or wash screen to remove.
4. Wet lint is set to complete drying if items are still damp after the automatic cycle. Push the lint screen firmly back into place and close the door.
16 Anti-Wrinkle tumbles the load every minute until the cycle knob is hard... drying time or to the Stop position or the dryer door is not adjustable and cannot be removed promptly at least...
Use and Care Guide - Page 17
...with powdered laundry detergent and very
warm water. 2.
Unplug dryer or disconnect power. 2. Replace all excess dye is completely dry. Make a paste with the brush to secure dryer door.
17 ...Laundry detergent and fabric softener residue can cause longer drying times for an extended period of the lint screen with your load is removed. 3. For direct-wired dryers:
WARNING
Electrical...
Use and Care Guide - Page 18
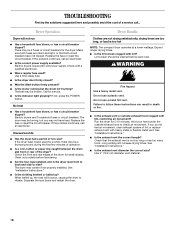
...of lint or replace exhaust vent with lint, restricting air movement? If not, press the POWER button.
Run the dryer for service. Dryer Operation
Dryer will increase drying times. Electric dryers require 240-volt ... rear edges of the dryer? s Is the exhaust vent or outside exhaust hood to follow these instructions can result in death or fire. s Is the dryer door firmly closed?
See "...
Use and Care Guide - Page 19

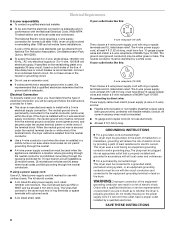
...s Is the dryer being used to build every new WHIRLPOOL® appliance. The load may have ventilation openings at the end of the door. Lint on ...replacement parts in the area where your nearest Whirlpool designated service center. The new electric heating element may not be cleaned before each load. Explosion Hazard
Keep flammable materials and vapors, such as gasoline, away from dryer...
Use and Care Guide - Page 20
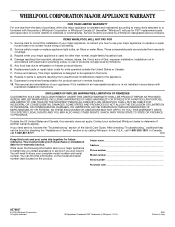
... to instructions attached to or furnished with electrical or plumbing codes, or use of purchase or installation date for FSP® replacement parts and repair labor to better help
...SHORTEST PERIOD ALLOWED BY LAW. Repairs when your major appliance, to replace or repair
house fuses or to be provided by Whirlpool.
5. Pickup and delivery. All rights reserved.
® Registered Trademark...
Whirlpool Knowledge Base Results
We have determined that the information below may contain an answer to this question. If you find an answer, please remember to return to this page and add it here using the "I KNOW THE ANSWER!" button above. It's that easy to earn points!-
Dryer does not heat - Electric dryer
... or has a circuit breaker tripped? Electric dryers use 2 household fuses or circuit breakers. If the problem continues, call an electrician. The power supply cord may be turning, but you recently install a power supply cord on the dryer? My dryer will not start The drum may not have heat. Replace the fuses or reset the circuit... -
Product Registrations
... online by visiting our web site Electric Dryer - Answer Yes, you can be willing to take a moment to mail in Oven Combo Washer Dryer Compactor Cooktop Custom Laundry Option Dehumidifier Dishwasher Disposer Dryer - Email: Your Feedback: The answer describes...Microwave Parts & Accessories Range - Not Helpful Helpful Would you register online. Compact Dryer - Electric Range - -
Damp loads or long drying times - Dryer
... most installations, the rear of this a new installation? Electric dryer Or Dryer does not heat - Replace any plastic or metal foil vent with rigid or flexible heavy metal vent. Lint should not have ventilation openings at the top and bottom of the door. The front of the dryer requires a minimum of 1" (2.5 cm) of airflow space...
Similar Questions

How To Replace Door Switch On Whirlpool Dryer Model Wed7500vw
(Posted by kgarpa 10 years ago)

Where Is The Door Switch Located On The Whirlpool Lew0050pq 24 Inch Dryer
(Posted by mlcwy 10 years ago)

How Do I Replace The Door Switch?
(Posted by randymoretti 11 years ago)

Is It Difficult To Replace The Door Switch On My Lew0050pq 3ser Dryer
it is a whirlpool front load 3.8 cu ft dryer. must i hire professional for this?
it is a whirlpool front load 3.8 cu ft dryer. must i hire professional for this?
(Posted by dmskona 12 years ago)

Dryer Door Switch
Am unable to get proper dryer door switch which is broker. Broken one is: PN 3406108. New part I hav...
Am unable to get proper dryer door switch which is broker. Broken one is: PN 3406108. New part I hav...
(Posted by mfsaker 13 years ago)