
Whirlpool LER4634PT Support Question
Whirlpool LER4634PT Support Question
Find answers below for this question about Whirlpool LER4634PT.Need a Whirlpool LER4634PT manual? We have 2 online manuals for this item!
Question posted by scottoe69 on July 20th, 2020
Won't Run !
replaced heating element and thermostat pluged it in and it won't run ! What's wrong Now ?
Current Answers
Answer #1: Posted by Odin on July 20th, 2020 7:57 AM
Odin

Member since:
April 10th, 2010 Points: 41,236,690

Member since:
April 10th, 2010 Points: 41,236,690
Hope this is useful. Please don't forget to click the Accept This Answer button if you do accept it. My aim is to provide reliable helpful answers, not just a lot of them. See https://www.helpowl.com/profile/Odin.
Related Whirlpool LER4634PT Manual Pages
User Instructions - Page 1
... number in -warranty service. You must provide proof of Contents / Índice
ASSISTANCE OR SERVICE 1 DRYER SAFETY 2 DRYER USE 4 DRYER CARE 5 TROUBLESHOOTING 6 WARRANTY 7
AYUDA O SERVICIO TÉCNICO 9 SEGURIDAD DE LA SECADORA 9 USO DE...call 1-800-442-9991 or visit our website at the top inside dryer door well. Write down the following information about your sales slip together for in ...
User Instructions - Page 2
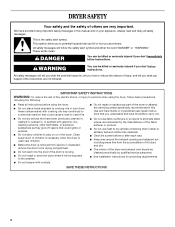
...if the instructions are very important. s Before the dryer is used near children. s Do not repair or replace any part of the dryer or attempt any servicing unless specifically recommended in this manual...shock, or injury to play on your dryer. rounding areas free from service or discarded, remove the door to carry out. This is moving. s Do not use heat to the weather. Always read and ...
User Instructions - Page 3
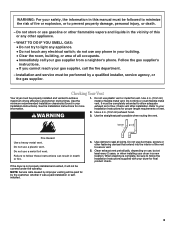
... in death or fire. WARNING
1. Failure to follow the Installation Instructions supplied with your dryer for by a qualified installer, service agency, or the gas supplier. NOTE: Service calls... of this manual must be covered under the warranty. Check vent after installation. If the dryer is complete, be performed by the customer, whether it will be properly installed and vented ...
User Instructions - Page 4
...load from storing and shipping.
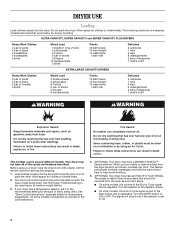
1. This feature periodically tumbles, rearranges and fluffs the load without heat to medium weight fabrics.
3. s On some models, temperature is helpful when drying items ... Cycle Control knob to follow these instructions can completely remove oil. If your dryer, wipe the dryer drum with a damp cloth to follow these instructions can form. The signal ...
User Instructions - Page 5

...filled)
Drying
Stuffed toys/pillows Foam rubber filled
Air
N/A
(no heat)
90 min. IMPORTANT: s Do not run the dryer with your dryer anytime during removal, check the exhaust hood and remove the lint.... stained area of the dryer. Lower the front legs to dry the drum. to remove residue buildup. 3. Pull the lint screen straight up. As Needed Cleaning
1. Replace screen
in death, explosion...
User Instructions - Page 6
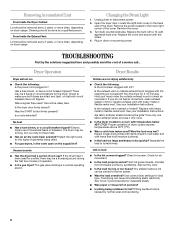
... fuses or breakers.
Run the dryer for air movement. ...heat
s Has a fuse blown, or a circuit breaker tripped?
If you may be removed every 2 years, or more often, depending on dryer usage. s Is the dryer located in the lower right corner of dryer...Replace with the screw.
4.
s Is pilling being dried. Replace the bulb with lint? s Has an air dry cycle been selected? Dryer...
User Instructions - Page 7
... dark colors. Check the manufacturer's care label. Dry smaller loads that can stain your dryer, to replace house fuses or correct house wiring or reset circuit breakers, or to correct the installation ...Loads are wrinkled
s Was the load removed from state to load type.
The new electric heating element may not apply to or furnished with local electrical and plumbing codes, or use FSP®...
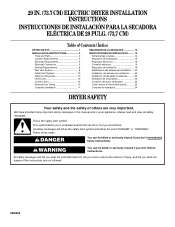
Installation Instructions - Page 1
... 4 Venting Requirements 8 Plan Vent System 8 Install Vent System 10 Install Leveling Legs 10 Level Dryer 10 Connect Vent 10 Reverse Door Swing 10 Complete Installation 11
SEGURIDAD DE LA SECADORA 12
INSTRUCCIONES DE...22 Cómo invertir el cierre de la puerta 23 Complete la instalación 24
DRYER SAFETY
Your safety and the safety of injury, and tell you what can happen if ...
Installation Instructions - Page 2
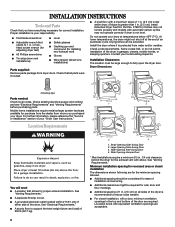
... fire. Some codes limit, or do so can be large enough to support the total weight (dryer and load) of an automatic cycle. Contact your responsibility.
You will need s A location that ...of installation and servicing. Check that all sides of 1 in. (2.5 cm) under entire dryer. (If slope is not level. Mobile home installations require metal exhaust system hardware available for ...
Installation Instructions - Page 3
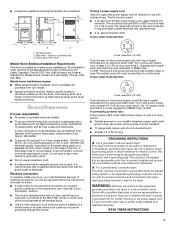
...terminals with all local codes and ordinances. For a grounded, cord-connected dryer: This dryer must be run with ring or spade terminals and UL approved strain relief.
closet or... or non-metallic sheathed copper cable (with vents
Mobile Home-Additional Installation Requirements
This dryer is properly installed and grounded in conformance with ring or spade terminals and UL approved...
Installation Instructions - Page 4
... wires to hold -down screw location 5. Tighten strain relief screws just enough to remaining 2 terminals (gold). The strain relief should have a tight fit with the dryer cabinet and be in . (1.9 cm) UL approved strain relief (UL marking on strain relief) into the hole below terminal block opening . External ground connector 3.
Failure...
Installation Instructions - Page 5

...block screw.
12
3
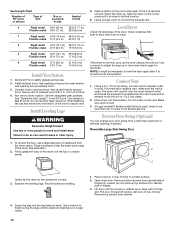
1. Neutral prong 5. External ground connector 4. Dotted line shows position of dryer rear panel. Center silver-colored terminal block screw 3. Connect neutral wire (white or center wire)...*
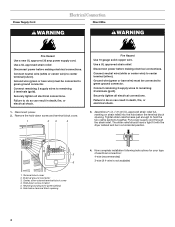
4-wire connection: Direct Wire
A UL listed, 120/ 240 volt minimum, 30 amp., dryer power supply cord*
3-wire connection:
Power Supply Cord
3-wire direct
1
A fused disconnect or...
Installation Instructions - Page 6

... 3. 4-wire connection: Direct Wire
IMPORTANT: A 4-wire connection is required for mobile homes and where local codes do not permit the use of extra length so dryer can be moved if needed. Direct wire cable must have 5 ft (1.52 m) of 3-wire connections. Tighten screw.
3
4
5
2
When connecting to external ground conductor screw. Spade...
Installation Instructions - Page 7
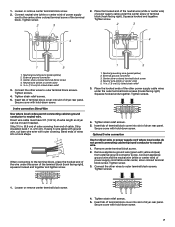
... to neutral wire. 1. Neutral grounding wire (green/yellow) 2. Place the hooked ends of extra length so dryer can be moved if needed. 1. Tighten screws.
4. Tighten screw.
2
3
4
4
1
5
1. Neutral... center terminal block screw.
2. Connect neutral wire (white or center wire) of dryer rear panel. Squeeze hooked end together. Center silver-colored terminal block screw 4. Tighten...
Installation Instructions - Page 8
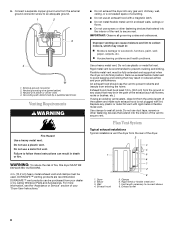
... using an existing vent system, clean lint from the external ground connector screw to secure vent. Replace any gas vent, chimney, wall, ceiling, or a concealed space of the exhaust (such as...enclosed walls, ceilings or floors. Plan Vent System
Typical exhaust installations Typical installations vent the dryer from entering the home. Neutral wire (white or center wire) 4. DURASAFE™ ...
Installation Instructions - Page 9
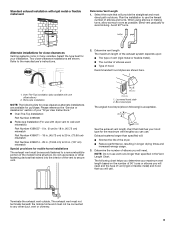
...in . (127 cm) mismatch
Special provisions for the maximum vent lengths you will use the fewest number of the dryer. NOTE: Do not use . Terminate the exhaust vent outside. Two close-clearance installations are shown here.
2
... you will need.
Determine the number of elbows you can use vent runs longer than specified will provide the straightest and most direct path outdoors. ...
Installation Instructions - Page 10
...to dryer location. Run vent to exhaust hood. Avoid 90º turns. Failure to do not remove) top screws from cabinet side of hinges.
3. Firmly grasp the body of the dryer. Slide the dryer ... cardboard from a right-side opening to a left-side opening around exhaust hood. 3. Make sure dryer is level.
3. (On gas models) If flexible metal tubing is close to seal exterior
wall ...
Installation Instructions - Page 11
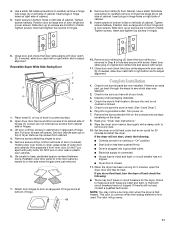
...Dryer is closed.
11. s Dryer door is plugged into a grounded outlet. If you do not remove) top screws from cabinet. 4. If there is first used. This odor is common when the heating element is still no heat... or right within slot to adjust alignment. When the dryer has been running or "On" position.
The odor will not start the dryer. Position door so large end of hinge.
10. ...
Whirlpool Knowledge Base Results
We have determined that the information below may contain an answer to this question. If you find an answer, please remember to return to this page and add it here using the "I KNOW THE ANSWER!" button above. It's that easy to earn points!-
My dishwasher has an odor
... or three days? Solution: Remove plastic parts from heater after cleaning the interior. Run the dishwasher through a normal cycle with a varnish. These innovative tablets provide a powerful, ... dishwasher safe plastics in the Order Review and Payment screen when you have fallen onto the heating element during a cycle. Use an air-dry or an energy-saving dry option. Is there... -
Nothing will operate on my built-in electric convection oven
... on your appliance light up? Has a household fuse blown, or has a circuit breaker tripped? Replace the fuse or reset the circuit breaker. If you do not have your Use and Care Guide,...functioning fine. Consult your Use and Care Guide for instructions on turning it should? Heating elements will operate on my built-in electric convection oven Why won't anything operate on the range... -
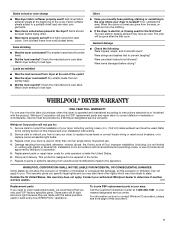
My dryer or load has an odor
... Knowledgebase search tips My dryer makes sounds or vibrations Dryer does not heat - Was a damp or wet load left in the washer or dryer for the first time? (Electric dryers) A new electric heating element may have an odor. Dryer The odor is on the load because the dryer pulls in the area where your dryer is too hot - Find...
Similar Questions

Dryer Is Not Producing Heat On Any Setting Including Air Only.
I have done some research and haven't been able to test with a multimeter.i did find one of my wifes...
I have done some research and haven't been able to test with a multimeter.i did find one of my wifes...
(Posted by RJVINCE777 9 years ago)

How To Replace Heating Element On Whirlpool Dryer Model Wed4800xq1
(Posted by birdjXDa 9 years ago)

Install New Heat Element, Dryer Still Not Heating
install new heat elemen, dryer still not heating need help on what could be wrong. the dryer runs, c...
install new heat elemen, dryer still not heating need help on what could be wrong. the dryer runs, c...
(Posted by hayesp84 10 years ago)

Where Is The Heating Element On My Ler4634 Jqo Dryer
(Posted by jontravis1 11 years ago)
Where Is The Heating Element On My Dryer Located
where is the heating element located on my whirlpool dryer mod no. LER4634PQ0
where is the heating element located on my whirlpool dryer mod no. LER4634PQ0
(Posted by chaunceeyoung 11 years ago)