Whirlpool GEW9250SU Support Question
Whirlpool GEW9250SU Support Question
Find answers below for this question about Whirlpool GEW9250SU.Need a Whirlpool GEW9250SU manual? We have 1 online manual for this item!
Question posted by Tacopsinc on June 9th, 2020
Washer Not Powering Up
condensation built up inside machine .Power button and settings wont power on.Interior light works.Model:GEW9250SUO
Current Answers
Answer #1: Posted by Odin on June 9th, 2020 5:58 PM
Odin

Member since:
April 10th, 2010 Points: 41,236,700

Member since:
April 10th, 2010 Points: 41,236,700
See https://www.repairclinic.com/RepairHelp/How-To-Fix-A-Dryer/1-5-902389-/New/Whirlpool-Dryer-Won-T-Start-gew9250su0.
If the issue persists or if you require further advice--or if these instructions don't seem to apply to your model--you'll have to consult the manufacturer. (Use the contact information at https://www.contacthelp.com//customer-service.)
If the issue persists or if you require further advice--or if these instructions don't seem to apply to your model--you'll have to consult the manufacturer. (Use the contact information at https://www.contacthelp.com//customer-service.)
Hope this is useful. Please don't forget to click the Accept This Answer button if you do accept it. My aim is to provide reliable helpful answers, not just a lot of them. See https://www.helpowl.com/profile/Odin.
Related Whirlpool GEW9250SU Manual Pages
Use and Care Guide - Page 1
www.whirlpool.com
Table of Contents 2
W10049540 ®
®
ELECTRONIC ELECTRIC DRYER
Use & Care Guide
For questions about features, operation/performance, parts, accessories or service, call: 1-800-253-1301 or visit our website at...
Use and Care Guide - Page 2
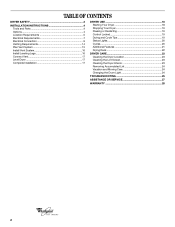
... Complete Installation 17
DRYER USE 18 Starting Your Dryer 18 Stopping Your Dryer 19 Pausing or Restarting 19 Control Locked 19 Drying and Cycle Tips 19 Status Lights 20 Cycles 20 Additional Features 21 Drying Rack 22
DRYER CARE 23 Cleaning the Dryer Location 23 Cleaning the Lint Screen 23 Cleaning the Dryer Interior 23 Removing Accumulated Lint...
Use and Care Guide - Page 3
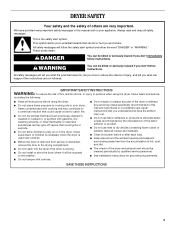
... as they give off vapors that could ignite or explode. s Clean lint screen before using the dryer. s The interior of others . Items contaminated with controls. s Before the dryer is removed from the accumulation of children is necessary when the dryer is , tell you how to reduce the chance of the fabric softener or product...
Use and Care Guide - Page 4
...starting installation.
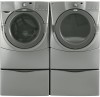
To do so, you purchased your DUET® washer and dryer?
You will need to the total height of the dryer for installing new exhaust vent)
s Tin snips (new vent ... cm) or 53.5" (135.9 cm), respectively. For a garage installation, you placing the dryer on a pedestal. s Flat-blade screwdriver
s #2 Phillips screwdriver
s Adjustable wrench that all parts...
Use and Care Guide - Page 5
... (Diamond Dust [Silver]). If you are installing your DUET® washer and dryer and wish to avoid having loose items fall behind the machines during operation. At lower temperatures, the dryer might not shut off at least 9" (22.9 cm) above the floor. The dryer must be installed or stored in garages, closets, mobile homes or...
Use and Care Guide - Page 6

...68.6 cm) (2.5 cm)
*Required spacing **For side or bottom venting, 0" (0 cm) spacing is allowed.
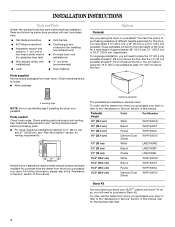
6 Recessed area B.
Dryer only
14" max.* (35.6 cm)
18" min.* (45.72 cm)
48 in.2* (310 cm2)
3"* (7.6 cm)
24 in...Required spacing **For side or bottom venting, 0" (0 cm) spacing is allowed. This dryer has been tested for ease of the door are acceptable. s For closet installation, with...
Use and Care Guide - Page 7
...built after 1996, and all local codes and ordinances. Connect to install with a 3-wire electrical supply connection. s Do not use an extension cord.
s This dryer...white wire) of the line.
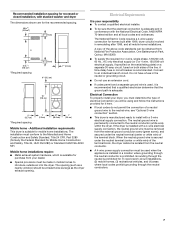
s A 4-wire power supply connection must be made in a location where... for recessed or closet installation, with stacked washer and dryer
The dimensions shown are for the recommended spacing...
Use and Care Guide - Page 8

... cord: if it will reduce the risk of electric shock by a qualified electrician. s For a permanently connected dryer: This dryer must be connected to the dryer must be run with all local codes and ordinances.
The 4-wire power supply cord, at least 4 ft (1.22 m) long, must be plugged into an appropriate outlet that connect to...
Use and Care Guide - Page 9
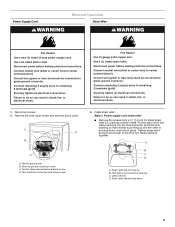
...hold-down , and hold in place. External ground conductor screw C. Style 1: Power supply cord strain relief s Remove the screws from a ³⁄₄" (1.9 cm) UL ...listed strain relief (UL marking on strain relief). Disconnect power before making electrical connections.
Connect remaining 2 supply wires to center terminal (silver).
Strain...
Use and Care Guide - Page 10
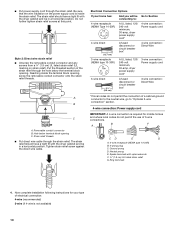
... (UL marking on the power supply cord is not available)
10 Put the threaded section of electrical connection: 4-wire (recommended) 3-wire (if 4-wire is inside the terminal block opening C....NEMA type 10-30R)
A UL listed, 120/ 240-volt minimum, 30-amp, dryer power supply cord*
3-wire connection: Power supply cord
3-wire direct
3¹⁄₂" (8.9 cm)
A fused disconnect or circuit...
Use and Care Guide - Page 11

...screws.
5. Connect neutral ground wire and the neutral wire (white or center wire) of power supply cord under the screw of the wire under center, silver-colored terminal block screw....into a hook shape.
Shape ends of dryer rear panel.
Remove center silver-colored terminal block screw. 2. Remove neutral ground wire from end of power supply cord to center silver-colored terminal block...
Use and Care Guide - Page 12

... or bare) of cable.
Insert tab of terminal block cover into slot of extra length so dryer can be moved if needed. Ring terminals G. Strip 3¹⁄₂" (8.9 cm) of outer covering from end of power supply cable C. ¾" (1.9 cm) UL listed strain relief D. Tighten screw. Tighten screw. A. Tighten screws.
5. You have...
Use and Care Guide - Page 13

... screw. Place the hooked end of the neutral wire (white or center wire)
of direct wire cable under the center screw of power supply cord/cable under the screw of dryer rear panel. Neutral ground wire C. Squeeze hooked ends together. A. Tighten screws.
4. When connecting to neutral wire.
1. Remove neutral ground wire from...
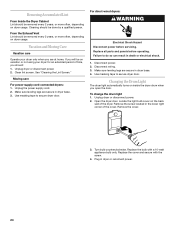
Use and Care Guide - Page 17
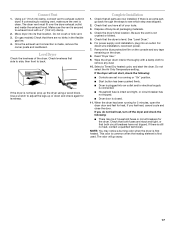
... was skipped.
2. For direct wire installation, reconnect power.
7. Remove the blue protective film on the console and any dust.
10. s Start button has been pushed firmly.
If there is clean. Level Dryer
Check the levelness of /recycle all parts are no heat, contact a qualified technician. Wipe the dryer drum interior thoroughly with a 4" (10.2 cm) clamp...
Use and Care Guide - Page 18

...
then press the CONTROL ON button. Failure to follow these instructions can result in death or fire. As the cycle runs, the control senses the dryness of the cycle based on it (including cooking oils). Failure to starting your dryer. Place laundry into dryer and shut door. 3.
The preset settings and drying time for the...
Use and Care Guide - Page 20
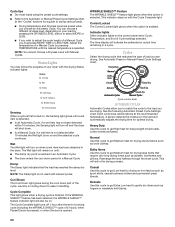
...button to adjust the cycle length of a Manual Cycle, you must press MORE TIME or LESS TIME. This indicator stays on and the selected cycle continues. Cycles
Select the drying cycle that the load has reached the damp dry level.
s The dryer enters the cool down . Laundry is selected. Cycle Complete This light...Damp The Damp light indicates that matches the type of Cycle settings selected. The ...
Use and Care Guide - Page 21
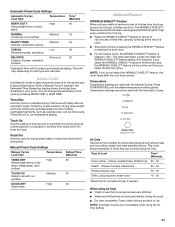
...s Shake and fluff pillows by pressing the WRINKLE SHIELD™ feature or opening the dryer door. Lightweight garments, such as exercise wear, can form. Quick Dry
Use this cycle ...that need a short drying time. Manual Preset Cycle Settings
Manual Cycles Load Type
Temperature
TIMED DRY Heavyweight items, bulky items, bedspreads, work clothes
High
TOUCH UP Helps to smooth out wrinkles
...
Use and Care Guide - Page 23
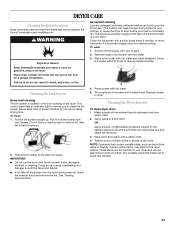
...laundry detergent and very
warm water. 2. Make a paste with hot water. 5. These stains are removed.
3.
The control panel has an indicator light to remind you to avoid dye transfer.
23 Cleaning the Dryer Interior
To clean dryer... stains are not harmful to stop before each load. Dry unstable dye items inside out to clean the lint screen before your fingers. Clean the lint screen ...
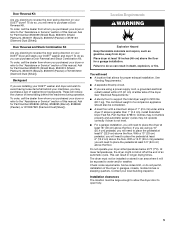
Use and Care Guide - Page 24
.... Open the dryer door. Locate the light bulb cover on inside the dryer drum when you should: 1. If you are secure in dryer base. 4. Unplug the power supply cord. 2. Use masking tape to secure dryer door. Plug in death or electrical shock.
1. Disconnect wiring. 3. Use masking tape to secure dryer door. Changing the Drum Light
The dryer light automatically turns on...
Use and Care Guide - Page 25
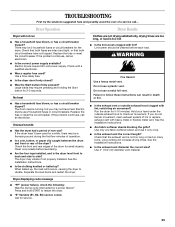
... the Installation Instructions.
Unusual sounds
s Has the dryer had a period of a service call... The dryer may require pressing and holding the Start button for small objects.
Dryer displaying code message
s "PF" (power failure), check the following: Was the drying cycle interrupted by a power failure? Electric dryers require 240-volt power supply.
There may not have not...
Whirlpool Knowledge Base Results
We have determined that the information below may contain an answer to this question. If you find an answer, please remember to return to this page and add it here using the "I KNOW THE ANSWER!" button above. It's that easy to earn points!-
Lint is on the load - Top-load HE washer with Dispensers in Corners
...laundry load. Always check all pockets and the interior of a dryer removes lint from lint takers (corduroys, synthetics, permanent press). The air movement and tumbling of the washer prior to create more lint in the load if the washer...color-lights with lights and darks with Dispensers in my Cabrio HE washer. Is your laundered items when line drying. Top-load HE washer with... -
Display shows rL or F34 - Front-load washer
...; find it by entering your model number in the washer or reconnect the power. To remove the error display, press Pause/Cancel once. Plug in the search tool below. Front-load washer Display shows F22 or FdL - If Pause/Cancel does not work: Unplug the washer or disconnect the power for details; Front-load... -
Display shows LF - Top-load washer with Dispensers in Corners
...from being continuously sucked out of the machine (siphoning) as it fills. See the...valves in Corners The drain hose should be too far inside the drainpipe (standpipe) or laundry tub. There must be a gap between the drain ...properly operate with agitators. If Pause/Cancel does not work: Unplug the washer or disconnect the power for service. Plug in Corners Display shows uL -...
Similar Questions

Cabrio Dryer Wont Run Sensing Light On
(Posted by kamlo 9 years ago)

Whirlpool Duet Dryer Manual Button Will Not Work Model Wed9500tw1
(Posted by pruitma 10 years ago)

Cabrio Dryer Wont Start Sensing Light
(Posted by mrtallcze 10 years ago)
How Do You Unlock A Whirlpool Duet Model Gew9250pwo Dryer
(Posted by pagosavet 10 years ago)

My Dryer Has Power And Lights Up But It Will Turn On
(Posted by yannier2002 10 years ago)