
Weider 8620 Support Question
Weider 8620 Support Question
Find answers below for this question about Weider 8620.Need a Weider 8620 manual? We have 1 online manual for this item!
Question posted by npriscilla on April 24th, 2020
Bolts
Can I purchase bolts to attach the removable press forward arms on the Weider?
Current Answers
Answer #1: Posted by techyagent on April 24th, 2020 7:05 PM
techyagent

Member since:
June 17th, 2014 Points: 4,799,800

Member since:
June 17th, 2014 Points: 4,799,800
You can buy the parts from the link given below:-
https://www.searspartsdirect.com/search?q=weider%208620
Thanks
Techygirl
Answer #2: Posted by Savior91 on April 26th, 2020 3:26 PM
Savior91

Member since:
April 25th, 2020 Points: 42,150
Member since:
April 25th, 2020 Points: 42,150
Over time, parts of your Weider weight system can wear out or break. When that happens, trust Sears PartsDirect to have the Weider replacement parts you need to fix the problem.
Check out their website to purchase the parts of Weider 8620
https://www.searspartsdirect.com/combo/1490-1234713/weider-weight-system-parts
Related Weider 8620 Manual Pages
English Manual - Page 2
...WEIDER is made must be free from state to the terms set forth above is limited to the original purchaser. Limited Warranty
ICON Health & Fitness... date of purchase.
Some states do not allow limitations on how long an implied warranty lasts. Remove the EXPLODED DRAWING... DRAWING/PART LIST and a PART IDENTIFICATION CHART are attached to you. No other rights which warranty claim is...
English Manual - Page 3
...with pre-existing health problems. Read all users of this manual and in any time while exercising, stop immediately and make sure that could cause the home gym system to tip.
11....before using the home gym system.
3. Read all parts often. Never release the press arm, butterfly arms, leg lever, lat bar, leg press plate, or nylon strap while weights are on a level surface. Use the home ...
English Manual - Page 4
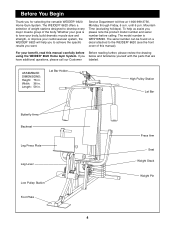
... Pulley Station Foot Plate
4
Press Arm Seat
Weight Stack Weight Pin Whether your goal is WESY85290. Mountain Time (excluding holidays).
Length: 59 in . Before You Begin
Thank you , please note the product model number and serial number before Before reading further, please review the drawing using the WEIDER¨ 8620 Home Gym System. To...
English Manual - Page 5
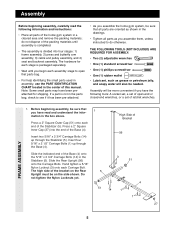
...area and remove the packing materials; Press a 2Ó Square Inner Cap (27) into four stages: 1) frame assembly, 2) press and butterfly arm assembly,...each assembly stage to see if it has been pre-attached.
¥ As you have the following information and...Stabilizer (5). Insert four 5/16Ó x 2 1/2Ó Carriage Bolts (1) up through the Base (4). Do not tighten the Nylon Locknuts...
English Manual - Page 6
...55
44 3
56
3
49 Crossbar
42
4 25
Pin Groove 19
4ÑBracket
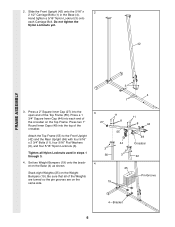
6 Press a 2Ó Square Inner Cap (27) into each Carriage Bolt.
Be sure that all Nylon Locknuts used in the Base (4). Hand tighten a 5/16...FRAME ASSEMBLY
3
4 1
3. Press two 1Ó Round Inner Caps (49) into the top of the Top Frame (55). Stack eight Weights (25) on the Base (4) as shown. Attach the Top Frame (55) to...
English Manual - Page 7
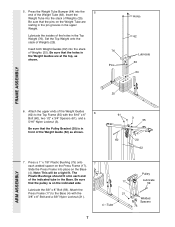
... upper ends of the Weight Tube (63). Note: This will be a tight fit. Attach the Press Frame (17) to the Top Frame (55) with the 3/8Ó x 8Ó Bolt and a 3/8Ó Nylon Locknut (21).
21
4 ÑTube
Welded Spacers
75
7
ARM ASSEMBLY Press the Weight Tube Bumper (64) into place on the Weight Tube are at the...
English Manual - Page 8
... Inner Cap (49) into the lower ends of the Press Frame (17) with soapy water. Note the position of the handle. Arm identification is behind the indicated bracket on the Press Arm with two 5/16Ó x 2 1/2Ó Bolts (22) and two 5/16Ó Nylon Locknuts (3). Attach the Left Arm (47) in the inset drawing. Wet the handle...
English Manual - Page 9
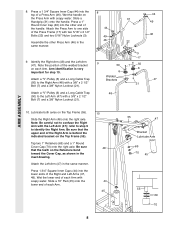
.... The bracket on the Seat
Frame must be behind the Press Frame
(17). Attach the Leg Lever (29) to the Rocker Arm (32) with the 3/8Ó x 2 1/2Ó Bolt and a 3/8Ó Nylon Jam Nut (33).
Attach the Rocker arm (32) to the Base (4) with two 5/16Ó x 2 3/4Ó Bolts (11),
8
two 5/16Ó Flat Washers (8), and two 5/16...
English Manual - Page 10
... the indicated 3 1/2Ó Pulley (15)
15
attached to turn freely.
14 23 58
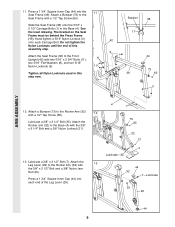
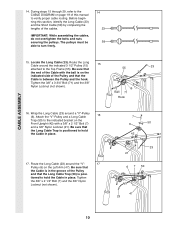
15. Tighten the 3/8Ó x 3 3/4Ó Bolt (71) and the 3/8Ó
Nylon Locknut (not...Attach the ÒVÓ-Pulley and a Long Cable
16
Trap (50) to hold the Cable in the groove of the Pulley and that the Long Cable Trap (50) is posi-
Before beginning this manual to the CABLE DIAGRAM on the Left Arm...
English Manual - Page 11
...the 3/8Ó x 2Ó Bolt (12)
55
and the 3/8Ó Nylon Locknut (21). Be sure
that the Cable Trap is
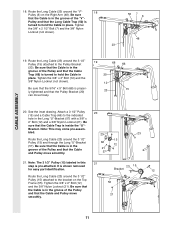
turned to the bracket on the Right Arm (48). Route the Long ...Attach a 3 1/2Ó Pulley
20
(15) and a Cable Trap (66) to hold the Cable in the groove of the Pulley and that the Long Cable Trap (50) is inside the ÒUÓ-
Be sure that the Cable is shown removed...
English Manual - Page 12
...a 3/8Ó x 3 1/2Ó Bolt (16), a 3/8Ó Flat Washer ...attached. Wrap the Short Cable (58) around a ÒVÓ- Attach the Pulley to hold the Cable in place and that the Cable is turned to the Rocker Arm (32) with a 3/8Ó x 2 1/2Ó Bolt (7)
and a 3/8Ó Nylon Locknut (21). Tighten the 3/8Ó x 3 1/2Ó Bolt... x 3 3/4Ó Bolt (71).
25 42
71...Attach the Pulley...
English Manual - Page 13
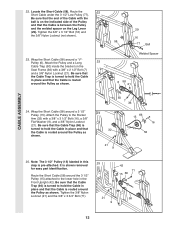
...removed for easy part identification. Note: The 3 1/2Ó Pulley (15) labeled in the
inset drawing.
2 57
10
58
CABLE ASSEMBLY
2
10
57
58
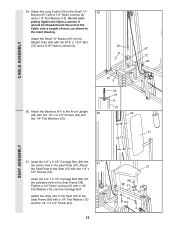
13 It is pre-attached... upper hole in the Press Frame (17).
Attach the end of threads are
showing above the ... 3/8Ó Nylon Locknut (21) and the 3/8Ó x 3 1/2Ó Bolt (16).
27. Do not
completely tighten the Nylon Locknut. Note: The 3...
English Manual - Page 14
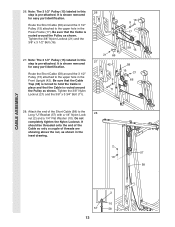
...) into
31
the center hole in the Seat Plate (37).
CABLE ASSEMBLY
29. Do not com- Insert the 1/4Ó x 2 1/2Ó Carriage Bolt (38) into the indicated hole in
the inset drawing. Attach the Small ÒUÓ-Bracket (67) to the Small ÒUÓ-
29
Bracket (67) with a 1/4Ó Flat Washer (10) onto...
English Manual - Page 15
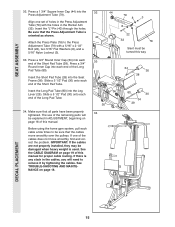
...remaining parts will need to the Press Adjustment Tube (79) with the holes in the Press Adjustment Tube (79) with a 5/16Ó x 2 1/2Ó Bolt (22), two 5/16Ó...Arm (32). See the CABLE DIAGRAM on page 16 of the cables does not move smoothly over the pulleys. Insert the ÒLÓ-Pin (40) through the holes. Attach the Press Plate (78) to remove it by tightening the cables. Press...
English Manual - Page 16
... Weights, and turn the bent end downward.
The weight setting of the weight stack can be attached in increments of 12.5 pounds.
Refer to the exercise poster accompanying this manual to see ADJUSTING AND REMOVING THE LEG PRESS PLATE AND ADJUSTMENT TUBE and LOCKING THE LEG LEVER on page 17 to find the approximate...
English Manual - Page 17

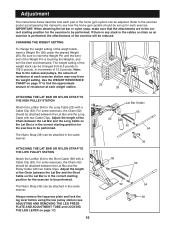
... (29) must be locked in the Press Adjustment Tube with the set of the Leg Press Plate (78), remove the ÒLÓ-Pin (40) from the Press Adjustment Tube (79) and the Rocker Arm (32).
Align a different set of holes in place. For some exercises, the Press Adjustment Tube (79) must be removed.
weight plates. The other numbers...
English Manual - Page 18
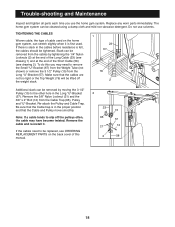
...: If a cable tends to the other hole in the Long ÒUÓ-Bracket
2
(57). Re-attach the Pulley and Cable Trap. Be sure that the cables are not too tight or the Top Weight (... the back cover of cable used . Slack can stretch slightly when it . Remove the 3/8Ó Nylon Locknut (21) and the
3/8Ó x 2Ó Bolt (12) from the Long ÒUÓ-Bracket (57). If the cables need...
English Manual - Page 21
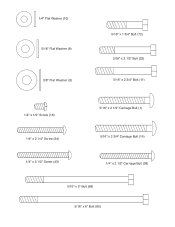
1/4" Flat Washer (10) 5/16" Flat Washer (8) 3/8" Flat Washer (9)
5/16" x 1 3/4" Bolt (72) 5/16" x 2 1/2" Bolt (22) 5/16" x 2 3/4" Bolt (11)
1/4" x 1/2" Screw (18) 1/4" x 2 1/4" Screw (24)
5/16" x 2 1/2" Carriage Bolt (1) 5/16" x 2 3/4" Carriage Bolt (14)
1/4" x 2 1/2" Screw (43)
1/4" x 2 1/2" Carriage Bolt (38)
5/16" x 5" Bolt (68) 5/16" x 6" Bolt (60)
English Manual - Page 23

...; Square Inner Cap 10Ó Pad Press Arm Left Arm Right Arm 1Ó Round Inner Cap Long Cable ...Bolt 1Ó Retainer 1Ó Round Cover Cap 3/8Ó x 3 3/4Ó Bolt 5/16Ó x 1 3/4Ó Bolt Bumper 1 1/8Ó x 2 1/2Ó Plastic Bushing 1Ó x 7/8Ó Plastic Bushing Top Weight 3 1/2Ó Low Pulley Leg Press Plate Press Adjustment Tube Long Pad Tube UserÕs Manual Exercise...
English Manual - Page 25
... No. 156863 J01539-C R0699A
Printed in Canada © 1999 ICON Health & Fitness, Inc. The SERIAL NUMBER of the product (see the PART LIST and EXPLODED...assist you, please be prepared to give the following information:
1.
until 6 p.m. The MODEL NUMBER of the product (WEIDER¨ 8620 Home Gym System).
3. The KEY NUMBER and DESCRIPTION of the part(s) (see the front cover of this manual)....
Similar Questions


Bolt Size
my machine came without bolts for the seat what size are they
my machine came without bolts for the seat what size are they
(Posted by Tswitt37 1 year ago)

I Need To Purchase Replacement Bolts. How Much Are They?
(Posted by jchavez99981 3 years ago)

What Is The Piece Sticking Out Between Your Legs When You Sit On A Weider 8620
plus the wierd piece sticking straight up that it is attached
plus the wierd piece sticking straight up that it is attached
(Posted by misssjx 4 years ago)

I'm Looking For The Exercise Manual For The Weider 200 Pound Bench Press.
I want to know if this machine is capable of doing standing cable row exercises
I want to know if this machine is capable of doing standing cable row exercises
(Posted by gallykg 9 years ago)