Get support for Uniden UDW20553

Uniden UDW20553 Support Question

Uniden UDW20553 Support Question

Find answers below for this question about Uniden UDW20553.
Need a Uniden UDW20553 manual? We have 3 online manuals for this item!
Question posted by stevenochoa20 on June 30th, 2011

Is There A Way Tomake Unidenudw20553big Wireless Big Camara Into A Wired Camara

HOW CAN I AND IT HAVE ALL FEATURES

Current Answers

Answer #1: Posted by kcmjr on June 30th, 2011 3:49 PM
This answer was accepted by the poster of the original question.
kcmjr

Member since:
May 5th, 2011

Points: 4,254,245
1,100
points
No, this cannot be done.

The camera is designed as a wireless device.  It has no connection available for a coaxial cable.

A radio engineer could modify it but it would be easier and less expensive to purchase one designed for a coax connection.

The user guide is here if you need a copy: http://www.helpowl.com/manuals/uniden-udw20553-english-owners-manual-fdc1e64.pdf


Licenses & Certifications: Microsoft, Cisco, VMware, Novell, FCC RF & Amateur Radio licensed.

Related Uniden UDW20553 Manual Pages

English Owners Manual - Page 1

Need Help? UDW20553 Video Surveillance System User's Manual What's in the box? Never use damaged products! Get answers 24/7 at our website: www.uniden.com. UDW20000 receiver with 7‑inch color display and remote control UDWC25 wireless weatherproof camera Accessory details are missing or damaged, contact our Customer Care Line immediately. Visit our website...
English Owners Manual - Page 2

...lightning, avoid handling any batteries in water. Check with the end user. Accessory Software CD Remote Control AV Cable USB Cable Extension Cord Camera Stand Receiver X X X X One Per Outdoor Camera X Indoor Camera X X AC Adapter X X X Important Safety Instructions! This manual contains important information about this manual. When using your equipment, always follow basic safety...
English Owners Manual - Page 3

...; Do not expose the equipment to high temperatures, and avoid leaving the equipment in direct sunlight for medial or parental supervision. Do not cover the camera or receiver with any object such as a substitution for more than a few minutes. SAVE THESE INSTRUCTIONS! For best results: To avoid damage to your equipment...
English Owners Manual - Page 4

... and tilt in zoom mode 16 Understanding Night Vision 16 Connecting to Your TV 17 Reducing pixellation 17 Multiple Camera Features 18 Pairing Cameras 18 Some things to know about pairing cameras 18 Changing to a Different Camera.........19 Setting Up a Scan 20 Using Quad Display 21 To enter quad display 21 To exit quad display...
English Owners Manual - Page 5

... outlet, and press the Power button on the remote control. Connect the other end of each camera and connect an AC adapter to the camera's power input pigtail. (If necessary, connect the extension cord to the camera's pigtail and connect the AC adapter to the receiver's power input. Antenna Registration Name: Registration Code...
English Owners Manual - Page 6

... time. Press the Power button on . a Power status light doesn't come on the state of the camera and receiver, you what they mean. Since the icons appear based on Try... --reconnecting the AC adapter ...Signal Signal status As soon as the receiver powers on, it detects the camera and shows the video on with the camera and receiver. The icons at the top of the screen tell you won...
English Owners Manual - Page 7

... 4. the signal status icon shows no signal from the camera. 1 2 3 4 The video currently on the display comes from the camera is turned on --re-pairing the camera and receiver (see page 18) see page 23 for... tips on improving video quality see page 24 for tips on the receiver Try... --making sure the camera is 1-low, 2-fair, 3-good, or 4-strong. There is currently zoomed in. The video is...
English Owners Manual - Page 8

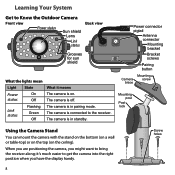
... pigtail Antenna connector Mounting bracket Bracket screws Pairing button Mounting Camera screw brace Mounting post Post lock Using the Camera Stand You can mount the camera with the stand on the bottom (on a wall or...-top) or on the top (on . Learning Your System Get to Know the Outdoor Camera Front view Power status Sun shield Lens Link status Back view Grooves for sun shield What...
English Owners Manual - Page 9

...the mounting bracket. 2. Remove the bolts on the stand to make sure it is securely in a hanging position, you want to mount the camera in place. 9 Use the included screws and anchors to attach the base to ... bracket off of the screw holes. 2. If necessary, adjust the camera angle, then replace and tighten the bolts. 2 Flip the bracket upside down and slide it back onto the...
English Owners Manual - Page 10

... tighten the wingnut to lock the post into place. 3. If the top of the mounting bracket (see page 9). Tighten the camera brace up against the camera to secure it in place. 1 Attach the camera to the mounting screw and turn it a few turns. 4. Unlock the mounting post by turning the wingnut to the mounting...
English Owners Manual - Page 11

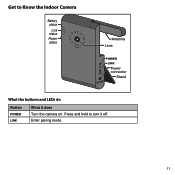
Get to turn it does Turn the camera on. Enter pairing mode. 11 Press and hold to Know the Indoor Camera Battery status Link status Power status Antenna Lens POWER LINK Power LINK connector Stand What the buttons and LEDs do Button POWER Link What it off.
English Owners Manual - Page 12

... Status State What it to a flat surface), you can place it on a wall or a ceiling (or even if you just want to secure it means On The camera is fully charged. Orange The camera is charging. Off The camera is in 3 minutes. Green The battery is connected to the mounting instructions with the outdoor...
English Owners Manual - Page 13

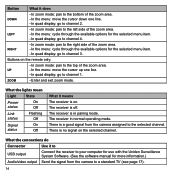
... POWER --Turn the receiver on. Get to Know the Receiver and Remote Display Antenna Link status Signal status Speakers IR sensor SELECT MENU/ DOWN LEFT CAMERA OK ZOOM POWER OK RIGHT UP What the buttons do Button What it off. Press and hold to the selected...
English Owners Manual - Page 14

... manual for the selected menu item. --In quad display: go to channel 3. The receiver is a good signal from the camera to the selected channel. There is in normal operating mode. There is off. Up --In the menu: move the cursor ... menu: cycle through the available options for more information.) Send the signal from the camera assigned to a standard TV (see page 17). 14
English Owners Manual - Page 15

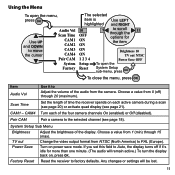
... Audio Vol Use it to Adjust the volume of the display. Scan Time Set the length of the four camera channels On (enabled) or Off (disabled). CAM1 - TV out Change the video output format from 1 (... display turns off ) through 15 (max). CAM4 Turn each of time the receiver spends on each active camera during a scan (see page 20) or activate quad display (see page 18). Any changes or settings ...
English Owners Manual - Page 16

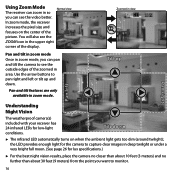
Tilt down . Pan and tilt features are only available in the upper right corner of the display. the LED provides enough light for the camera to capture clear images in deep twilight or under a ...conditions. Using Zoom Mode Normal view The receiver can zoom in so you can pan and tilt the camera to see the video better. 1 In zoom mode, the receiver increases the pixel size and focuses ...
English Owners Manual - Page 17

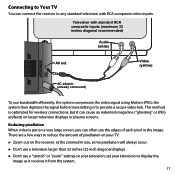
... method is put on a very large screen, you can often see the edges of pixellation on your television to provide a secure video link. Television with RCA composite video inputs. There are a few ways to reduce the amount of each pixel in size, some pixellation will always occur. ►► Don't use a television...
English Owners Manual - Page 18

Multiple Camera Features Your receiver supports a total of the accessory cameras. (See our website for compatible camera options.) Pairing Cameras Pairing is like introducing the camera and the receiver so they can communicate. You can 't control which camera the receiver will detect first. 18 If a channel is set it into pairing mode for 60 seconds. 5. Any cameras that came...
English Owners Manual - Page 19

..., the receiver goes to quad display, then back to the first camera. 1 2 3 4 12 34 ►► Each time you have a camera paired to that channel. ►► The receiver skips any channels... the next enabled channel, regardless of whether there is a camera present on that channel. Changing to a Different Camera ►► On the receiver, press to cycle through the enabled channels ...
English Owners Manual - Page 24

... interference: ►► electrical appliances, especially microwave ovens ►► computer equipment, especially wireless LAN equipment ►► other radio-based wireless devices, such as affected by the weak signal. There is interference. If the static is on all cameras --Check near the receiver for the source of interference. --Try moving the receiver...

Similar Questions

Ask a New Question
Use the box below to post a new question about this Uniden product .
Points & Prizes
  • You can earn points for nearly everything you do on HelpOwl.com
  • You can trade in those points for gift cards at leading retailers such as Amazon.com and Walmart
  • It's that simple!
See How it Works
Create a Free Account

Uniden Manuals

Find free Uniden UDW20553 manuals and user guides available at ManualOwl.com. Try out our unique manual viewer allowing you to interact with manuals from directly within your browser!

Uniden Reviews

View thousands of Uniden user reviews and customer ratings available at ReviewOwl.com.

Contact Information

Complete Uniden customer service contact information including steps to reach representatives, hours of operation, customer support links and more from ContactHelp.com.

Scoreboard Ratings

See detailed Uniden customer service rankings, employee comments and much more from our sister site.