Get support for Troy-Bilt TB6044 XP

Troy-Bilt TB6044 XP Support Question

Troy-Bilt TB6044 XP Support Question

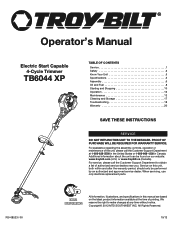
Find answers below for this question about Troy-Bilt TB6044 XP.
Need a Troy-Bilt TB6044 XP manual? We have 2 online manuals for this item!
Question posted by claborn on July 31st, 2023

Fuel System

How do the fuel lines rout properly?

Current Answers

Answer #1: Posted by khanjee on August 2nd, 2023 1:07 PM
This answer was accepted by the poster of the original question.
khanjee

Member since:
July 23rd, 2016

Points: 205,300
1,100
points
he fuel supply system is generally reliable and any problems that do occur are usually traceable to the pump , the fuel filter or the tank. Occasionally, however, the fault lies in the fuel line between the tank and the engine .

Pipes can suffer from two main faults: leaking or blockage. Probably the first indication you will get of a leak is the smell of petrol wafting into the car - don't delay in finding the problem, as the petrol vapour can be ignited easily.

Twin fuel-pipe system

Twin fuel pipes are checked for leaks in the same way as single ones.

Blocked pipes are usually very obvious - the car comes to a halt or suffers from fuel starvation. Thankfully this is now rare because fuel filters are fitted to remove dirt.

Types of pipe

The fuel line typically consists of rigid metal pipes, with flexible rubber or plastic hoses running from the pipes to the tank and the fuel pump , and from the pump to the carburettor . The flexibility of the hoses allows some movement between these different components. On some cars the rigid pipes are made of reinforced plastic rather than metal.

Types of pipe connectionsJubilee clip

Metal pipe connection

There are two types of common fuel pipe connections. One is a flexible pipe connection using a Jubilee clip. The other is a metal-to-metal connection. The metal pipe has a tapered flare at the end into which fits an olive. The two pipes are tightened together around the olive, which seals the jointInspection

A fault in the pipes and hoses, or in their connections, is a potential fire hazard, so you should check the system every year.

Disconnect the battery as a safety precaution against any possible sparks . Jack up the car and support it on axle stands. Carefully inspect the pipe along its whole length. Look especially carefully at the joints, checking for dark stains that indicate a leak. Use a spanner to check that all union pipe connections are tight.

Also check each metal pipe for rust - use a wire brush to remove any surface rust on the pipes. If the pipe is badly pitted underneath it should be replaced.

Inspect the flexible hose and connections too. Bend and twist them, looking for any splits. If the pipe has become hardened due to old age or is soft because of oil contamination, it should be replaced. Flexible pipes use several types of securing clip; make sure they are tight and not corroded.

Check the routing of the pipes, they should not run too close to hot engine parts such as the exhaust pipe or manifold . Check the pipe is secure in its clips and isn't chafing on anything.

If you found a pipe or hose that is badly damaged it will need replacing. Before you start work, drain the fuel from the tank into a suitable container and store it safely.


Please Accept my answer by providing you with the best possible solution. Would be more glade.
THANK YOU
Answer #2: Posted by HelpHero on August 3rd, 2023 8:54 PM
HelpHero

Member since:
September 3rd, 2022

Points: 523,380
100
points
To properly route the fuel lines on your Troy-Bilt TB6044 XP, please follow these steps:

1. Start by removing any remnants of the old fuel lines that may still be attached to the trimmer. Cut them off close to the fuel tank and carburetor using a pair of scissors or wire cutters.

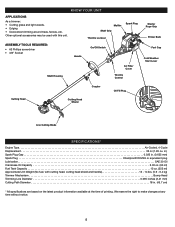
2. Locate the fuel tank. The fuel tank on the TB6044 XP is typically located near the rear handle of the trimmer.

3. Identify the fuel line connections on the fuel tank. There should be two connections: one for the fuel line from the carburetor and one for the return line (if applicable). The connections may be marked with labels like "in" and "out" or "main" and "return."

4. Cut a new piece of fuel line that matches the length of the original fuel line. Ensure the diameter of the replacement fuel line matches the original size as well (usually around 1/4 inch).

5. Slide one end of the fuel line onto the fuel tank connection marked for the fuel line from the carburetor. Ensure it fits snugly and securely onto the connection.

6. Next, locate the carburetor. The carburetor is typically located near the engine and has several fuel line connections.

7. Identify the appropriate fuel line connection on the carburetor for the fuel line. It may be marked with a label or a color code.

8. Cut another piece of fuel line that matches the length of the original line that connected to the carburetor. Slide one end onto the appropriate fuel line connection on the carburetor, ensuring a secure fit.

9. If there is a return line on your TB6044 XP, locate the second fuel line connection on the fuel tank marked for the return line.

10. Cut a new piece of fuel line for the return line and slide one end onto the appropriate fuel line connection on the fuel tank.

11. Finally, trim the excess fuel line if necessary, leaving a clean and tidy installation.

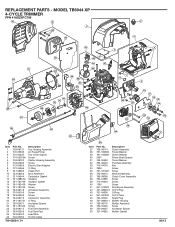
Please note that the exact configuration of the fuel lines may vary slightly between models or variations of the TB6044 XP. Refer to the trimmer's specific user manual or contact Troy-Bilt customer support for detailed instructions and diagrams if needed.

I hope this helps you properly route the fuel lines on your Troy-Bilt TB6044 XP trimmer! If you have any further questions, feel free to ask.


I hope this is helpful? PLEASE "ACCEPT" and mark it "HELPFUL" to complement my little effort. Hope to bring you more detailed answers.

Helphero

Related Troy-Bilt TB6044 XP Manual Pages

Operation Manual - Page 1

... the unit can be performed by an authorized and approved service dealer. Operator's Manual Electric Start Capable 4-Cycle Trimmer TB6044 XP TABLE OF CONTENTS Service 1 Safety 2 Know Your Unit 5 Specifications 5 Assembly 6 Oil and Fuel 8 Starting and Stopping 10 Operation 12 Maintenance 13 Cleaning and Storage 17 Troubleshooting 18 Warranty 20 SAVE THESE INSTRUCTIONS...
Operation Manual - Page 2

...8226; Only use . • Read the instructions carefully. Check for later use the trimming line described in the Specifications section of this unit only in place and secure. Operate this manual....thrown objects. Read the operator's manual and follow these instructions for fuel leaks. Do not operate the unit with the controls and proper use of the unit. • Do not operate this unit ...
Operation Manual - Page 3

... always be in the starting . Take extra care when working on both trimming lines extended and the proper line installed. Do not operate the unit before starting the unit. • Use ...manufacturer (OEM) replacement parts and accessories for its intended purpose. • Always hold the unit with fuel in the tank, inside a building where fumes may reach an open flame (pilot lights, etc.) or...
Operation Manual - Page 4

...FUEL Always use clean, fresh unleaded fuel. • OIL Refer to do not touch the line cutting blade. 4 Failure to operator's manual for the proper type of oil. • DO NOT USE E85 FUEL... SYMBOLS • This operator's manual describes safety and international symbols and pictographs that fuel containing greater than 10% ethanol will likely damage this engine and void the warranty....
Operation Manual - Page 5

... Cover Throttle Control Starter Rope Grip Primer Bulb Fuel Cap Cold Weather Start Lever Cutting Head Coupler Cutting Head Shield Oil Fill Plug Line Cutting Blade SPECIFICATIONS* Engine Type Air-Cooled, ... head shield and handle 13 - 14 lbs. (5.9 - 6.4 kg) Trimmer Mechanism Bump Head Trimming Line Diameter 0.095 inches (2.41 mm) Cutting Path Diameter 18 in . (0.635 mm) Spark Plug Champion...
Operation Manual - Page 8

... is in the crankcase. The importance of the oil bottle. Unscrew the top of maintaining the proper oil level cannot be added before each use. Pour the entire bottle into the oil fill hole...overemphasized. Unscrew the oil fill plug (Fig. 7). 5. NOTE: Save the empty oil bottle. OIL AND FUEL USING THE RIGHT OIL Use a high-quality SAE 30 weight oil of the oil bottle. 2. DO ...
Operation Manual - Page 9

... 30 ft. (9.1 m) from the area. Do not start the engine until fuel vapors dissipate. 1. Move the unit at a distance from the fuel container and the fueling site before starting the engine. 9 Using Fuel Additives Use a fuel additive, such as 1% water in the fuel can make fuel and oil separate, forming acids when stored. Ignited vapors may have...
Operation Manual - Page 10

... and the unit must be used during this unit only in the OFF (O) position until the unit starts (Fig. 11). Fill the fuel tank. The On/Off switch is properly warmed up for an additional 30 to the Closed position (Fig. 10). The unit may be in the starting procedure with step...
Operation Manual - Page 11

... oil level. The On/Off switch is properly warmed up for the proper use of the electric start port (Fig. 12). Crouch in the OFF (O) position until fuel is above 40°F. 3. Run the ...In cold weather (below 40°F), move the cold weather start accessory (items sold separately). If fuel cannot be used during this feature. IF THE ENGINE IS HOT... the engine does not start, ...
Operation Manual - Page 12

... eye, hearing, hand, foot and body protection to reduce the risk of trimming line is running. This improves the unit's cutting efficiency and throws clippings away from left to the proper length if any excess line is released. Attempting to release line in the operating position (Fig. 13). • Hold the shaft grip with...
Operation Manual - Page 13

... the frequency stated in the Specifications section. NOTE: Always use the trimming line described in the table. NOTE: Some maintenance procedures may not release properly if the line is too long. WARNING: Never use metal-reinforced line, wire, chain or rope. The line may require special tools or skills. Turn the bump knob clockwise to...
Operation Manual - Page 14

... up any oil that the engine is too low, add oil. The importance of maintaining the proper oil level cannot be overemphasized. Stop the engine and allow it to Adding Oil. Clean the .... 20 Spool Cover Inner Reel Outer Spool 14 Removing Old Trimming Line and Obstructions If necessary, remove any old trimming line and/or obstructions from entering the oil fill hole. 2. CHECKING THE...
Operation Manual - Page 15

...oil fill hole. Push the air filter cover back onto the air filter housing. Fig. 21 Fill Line Fig. 22 Hole Air Filter Housing Tab Air Filter Cover Air Filter Fig. 23 Cover Screw 15...from the initial use to the engine. Squeeze the air filter to the right. oz (60 ml) fill line indicated on the oil fill plug (Fig. 7). Wipe up any oil that may have spilled. 7. CHANGING...
Operation Manual - Page 16

... cylinder head. NOTE: If using a torque wrench, torque to cool. If, after checking the fuel and cleaning the air filter, the engine still will not idle • the engine hesitates or ... speed screw as follows: 1. NOTE: Careless adjustments can seriously damage the unit. Checking the fuel, cleaning the air filter, and adjusting the idle speed should make carburetor adjustments. Do not over...
Operation Manual - Page 17

...and allow it to run until it stalls. Use a small brush to clean the outside of old fuel according to federal, state and local regulations. 17 Store the unit in a dry, well-ventilated ... not use or damage. • Store the unit in a horizontal position. STORAGE • Never store a fueled unit where fumes may reach an open flame or spark. • Allow the engine to distribute the oil. ...
Operation Manual - Page 18

... is dirty The spark plug is fouled Drain the fuel tank and add fresh fuel Clean or replace the air filter Replace the spark plug THE CUTTING HEAD WILL NOT ADVANCE LINE The cutting head is bound with grass The cutting head is out of line The inner reel is bound up The cutting...
Operation Manual - Page 20

...-ups - Spark Plugs, Carburetor Adjustments, Filters B. Bump Knobs, Outer Spools, Cutting Line, Inner Reels, Starter Pulley, Starter Ropes, Drive Belts, Saw Chains, Guide Bars,...improve the design of any Troy-Bilt Product without limitation, expenses incurred for substitute or replacement lawn care services, for transportation or for related expenses, or for rental expenses to temporarily replace ...
Parts Diagram - Page 1

MODEL TB6044 XP 4-CYCLE TRIMMER PPN 41ADZ6PC766 46 47 1 48 49 2 5 37 38 39 27 41 6 3 4 50 42 43 45 44 40 36...Intake Port Boot Assembly Carburetor Gasket Insulator Insulator Gasket Washer Screw Aircleaner Assembly Screw Screw Carburetor Assembly O-Ring Aircleaner Spacer Screw Fuel Tank Assembly Fuel Tank Pad Lead Wire Thottle Cable Item 27 28 29 30 31 32 33 34 35 36 37 38 39 40 41...
Parts Diagram - Page 2

MODEL TB6044 XP 4-CYCLE GAS TRIMMER PPN 41ADZ6PC766 Item Part No. Description 1 753-06887 Throttle Housing Assembly (includes 2 - 5) 2 791-182405 Switch Assembly 3 753-05171 Throttle Lock-out 4 753-...

Similar Questions

3 Fuel Lines??
This has me stumped....Old 4 stroke trimmer given to me. All fuel lines broken or gone. Carb...no pr...
(Posted by donmmiller47 11 months ago)
Fuel Line Routing Tb6044xp
the primer has 3 tits, carb has 3 nipples, tank has 2 lines, anyone have a diagram of where each lin...
(Posted by zeezeelee1968 2 years ago)
Fuel Lines For Tb6044xp
I think I have fuel lines going to the wrong nipples on the primer bulb. It is a three nipple bulb. ...
(Posted by memeishere 3 years ago)
Fuel Lines
I'm having trouble knowing where to correctly place the 3 fuel lines any help?
(Posted by Reynaldoher98 7 years ago)
Ask a New Question
Use the box below to post a new question about this Troy-Bilt product .
Points & Prizes
  • You can earn points for nearly everything you do on HelpOwl.com
  • You can trade in those points for gift cards at leading retailers such as Amazon.com and Walmart
  • It's that simple!
See How it Works
Create a Free Account

Troy-Bilt Manuals

Find free Troy-Bilt TB6044 XP manuals and user guides available at ManualOwl.com. Try out our unique manual viewer allowing you to interact with manuals from directly within your browser!

Troy-Bilt Reviews

View thousands of Troy-Bilt user reviews and customer ratings available at ReviewOwl.com.

Contact Information

Complete Troy-Bilt customer service contact information including steps to reach representatives, hours of operation, customer support links and more from ContactHelp.com.

Scoreboard Ratings

See detailed Troy-Bilt customer service rankings, employee comments and much more from our sister site.

Troy-Bilt Recalls

Find comprehensive Troy-Bilt recall information updated hourly on RecallOwl.com.