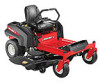
Troy-Bilt Mustang 50 Support Question
Troy-Bilt Mustang 50 Support Question
Find answers below for this question about Troy-Bilt Mustang 50.Need a Troy-Bilt Mustang 50 manual? We have 2 online manuals for this item!
Question posted by larryr968 on September 9th, 2015
How To Remove Engine From Cutting Will Need To Install A New Motor Cs4325
Current Answers
Answer #1: Posted by TechSupport101 on September 10th, 2015 12:08 AM

Member since:
May 24th, 2013 Points: 12,171,305

Answer #2: Posted by Victoria45 on May 14th, 2023 2:47 AM

Member since:
May 10th, 2023 Points: 1,190
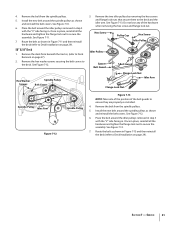
1. Turn off the engine and disconnect it from any power source.
2. Remove the spark plug wire from the spark plug.
3. Drain the fuel tank and remove it from the cutting tool.
4. Remove the air filter and cover.
5. Remove any belts or pulleys that are attached to the engine.
6. Remove any wiring or cables that are attached to the engine.
7. Remove any bolts or screws that are holding the engine in place.
8. Gently pull the engine away from the cutting tool, taking care not to damage any of the surrounding components.
9. Once the engine is free, lift it out of the cutting tool and set it aside.
To install the new motor (such as the Cs4325), you will need to follow the manufacturer's instructions. Generally, the procedure will be similar to removing the old engine, but in reverse. Make sure to properly attach any belts, pulleys, wiring, and cables before bolting the new motor in place. Finally, make sure to refill the fuel tank and test the cutting tool before use.
Related Troy-Bilt Mustang 50 Manual Pages


Similar Questions

how do we install rear bagger to engage safety switch

new belt installed good on lowest cutting setting comes loose and off on any higher setting.
