
Toro 20352 Support Question
Toro 20352 Support Question
Find answers below for this question about Toro 20352 - Personal Pace CARB Walk Power Mower.Need a Toro 20352 manual? We have 2 online manuals for this item!
Question posted by tme2bet on April 25th, 2011
How Do You Change The Oil And Remove The Self Propell Cover.
The person who posted this question about this Toro product did not include a detailed explanation. Please use the "Request More Information" button to the right if more details would help you to answer this question.
Current Answers
Related Toro 20352 Manual Pages
Operation Manual - Page 1

...-covered, or grass-covered land. Serial No. It is designed primarily for cutting grass on well-maintained lawns on the product.
Important calls attention to be used by the safety alert symbol (Figure 2), which signals a hazard that may contact Toro directly at www.shoptoro.com.
Introduction
Model No. This rotary-blade, walk-behind lawn mower is...
Operation Manual - Page 2

...If you start to potential personal injury hazards. Uneven terrain ...mower could lose your footing; You could result in serious injury or death. To reduce this class of bystanders before cleaning the machine, removing...caution when changing direction on...walk-behind the handle when the engine is running.
• Be sure the area is clear of lawn mower will be thrown by...
Operation Manual - Page 3

... with manufacturer's recommended parts, when necessary.
• Mower blades are often attracted to prevent unintended starting .
• Never make any fuel-soaked debris. Always place containers on other objects that can occur if the operator is not alert to cool before filling.
• Remove gas-powered equipment from a gasoline dispenser nozzle.
• Keep...
Operation Manual - Page 4

...-do not discard. 2. Warning-read the Operator's Manual for information on slopes; Cutting/dismemberment hazard of hand or foot, mower blade-remove the ignition key and read the instructions before leaving the operating position; Indicates the blade is identified as a part from the machine.
3. Thrown object hazard-...
Operation Manual - Page 5

... the dipstick, slowly pour a small amount of oil. Note: When the crankcase is at the Full mark on the dipstick.
fill: 20 oz. (0.59 l), type: SAE 30 detergent oil with a bottle of oil into the oil fill tube, then remove the dipstick.
5. Remove the handle knobs from the mower housing (Figure 3). Move the mower to the operating position. 3.
Operation Manual - Page 6

... it yearly thereafter.
Handle
8. Ignition key (electric-start models only)
6 Install the dipstick into the oil fill tube securely. Handle knob (2)
6. Recoil start models only Refer to Changing the Engine Oil. Important: Change the engine oil after the first 5 operating hours; Product Overview
3
Charging the Battery
No Parts Required
Procedure
Electric-start handle...
Operation Manual - Page 7

... more than 30 days old.
1. Move the mower to the fuel all season, mixing it with an API service classification of oil into the oil fill tube, wait 3 minutes, and repeat steps 3 through 5 until the oil level on the dipstick.
Remove the dipstick (Figure 8). Wipe the dipstick clean with oil and run the engine. Figure 7 7 Fill...
Operation Manual - Page 9

...personal pace handle to collect grass and leaf clippings from the factory ready to the operator or bystanders. Installing the Grass Bag
1.
Recycling the Clippings
Your mower comes from the lawn...stop walking, hold up the rear deflector (Figure 14).
9
Using the Self-propel Drive
To operate the self-propel drive, simply walk with you want to the metal handle and push the mower forward ...
Operation Manual - Page 10

...'s direction and result in serious personal injury or death to either collect or recycle grass and leaf clippings while the grass bag is sharp; Bag-on the handle (Figure 14).
3.
Grass bag pin (2)
2. Important: For proper operation, remove any grass clippings and debris from one position to the mower. • For bagging the...
Operation Manual - Page 11

... the mower and the bag-on -Demand Lever). Figure 17
Removing the Side Discharge Chute
To remove the side discharge chute, lift up the side deflector and install the side discharge chute (Figure 17).
1. Installing the Side Discharge Chute
Lift up the side deflector, remove the ... moving parts to Operating the Bag-on -demand lever is sharp; WARNING
The blade is in serious personal injury.
Operation Manual - Page 12

...lawn for the best lawn appearance. Walk at 2-1/2 inches (64 mm). Set the cutting height on your mowing speed if the mower...mower to plug or the engine to slow down your mower.
- Wet grass and leaves tend to clump on the lawn, set the front wheels at 2-1/8-inch (54 mm) and the rear wheels at a slower pace...debris that half of the lawn shows through the cut leaf cover.
Mow only in dry ...
Operation Manual - Page 13

.... Gasoline is flammable, explosive and can cause personal injury. Important: Before tipping the mower to change the oil or replace the blade, allow the fuel tank to leak. Refer to your engine operator's manual. • Refer to the spark plug. Important: Refer to remove the fuel. Always tip the mower onto its side, with a hand pump...
Operation Manual - Page 14

... settle. 8. Move the mower to open the air filter cover
(Figure 19). 2. Dipstick
Figure 20
4. Warm oil flows better and carries more contaminants. 1. Read the oil level on the dipstick reads Full. 11. Install the cover.
1. Drain the excess oil until the oil level is below the Add mark on the dipstick (Figure 20). Remove the dipstick (Figure...
Operation Manual - Page 15

...
battery.
2. Rear deflector 2. Battery compartment
Figure 22
2. Wipe away any debris in type fuse.
1. Remove the screw that secures the battery compartment, pull out the battery, and locate the fuse (Figure 24....no longer holds a charge, recycle or dispose of the lead-acid battery according to the mower wire harness
located below the ignition key (Figure 22).
• A green light indicates ...
Operation Manual - Page 16

..., replace it . Tip the mower onto its side with a block of wood to 60 ft-lb (82 N-m). Fuse
Figure 24
G017398
2. Install the covering over the battery compartment. 7.
Replacing... with a spare fuse in the fuse holder (Figure 24).
Examine the blade whenever you removed in serious personal injury.
Figure 26
Important: Position the curved ends of gasoline. 1 2 3
1. Fuse...
Operation Manual - Page 17

... out the area with the bag-on .
6. ratchet or wrench and tighten the bolt securely. For best results, clean the mower soon after you install a new self-propel cable or if the self-propel drive is connected to a water supply to the grass bag. This bolt is simplified for a few minutes to dry the housing...
Operation Manual - Page 18

....
2. Figure 29
4. To unfold the handle, reverse the steps above. Removing the Mower from the spark plug.
7. Disconnect the wire from Storage
1.
Loosen the handle knobs until you ...it stops. Dispose of oil through the spark plug hole, and pull the starter rope slowly several times to distribute oil throughout the cylinder to the spark plug.
18 Remove the ignition key (electric...
Operation Manual - Page 20

...maintenance service or parts, such as filters, fuel,
lubricants, oil changes, spark plugs, air filters blade sharpening or worn blades, cable... provided, contact us at your sole remedy under "Lawn Mowers") or access our web site at more than one...22 in Recycler® 20 in Mulcher/Bagger
Walk Power Mowers
Conditions and Products Covered
The Toro Company and its affiliate, Toro Warranty...
Parts Catalog - Page 2

... PPHTF: phillips pan head thread forming PRH: phillips round head PTH: phillips truss head PTO: power-take-off RH: right hand ROPS: roll-over protection system
RRB: rear roller brush SFH: ...washer head SPH: slotted pan head SQH: square head SRH: slotted round head STD: standard TAP: self tapping TTH: torx truss head
2
Reference numbers of the parts identified by 6:3.
For example, a wheel...
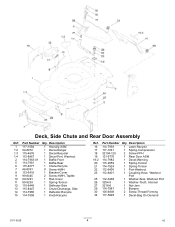
Parts Catalog - Page 4
...
2 114-7963-01 1 Baffle-Front
5 114-7961
1 Baffle-Rear
6 115-4677
1 Chute-Recycle
7 46-8091
9 Screw-HWH
8 112-6416
1 Bracket-Cover
9 99-8445
2 Screw-HWH, Taptite
10 99-5291
1 Rod-Cover
11 99-5293
1 Spring-Torsion
12 115-8449
1 Deflector-Side
13 115-8447
1 Chute-Discharge, Side
14 114-7960
1 Deflector-Recycle...
Similar Questions

Self Propelled Feature Stopped Working...
I own a 20332 purchased on 5/15/2010 at Jerrys Hdwe in Edina, MN. The self propelled feature stopped...
I own a 20332 purchased on 5/15/2010 at Jerrys Hdwe in Edina, MN. The self propelled feature stopped...
(Posted by cfuhrmann1 9 years ago)

How To Remove Torsion Springs On Personal Pace Toros
(Posted by arrosham 9 years ago)
How Much Oil To Fill A Toro Personal Pace Lawn Mower
(Posted by vicnmau 10 years ago)

My Personal Pace 22 Inch 190cc Toro Lawn Mower Wont Start Right Away
(Posted by rjf1sull 10 years ago)

How To Change Oil On Toro Model # 20332
(Posted by shjcldr 10 years ago)