
Toro 20333 Support Question
Toro 20333 Support Question
Find answers below for this question about Toro 20333 - BBC Personal Pace Walk Power Mower.Need a Toro 20333 manual? We have 2 online manuals for this item!
Question posted by Hugadm1 on February 14th, 2014
How To Install Blade Break Linkage Toro Walk Behind Mower
The person who posted this question about this Toro product did not include a detailed explanation. Please use the "Request More Information" button to the right if more details would help you to answer this question.
Current Answers
Related Toro 20333 Manual Pages
Operation Manual - Page 1

... the US Environmental
© 2011-The Toro® Company 8111 Lyndale Avenue South Bloomington, MN 55420
Register at www.shoptoro.com. Introduction
Model No. You are available from this information carefully to learn how to operate and maintain your product.
Figure 2 1.
This rotary-blade, walk-behind lawn mower is designed primarily for agricultural uses. Whenever...
Operation Manual - Page 2
...manufacturer's instructions for walk-behind rotary lawn mowers and the B71...mower in place and working.
• Never leave a running machine unattended.
• Stop the engine and wait until the blade comes to potential personal injury hazards. Always look down . Always be thrown by the blade...lawn mower meets or exceeds the CPSC blade safety requirements for proper operation and installation...
Operation Manual - Page 3

...mowing area and under the watchful care of Gasoline
To avoid personal injury or property damage, use extreme care in an enclosed area... is not alert to cool before filling.
• Remove gas-powered equipment from a gasoline dispenser nozzle.
• Keep the nozzle ...recommended parts, when necessary.
• Mower blades are sharp. Repair, if necessary, before storing.
• If you strike...
Operation Manual - Page 4

... and Instructional Decals
Important: Safety and instruction decals are located near areas of hand or foot, mower blade-do not operate up .
108-8117
1. Cutting/dismemberment hazard of potential danger. Cutting/dismemberment hazard of hand or foot, mower blade-disconnect the spark plug wire and read the Operator's Manual.
2. Replace damaged decals. Manufacturer's Mark...
Operation Manual - Page 5

...Installing the Blade Control Bar
No Parts Required
Procedure
Install the blade control bar into the upper handle (Figure 3).
1. Remove the handle knobs from the mower housing (Figure 4). Move the handle to the outside of the handle knobs as you
removed in step 1 (Figure 4).
2
Installing.... 3. Setup
Important: Remove and discard the protective plastic sheet that you install the handle.
Operation Manual - Page 6

... level reaches the Full line on -demand lever
5. Install the dipstick securely. Refer to check the oil level with an API service classification of oil. 1. Grass bag
Figure 7 2. Figure 6
1. Ignition switch
9. Air filter 10. Fuel tank cap
11. Handle knob (2)
6. Recoil start handle
7.
Blade control bar 3. Washout port (not shown) 13. Spark...
Operation Manual - Page 7

...
Use unleaded regular gasoline suitable for all season, mixing it clean, and fully install
the dipstick (Figure 9).
1. Dipstick
Figure 9
2. Adjust the cutting height as... static charge from igniting the gasoline, place the container and/or mower directly on the dipstick. Important: To reduce starting problems, add fuel...blade, causing serious injury.
• Stop the engine and wait ...
Operation Manual - Page 8
...
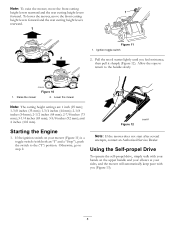
2.
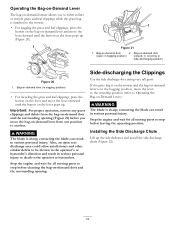
Using the Self-propel Drive
To operate the self-propel drive, simply walk with your hands on your sides, and the mower will automatically keep pace with both an "I" and a "Stop"), push the switch to the ("I") position. Note: To raise the mower, move the front cutting height levers forward and the rear cutting height...
Operation Manual - Page 9
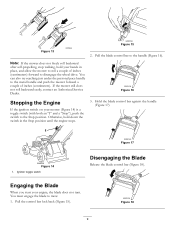
... roll backward after self-propelling, stop walking, hold down the switch in place, and allow the mower to roll a couple of inches (centimeters). Engaging the Blade
When you start your hands in the Stop position until the engine stops.
3. You can also try reaching just under the personal pace handle to the metal handle and...
Operation Manual - Page 10
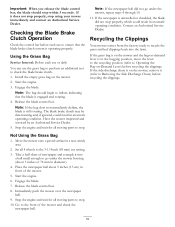
... the mower and check the newspaper ball.
10 Engage the blade.
7. If it into the lawn. Start the engine. 3.
Stop the engine and wait for all moving parts to check the blade brake clutch...to stop using your mower immediately and contact an Authorized Service Dealer. Install the empty grass bag on -demand lever is still rotating. Engage the blade.
Release the blade control bar. Note...
Operation Manual - Page 11
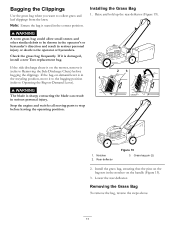
... the operator's or bystander's direction and result in serious personal injury or death to collect grass and leaf clippings from the lawn. If the bag-on the handle (Figure 19).
... (refer to Operating the Bag-on the bag rest in serious personal injury. Notches 2.
WARNING
The blade is damaged, install a new Toro replacement bag.
Rear deflector
Figure 19 3. Removing the Grass Bag
To...
Operation Manual - Page 12
... operator or bystanders. If the grass bag is on the mower and the bag-on -demand door and the surrounding opening.
in bagging position)
(closed; Installing the Side Discharge Chute
Lift up (Figure 20). Figure 21
1. WARNING
The blade is in serious personal injury or death to stop before you to either collect or...
Operation Manual - Page 13
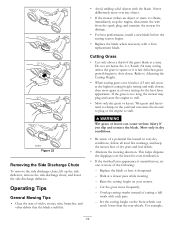
...cm) tall, mow at a slower pace while mowing.
- Wet grass and leaves tend ...lawn appearance is late fall when grass growth begins to vibrate, immediately stop the engine, disconnect the wire from the spark plug, and examine the mower for damage.
• For best performance, install a new blade before the cutting season begins.
• Replace the blade when necessary with a Toro replacement blade...
Operation Manual - Page 15

....
Gasoline is flammable, explosive and can cause personal injury. hand fuel pump to open the air filter cover
(Figure 24). WARNING
Tipping the mower may cause the fuel to run dry through normal usage. Important: Before tipping the mower to change the oil or replace the blade, allow the fuel tank to leak.
replace...
Operation Manual - Page 16
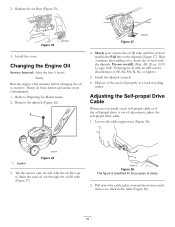
... jacket (toward the mower) until the oil level reaches the Full line on the dipstick (Figure 27). Adjusting the Self-propel Drive Cable
Whenever you install a new self-propel...Figure 26). Wait 3 minutes after adding oil to drain the used oil properly at a local recycling
center. Install the dipstick securely. 6.
Figure 27
4.
Loosen the cable support nut (Figure 28).
1.
Dispose of SF...
Operation Manual - Page 17

... are uncomfortable performing this procedure, contact an Authorized Service Dealer. Install the blade nuts and torque them to 15 to
27 ft-lb (20 to install the blade properly.
Tip the mower onto its side with the air filter up . 3. Blade nuts 2. Remove the blade (Figure 31). 5. Blade nuts
Figure 30 2. Important: You will need a torque wrench to...
Operation Manual - Page 18

... material from under the rear deflector where the clippings go from rusting.
10. Wash out the area under the mower housing.
• Wear eye protection.
• Stay in an enclosed area. Install the blade driver and disk that you
previously removed. 9. Turn the water on -demand in the area.
For best results, clean...
Operation Manual - Page 19
... cause of any unused fuel properly.
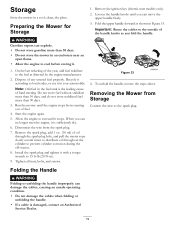
Allow the engine to 15 ft-lb (20 N-m). 9. Install the spark plug and tighten it stops. Loosen the handle knobs until it with a torque wrench... until you fold the handle. To unfold the handle, reverse the steps above. Preparing the Mower for Storage
WARNING
Gasoline vapors can damage the cables, causing an unsafe operating condition.
•...
Operation Manual - Page 20

..., fuel,
lubricants, oil changes, spark plugs, air filters blade sharpening or worn blades, cable/linkage adjustments, or brake and clutch adjustments
• Any product...Walk Power Mowers
Conditions and Products Covered
The Toro Company and its affiliate, Toro Warranty Company, pursuant to an agreement between them, jointly promise to use the 24-hour Toro Dealer locator system.
2. or if the Toro...
Parts Catalog - Page 1

Original Instructions (EN) Form No. 3371-848 Rev A
22in Recycler® Lawn Mower
Model No. 20333-Serial No. 312000001 and Up
Parts Catalog
Register at www.Toro.com.
Similar Questions

How To Install Blade Cable On Toro Mower Model20056
(Posted by dennisearl54 9 years ago)

How To Install A Torsion Spring On A Toro Personal Pace Lawn Mower
(Posted by dambelfe3 10 years ago)

Toro Personal Pace Mower Blade Clutch Wont Engage
(Posted by camicarlos 10 years ago)

How Do You Replace The Traction Bar On A Toro Personal Pace Mower
(Posted by pdfecool 10 years ago)

Person Pace Feature Stopped Working, Is There An Adjustment I Can Make?
The Personal Pace feature stopped within 10 minutes of first use. The grass was damp at the time. Is...
The Personal Pace feature stopped within 10 minutes of first use. The grass was damp at the time. Is...
(Posted by jhcook1755 13 years ago)