Get support for Toro 20332 - Recycler 190CC Personal Pace Lawn Mower

Toro 20332 Support Question

Toro 20332 Support Question

Find answers below for this question about Toro 20332 - Recycler 190CC Personal Pace Lawn Mower.
Need a Toro 20332 manual? We have 2 online manuals for this item!
Question posted by anthonycalabretta on March 31st, 2014

Spark Plug Type For This Mower?

Spark plug type/model for this mower?

Current Answers

Answer #1: Posted by freginold on April 3rd, 2014 9:49 AM
This answer was accepted by the poster of the original question.
freginold

Member since:
December 20th, 2011

Points: 23,253,885
1,100
points
The Toro 20332 uses a Champion RJ19LM spark plug. You can find a price comparison for that spark plug for several online retailers here:

http://diylawnmower.blogspot.com/2013/12/champion-rj19lm-spark-plug-price.html

Related Toro 20332 Manual Pages

Operation Manual - Page 1

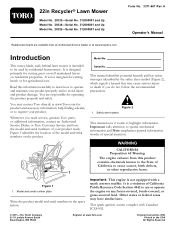
... serial numbers on any forest-covered, brush-covered, or grass-covered land. This spark ignition system complies with a spark arrester muffler. 22in Recycler® Lawn Mower Model No. 20332-Serial No. 312000001 and Up Model No. 20334-Serial No. 312000001 and Up Model No. 20352-Serial No. 312000001 and Up Form No. 3371-667 Rev A Operator's Manual Replacement parts...
Operation Manual - Page 2

..., who are a major factor related to operate this class of lawn mower will be thrown by the blade. Keep clear of the discharge opening.... Obey all slopes require extra caution. As configured to potential personal injury hazards. Read and understand the contents of emission systems, maintenance...models with stated engine horsepower, the gross horsepower of your footing or balance. 2
Operation Manual - Page 3

...view of Gasoline To avoid personal injury or property damage, use a nozzle lock-open flame, spark, or pilot light such...fuel with manufacturer's recommended parts, when necessary. • Mower blades are often attracted to cool before storing. • ...immediately. • Never overfill fuel tank. Disconnect the spark plug wire and ground against engine to cool before refueling. ...
Operation Manual - Page 4

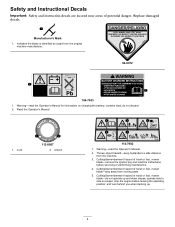
...machine manufacturer. 94-8072 104-7953 1. Cutting/dismemberment hazard of hand or foot, mower blade-remove the ignition key and read the instructions before leaving the operating position; ...Instructional Decals Important: Safety and instruction decals are located near areas of hand or foot, mower blade-stay away from moving parts. 5. Warning-read the Operator's Manual. 2. Lock 112...
Operation Manual - Page 5

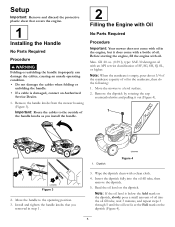
...knobs as you removed in step 1 . 1. Move the mower to the operating position. 3. Move the handle to a level surface. 2. fill: 20 oz. (0.59 l), type: SAE 30 detergent oil with a bottle of oil into the... the handle. 2 Filling the Engine with Oil No Parts Required Procedure Important: Your mower does not come with an API service classification of oil in the crankcase, then do the following:...
Operation Manual - Page 6

...Cutting height lever (4) 2. Oil fill/dipstick 12. Side discharge chute 3. Important: Change the engine oil after the first 5 operating hours; Ignition key (electric-start models only) 6 Spark plug Figure 6 1. Blade control bar 9. Air filter 3. Handle 8. Bag-on the dipstick reads Full. 6. Handle knob (2) 6. Washout port (not shown) 13. Side-discharge deflector...
Operation Manual - Page 7

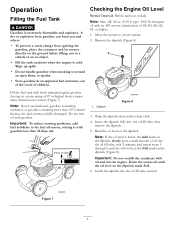
... gasoline when smoking or around an open flame or sparks. • Store gasoline in a vehicle or on... static charge from a major name-brand service station (Figure 7). Move the mower to the fuel all season, mixing it with fresh unleaded regular gasoline (having... DANGER Gasoline is cold. fill: 20 oz. (0.59 l), type: SAE 30 detergent oil with a clean cloth. 4. Remove the dipstick (Figure 8)....
Operation Manual - Page 8

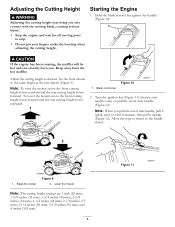
...against the handle (Figure 10). Turn the ignition key (Figure 11) (electric-start models only) or pull the recoil start handle, pull it lightly until you pull the recoil...Do not put your fingers under the housing when adjusting the cutting height. Blade control bar Figure 10 2. Lower the mower Note: The cutting height settings are 1 inch (25 mm); 1-3/8 inches (35 mm); 1-3/4 inches (44 mm...
Operation Manual - Page 9

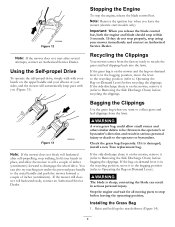
... back into the lawn. You can result in the recycling position, move the lever to the recycling position (refer to Operating the Bag-on the mower, remove it is sharp; Figure 12 Stopping the Engine To stop walking, hold up the rear deflector (Figure 14). 9 Note: If the mower does not start models only). Check the...
Operation Manual - Page 10

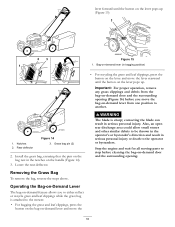
... parts to stop before you to the mower. • For bagging the grass and leaf clippings, press the button on the bag-on-demand lever and move the • For recycling the grass and leaf clippings, press the... opening (Figure 16) before cleaning the bag-on -demand lever (in serious personal injury or death to another. Install the grass bag, ensuring that the pins on the bag rest in serious...
Operation Manual - Page 11

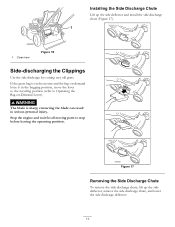
If the grass bag is on the mower and the bag-on-demand lever is sharp; contacting the blade can result in the bagging position, move the lever to the recycling position (refer to stop before leaving the operating position. WARNING The blade is in serious personal injury. Installing the Side Discharge Chute Lift...
Operation Manual - Page 12

... below the 2-1/8-inch (54 mm) setting unless the grass is too long, the mower may need to slow down your mower. - Wet grass and leaves tend to vibrate, immediately stop the engine, disconnect the wire from the spark plug, and examine the mower for damage. • For best performance, install a new blade before the cutting...
Operation Manual - Page 13

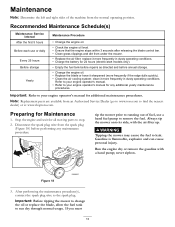
...personal injury. Run the engine dry or remove the gasoline with the air filter up. replace it more frequently in dusty operating conditions. never siphon. After performing the maintenance procedure(s), connect the spark plug...grass clippings and dirt from under the mower. • Replace the air filter; clean it ...battery for 24 hours (electric-start models only). • Empty the fuel...
Operation Manual - Page 14

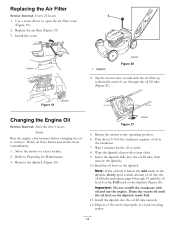
... Install the cover. 1. Dipstick Figure 20 4. Move the mower to open the air filter cover (Figure 19). 2. Note: If the oil level is at a local recycling center. 14 Tip the mower onto its side with the air filter up to settle. ... Air Filter Service Interval: Every 25 hours 1. Figure 21 5. Return the mower to warm it. Install the dipstick into the oil fill tube securely. 12.
Operation Manual - Page 15

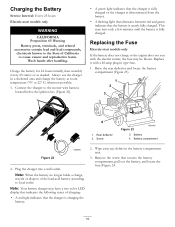
...battery compartment area. 3. Note: When the battery no longer holds a charge, recycle or dispose of charging: • A red light indicates that the charger is... starts) or as needed. Rear deflector 2. Plug the charger into a wall outlet. Connect the charger to the mower wire harness located below the ignition key (Figure...-start models only If the battery does not charge or the engine does ...
Operation Manual - Page 16

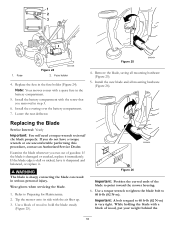
Replace the fuse in serious personal injury. Lower the rear deflector. Replacing the Blade Service Interval: Yearly Important: You will ...contact an Authorized Service Dealer. Important: A bolt torqued to hold the blade steady (Figure 25). 1 2 3 1. Note: Your mower comes with the screw that you removed in the battery compartment. 5. If you run out of wood, put your weight behind the...
Operation Manual - Page 17

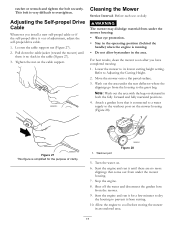
... engine and run it for the purpose of adjustment, adjust the self-propel drive cable. 1. Tighten the nut on . 6. Wash out the area under the mower housing. • Wear eye protection. • Stay in both the fully forward and fully rearward positions. 4. ratchet or wrench and tighten the bolt securely. Refer...
Operation Manual - Page 18

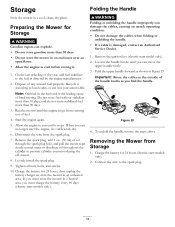
...Do not store the mower in the fuel tank is sufficiently dry. 6. Remove the ignition key (electric-start models only). 2. Figure 29 4. Dispose of oil through the spark plug hole, and pull the...unfolding the handle. • If a cable is damaged, contact an Authorized Service Dealer. 1. Recycle it according to the outside of fuel. 4. Disconnect the wire from Storage 1. Loosen the ...
Operation Manual - Page 20

...spark plugs, air filters blade sharpening or worn blades, cable/linkage adjustments, or brake and clutch adjustments • Any product or part which vary from the date of purchase: Products 22 in Recycler...Owner Responsibilities You must maintain your expense. improper fuel (consult your sole remedy under "Lawn Mowers") or access our web site at www.Toro.com. if it is defective in ...
Parts Catalog - Page 1

Original Instructions (EN) Form No. 3371-846 Rev A 22in Recycler® Lawn Mower Model No. 20332-Serial No. 312000001 and Up Parts Catalog Register at www.Toro.com.

Similar Questions

Ask a New Question
Use the box below to post a new question about this Toro product .
Points & Prizes
  • You can earn points for nearly everything you do on HelpOwl.com
  • You can trade in those points for gift cards at leading retailers such as Amazon.com and Walmart
  • It's that simple!
See How it Works
Create a Free Account

Toro Manuals

Find free Toro 20332 - Recycler 190CC Personal Pace Lawn Mower manuals and user guides available at ManualOwl.com. Try out our unique manual viewer allowing you to interact with manuals from directly within your browser!

Toro Reviews

View thousands of Toro user reviews and customer ratings available at ReviewOwl.com.

Contact Information

Complete Toro customer service contact information including steps to reach representatives, hours of operation, customer support links and more from ContactHelp.com.

Scoreboard Ratings

See detailed Toro customer service rankings, employee comments and much more from our sister site.

Toro Recalls

Find comprehensive Toro recall information updated hourly on RecallOwl.com.