
Thermador MED301JP Support Question
Thermador MED301JP Support Question
Find answers below for this question about Thermador MED301JP.Need a Thermador MED301JP manual? We have 4 online manuals for this item!
Question posted by kevinfraser on March 25th, 2019
How Do You Remove The Centre Rack ?
How do you remove the centre rack
Current Answers
Answer #1: Posted by Odin on March 26th, 2019 5:51 AM
Odin

Member since:
April 10th, 2010 Points: 41,236,620

Member since:
April 10th, 2010 Points: 41,236,620
Hope this is useful. Please don't forget to click the Accept This Answer button if you do accept it. My aim is to provide reliable helpful answers, not just a lot of them. See https://www.helpowl.com/profile/Odin.
Related Thermador MED301JP Manual Pages
Installation Instructions - Page 2
..." under the counter 4
Dimensions for 30" Wall-Mounted Units 6
Dimensions for 30" under the counter 8
Removing Packaging 9
For Convection Microwave Combination Units 10 Preparing Oven 10 Microwave Combination Units Adjustment Feature 11
Installation 12
Electrical Installation 12 Oven Installation 13 Testing Operation 14
Service 14
Before Calling Service 14
This Thermador Appliance is...
Installation Instructions - Page 11
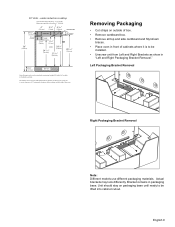
... air clearance of 1" between the bottom of the cooktop and the top of the oven. Removing Packaging
• Cut straps on outside of box. • Remove cardboard box. • Remove all top and side cardboard and Styrofoam
braces. • Place oven in front of cabinets where it is to be installed below the induction cooktop...
Installation Instructions - Page 12
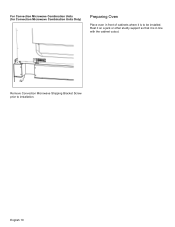
For Convection Microwave Combination Units (for Convection Microwave Combination Units Only)
Preparing Oven
Place oven in front of cabinets where it is to installation.
English 10
Remove Convection Microwave Shipping Bracket Screw prior to be installed. Rest it on a jack or other sturdy support so that it is in line with the cabinet cutout.
Installation Instructions - Page 14

.... To maintain serviceability, the flex conduit must not be shortened and should be routed to permit temporary removal of the oven.
Install a suitable conduit box (not furnished). Installation
Electrical Installation
Four-wire Connection
All model ovens on the front cover are dual rated, designed to be used to correctly attach the conduit to...
Installation Instructions - Page 15
...levers are securely in your hand and cause damage or injury.
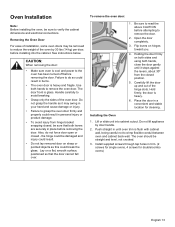
• Failure to the oven has been turned off before removing the door. Hold firmly;
Do not lift appliance by 30 lbs (14 kg) per... Grasp only the sides of the hinge slots. CAUTION:
When removing the door:
• Make sure oven is cool and power to grasp the oven door firmly and properly could result in personal injury or product...
Installation Instructions - Page 16
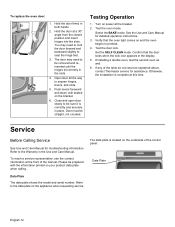
The door may need to be sure it is located on and the oven begins to be removed and reinserted until seated on power at this time.
Test the oven mode. Refer to expose hinges, levers, and slots.
5.
Hold the door firmly in the display. 5. Turn on the bracket.
6. See the Use and Care...
SP - Page 1
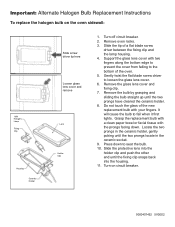
... Support the glass lens cover with the prongs facing down to the bottom of the oven. 5. Remove the bulb by grasping and sliding the bulb straight up until the fixing clip snaps ...and remove
Lens
Holder Clip
1. Do not touch the glass of a flat blade screw
driver between the fixing clip and the lamp housing. 4. It will cause the bulb to loosen the glass lens cover. 6. Remove oven racks....
User Manual - Page 4
Convection Roast 32 Broil 33 Convection Broil 35 Pizza 36 Speed Convection 37 Proof 37 Warm 38 Dehydrate 38
Cleaning and Maintenance 41
Cleaning 41
Avoid These Cleaners 41 Cleaning Guide 42
Maintenance 43
Replacing an Oven Light 43 Removing the Oven Door 44
Service 46
Before Calling Service 46
Troubleshooting Chart 46 Data Plate ...47
STATEMENT OF LIMITED PRODUCT WARRANTY 48
User Manual - Page 10

... may result in a risk of many foods, especially meats and poultry.
Telescopic Rack This rack allows for broiling and roasting. Note: Do not place food directly on the oven bottom.
Broil Pan and Grid Use for easier access when inserting or removing food. m
Warning:
Do not use aluminum foil or protective liners to determine...
User Manual - Page 11

... into Oven:
1. Rack should be moved while the oven is hot, do not let oven mitts contact hot heating elements. When the stop before turning oven on both sides.
2. Always use oven mitts when the oven is warm. Insert rack (see picture).
3. Removing Rack from Oven: 1. Inserting Rack
Flat Rack
The rack is designed with a stop so it will stop is reached, tilt rack up...
User Manual - Page 14
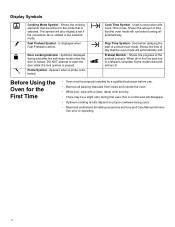
...Remove all bars lit.
Used when delaying the start with all packing materials from inside and outside the oven. • While cool, wipe with Cook Time mode. When all safety precautions and Use and Care Manual informa- Before Using the Oven for the mode that the oven... Mode Symbol - Shows the cooking elements that the oven mode will disappear. • Optimum cooking results depend...
User Manual - Page 15
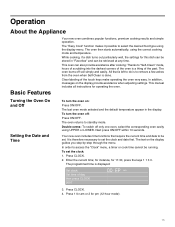
... to "Self-Clean" mode, hours of scrubbing into the darkest corners of the past. To turn the oven on: Press ON/OFF. It is a thing of the oven is therefore necessary to remove a few ashes from the oven when Self-Clean is displayed:
Set clock: Set time of the touch keys make operating the...
User Manual - Page 26
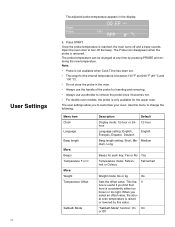
...
26
The adjusted probe temperature appears in the oven.
• Always use the handle of the probe for inserting and removing.
• Always use a potholder to remove the probe since it becomes hot.
• For double oven models, the probe is only available for the upper oven. The probe temperature can be changed at any...
User Manual - Page 32

...since roasting time may decrease. Refer to your liking, but is well suited for recommended rack positions.
32 Roast
Tips
Convection Roast
Tips
Roast uses both the upper and lower elements to...high-sided broil pan, or cover dish with foil 10-15 minutes after removing it from the oven.
• Refer to maintain the
oven temperature. Roast is best suited for large cuts of the exterior while ...
User Manual - Page 38
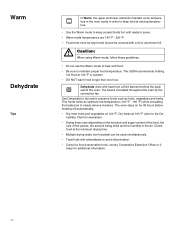
...while circulating the heated air to maintain proper food temperature. The oven stays on for 48 hours before shutting off automatically.
•... Check food at the minimum drying time.
• Multiple drying racks (not included) can be covered with a lid or aluminum foil...Warm mode to heat cold food.
• Be sure to slowly remove moisture. Use Dehydrate to keep food at 140 ºF or warmer...
User Manual - Page 39
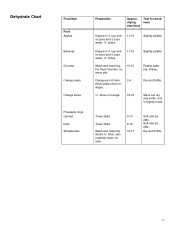
Slightly pliable. Towel dried.
9-13
Towel dried. Soft and pliable. For fresh cherries, remove pits.
10-15
Orange part of orange. 12-16
Slightly pliable.
Wash and towel dry. Dry and brittle.
39 drying...Test for done-
Skins are dry and brittle, fruit is slightly moist. Sliced ½" thick, skin (outside) down on rack.
8-12 12-17
Soft and pliable. Dry and brittle.
User Manual - Page 42
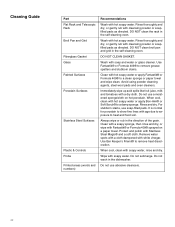
.... Do not submerge. Avoid using powder cleaning agents, steel wool pads and oven cleaners. Do not use a moistened sponge/cloth on a paper towel. When...Rack Broil Pan and Grid
Fiberglass Gasket Glass Painted Surfaces
Porcelain Surfaces
Stainless Steel Surfaces
Plastic & Controls Probe Printed areas (words and numbers)
Recommendations
Wash with white vinegar. DO NOT CLEAN GASKET. Remove...
User Manual - Page 43
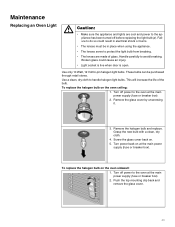
To replace the halogen bulb on the oven sidewall: 1. Remove the halogen bulb and replace. To replace the halogen bulb on the oven ceiling:
1. This will increase the life of glass. Turn off power to the oven at the main power supply (fuse or breaker box). 2. Remove the glass cover by unscrewing it.
3. Grasp the new...
Design Guide - Page 6
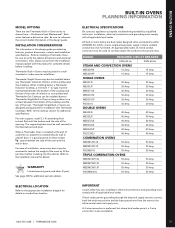
...When a Thermador Oven is installed at the end of the oven by a qualified technician. An electric or non-professional Thermador Gas Cooktop can be installed above a Thermador Single Built-in Ovens may be removed to reduce the...
MED271JS
30 Amp
30 Amp
MED301JS
30 Amp
30 Amp
MED301JP
30 Amp
30 Amp
POD301J
30 Amp
30 Amp
DOUBLE OVENS
ME302JS
40 Amp
40 Amp
ME302JP
40 Amp
40 Amp...
Design Guide - Page 17
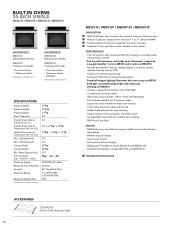
..." 24" 28 1/2" 28 1/4" 212 13/16" - 1/8" - 5/8"
240/208V AC, 60Hz 30 Amp 66" Flexible 4-Wire 7.3 kW @ 240V 5.85 kW @ 208V 192
ACCESSORIES
TLSCPRCK30 30-Inch Oven Telescopic Rack
86
ME301JS / ME301JP / MED301JS / MED301JP
INNOVATION - NEW SoftClose® door ensures ultra smooth closing of preheat cycle - Six adjustable...
Similar Questions

I Have Thermador Wdc30 Oven There Is Power But Does Not Heat At All Help
thermador wdc30 oven does not heat Has powe
thermador wdc30 oven does not heat Has powe
(Posted by Anonymous-165817 4 years ago)

Hinges For The Bottom Oven On Model No. Med302es
Where can I purchase hinges for the bottom oven on Model No. MED302ES
Where can I purchase hinges for the bottom oven on Model No. MED302ES
(Posted by johnk42662 8 years ago)
Oven Does What It Wants
the oven will go to broil when I'm trying to bake and will not turn off when I try. when we try to b...
the oven will go to broil when I'm trying to bake and will not turn off when I try. when we try to b...
(Posted by leerollman 8 years ago)


What Are The Oven's Interior Dimensions?
What are the oven's interior dimensions? What are the dimensions of the removable accessories like r...
What are the oven's interior dimensions? What are the dimensions of the removable accessories like r...
(Posted by olgalorenc 12 years ago)